All in One View
Content from The adventures of Docker and the Space Purple Unicorn Association
Last updated on 2026-07-14 | Edit this page
Estimated time: 20 minutes
Overview
Questions
- What are containers, and why might they be useful to me?
- How can I join the community effort to count the number of purple unicorns in space?
Objectives
- Learn what Docker is and why it is useful
- Introduce the Space Purple Unicorn Association
Docker
Junior Developer:
"But it works on my machine!"Senior Developer:
"Then we'll ship your machine!"
Once upon a time this was just a joke, but now it’s a reality!
Docker is a tool that allows you to create, deploy, and run applications using containers.
Why Containers?
There are two major motivations for using containers:
Reliable Software. A container packages all the necessary libraries with their correct versions. It also ensures the environment remains consistent wherever it runs. Finally, it encapsulates the recipe for running the software correctly.
Essentially, containers allow you to ship your machine!Microservices. Containers make it very easy to use microservices. These are small, independent programs that work together, and provide similar advantages to using libraries in your code: they make your software stack more modular, more powerful, and easier to understand.
Why Docker?
There are other ways to make containers, but Docker is the most popular and probably the most mature.
On some specialised environments (such as HPC), you might use a different container system (i.e. Apptainer). However, there are usually ways to convert from Docker to the other system. The reverse doesn’t always hold.
If you learn only one container system, learn Docker! As it has become the Rosetta Stone of containers.
The Space Purple Unicorn Association
The Space Purple Unicorn Association is a community effort to count the number of purple unicorns in space.
We are a friendly group of developers, data scientists, and unicorn enthusiasts, who are passionate about surveying and conserving the purple unicorn population.
To help you join the effort, we have created a set of tools and resources to help your community count the number of purple unicorns in space. These tools are distributed via Docker containers and should be easy to use.
If you’d like to join the effort to preserve this keystone species, please help us by running your own Space Purple Unicorn Counting service, and encouraging your local community to join in the count!
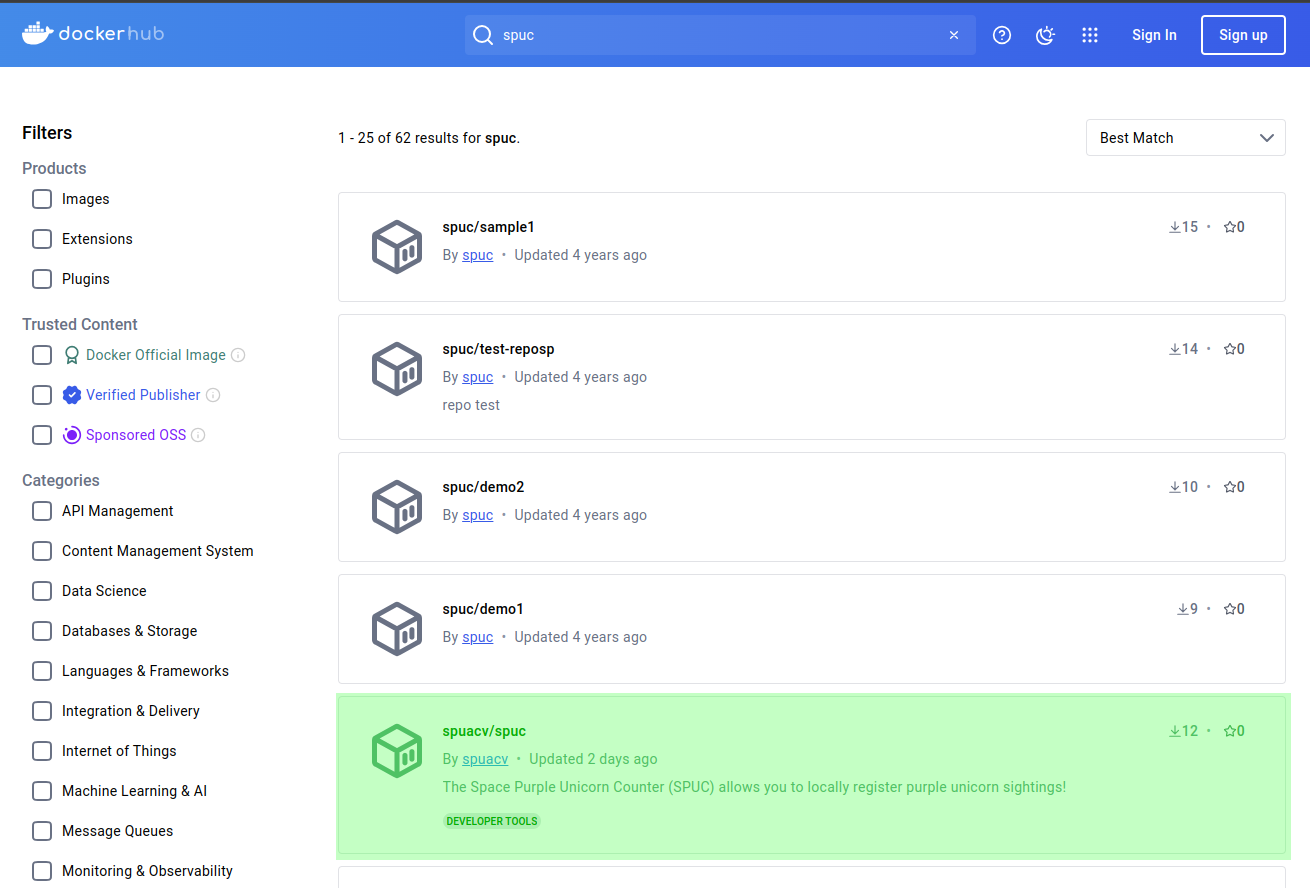
You can use the Space Purple Unicorn Counter (SPUC) container image for your service, which you can find on Docker Hub.
This image provides an API, which can be hit to add an event to the
sightings record. The location and brightness
of the unicorn need to be passed as parameters of a put request. For
example:
curl -X PUT localhost:8321/unicorn_spotted?location=moon\&brightness=100will register a unicorn sighting on the moon with a brightness of 100iuhc.
Remember to configure a port on your host machine to forward requests to the container.
You may also want to edit the print.config file to
change the way the sightings are reported.
Content from Docker Desktop
Last updated on 2026-07-14 | Edit this page
Estimated time: 40 minutes
In this episode, we will take a tour of the Docker Desktop dashboard, as is a helpful and graphical way of understanding the key concepts of Docker.
If you have installed Docker on a Windows or Mac machine, you will have Docker Desktop installed (Linux users generally wont have Docker Desktop).
Although useful as an introduction, it is unlikely that you will use Docker Desktop on your day to day work. You are much more likely to use the command line interface to interact with Docker, and we will cover this shortly.
It is also important to note that while Docker Desktop is mostly free, some features are offered at a premium. Additionally, it is not fully functional on all operating systems; it can produce conflicts with the docker engine on Linux, for example.
Therefore, this episode is meant to be demonstrative, that is, you do not need to follow along.
Overview
Questions
- What is Docker Desktop?
- What can it be used for?
- Why can’t it replace the cli?
Objectives
- Show Docker Desktop and its components.
- Understand what images and containers are.
- Visualize the process of image acquisition, container execution and where it ends.
- Understand the ephemeral nature of containers.
- Have a glimpse at containers that allow interaction.
- Understand the importance of cleaning up in docker.
- Understand the limitations of Docker Desktop.
The Space Purple Unicorn Association (SPUA) has instructed us to get to work on a very important mission, counting the number of purple unicorns in the universe!
They have told us to find the Space Purple Unicorn Counter (SPUC) container image in preparation for our mission.
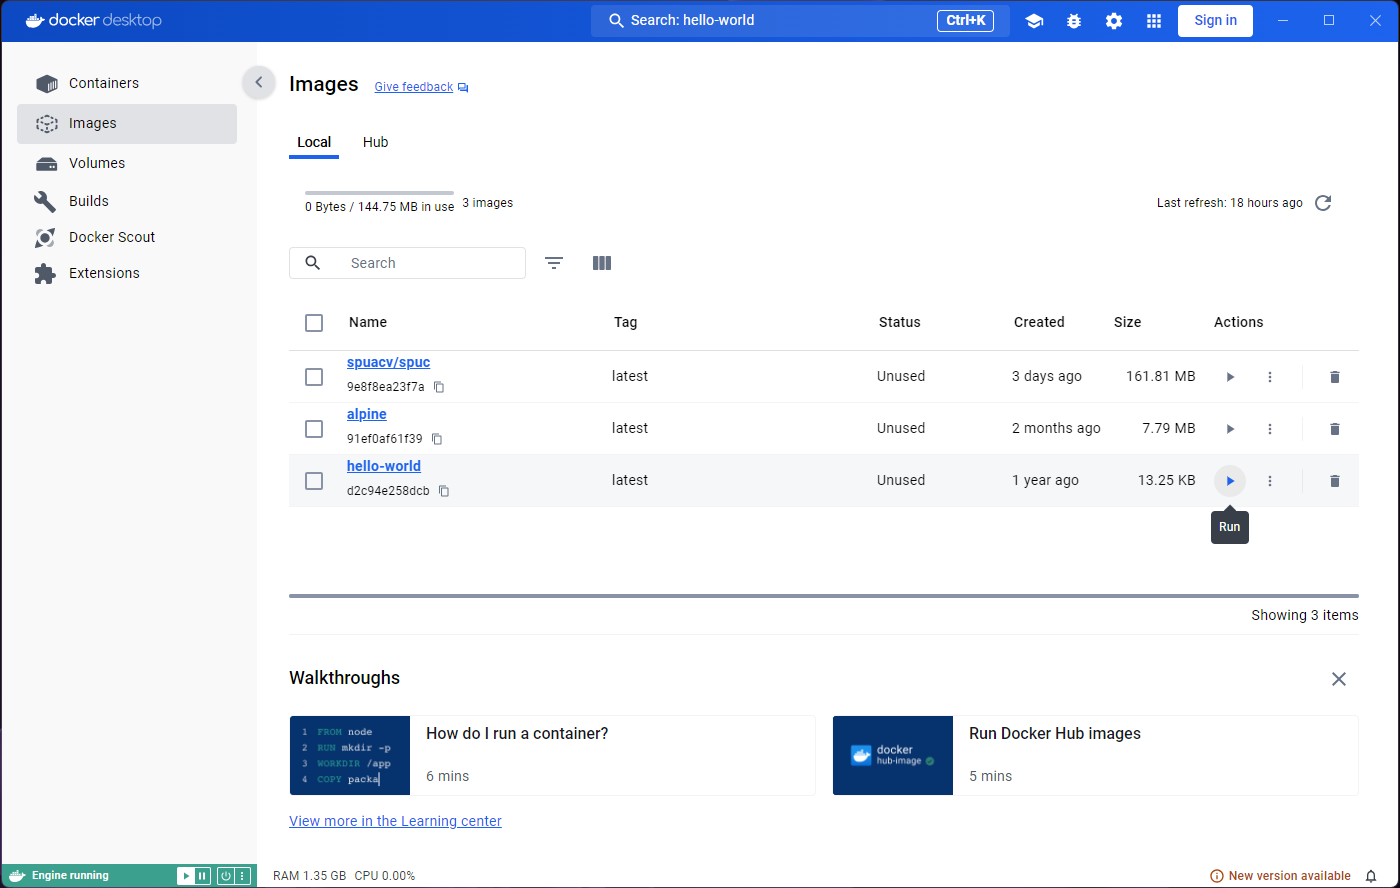
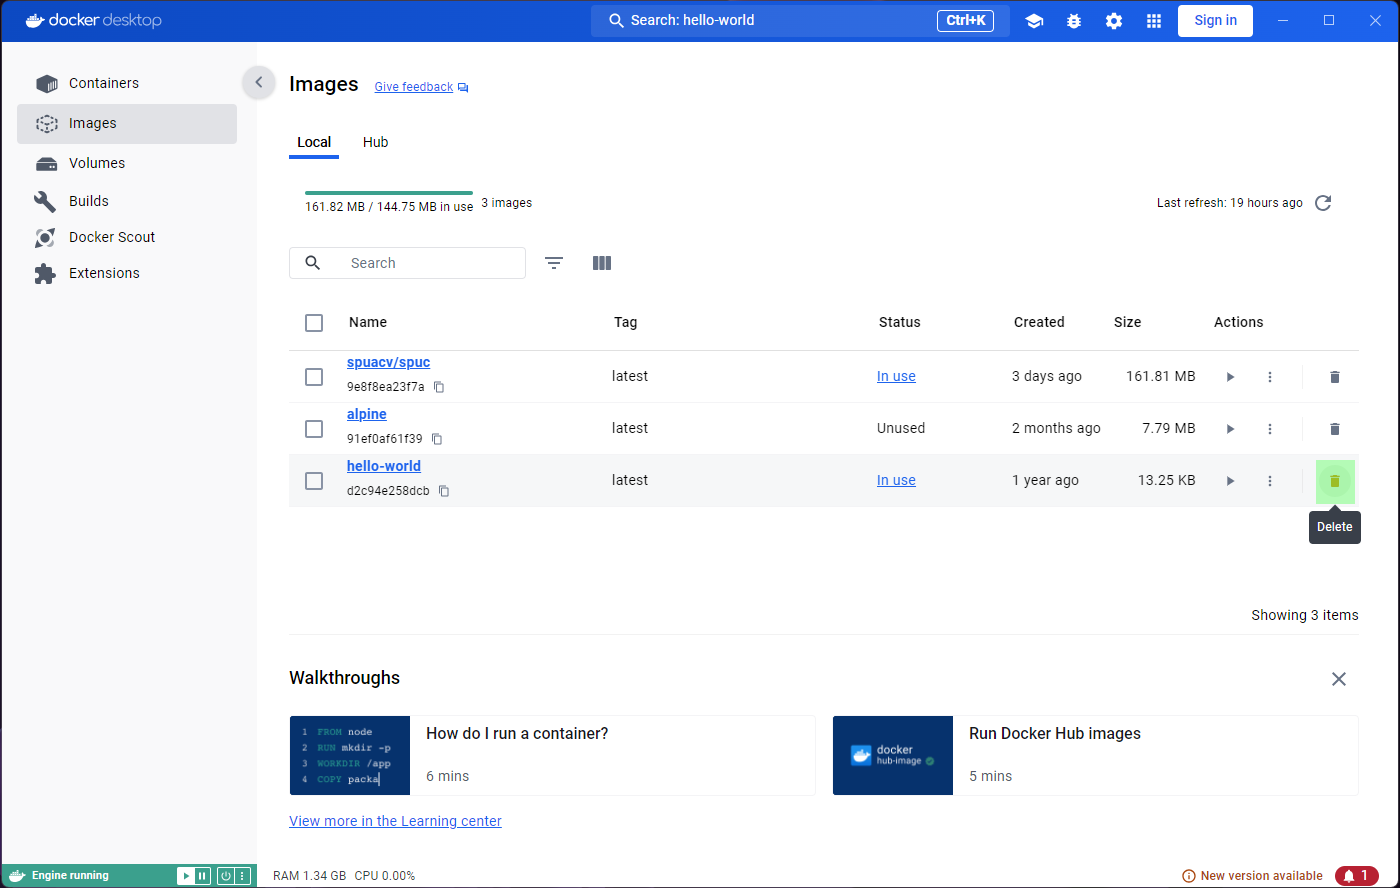
Getting images
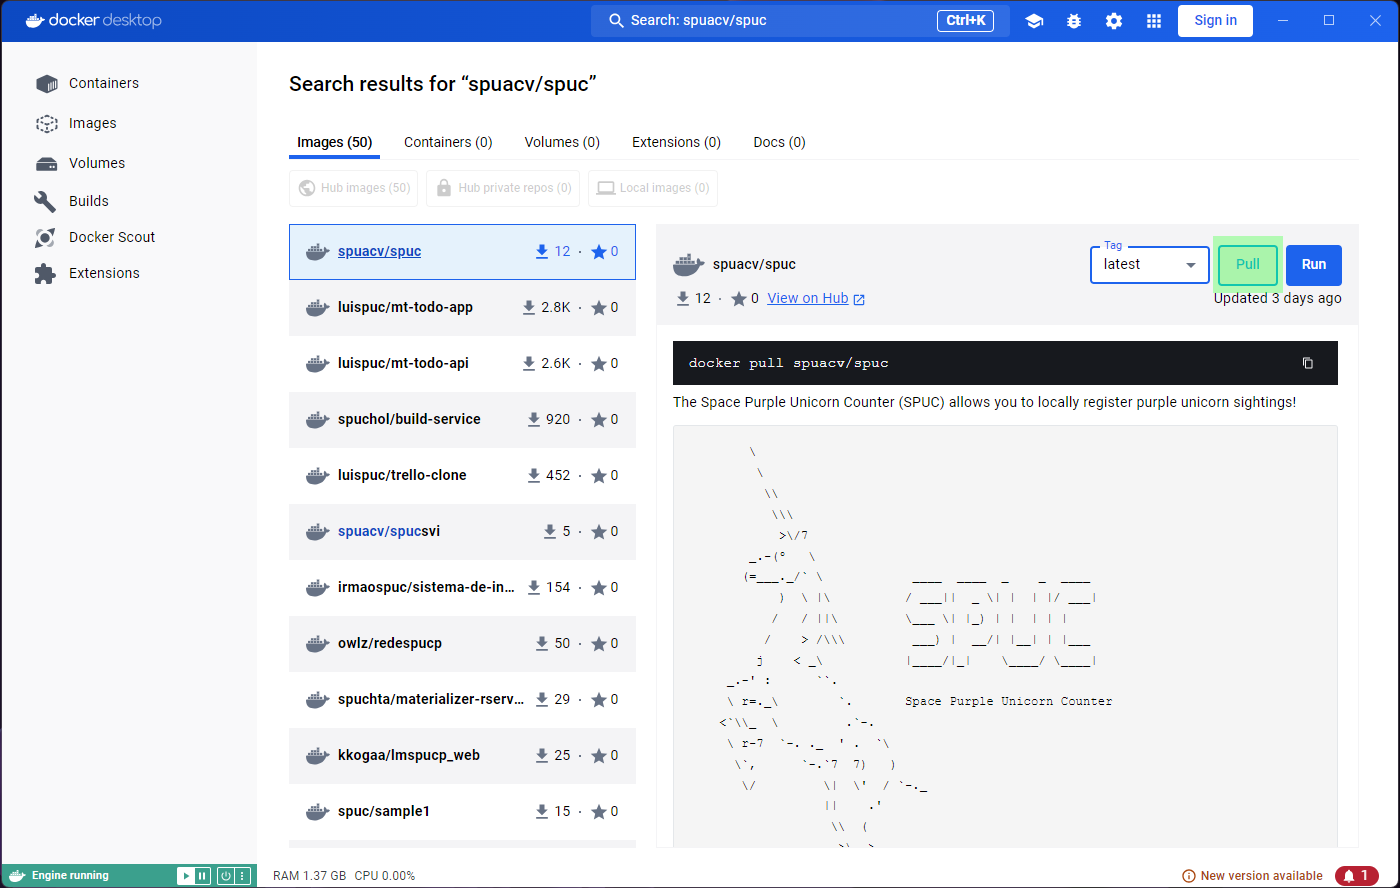
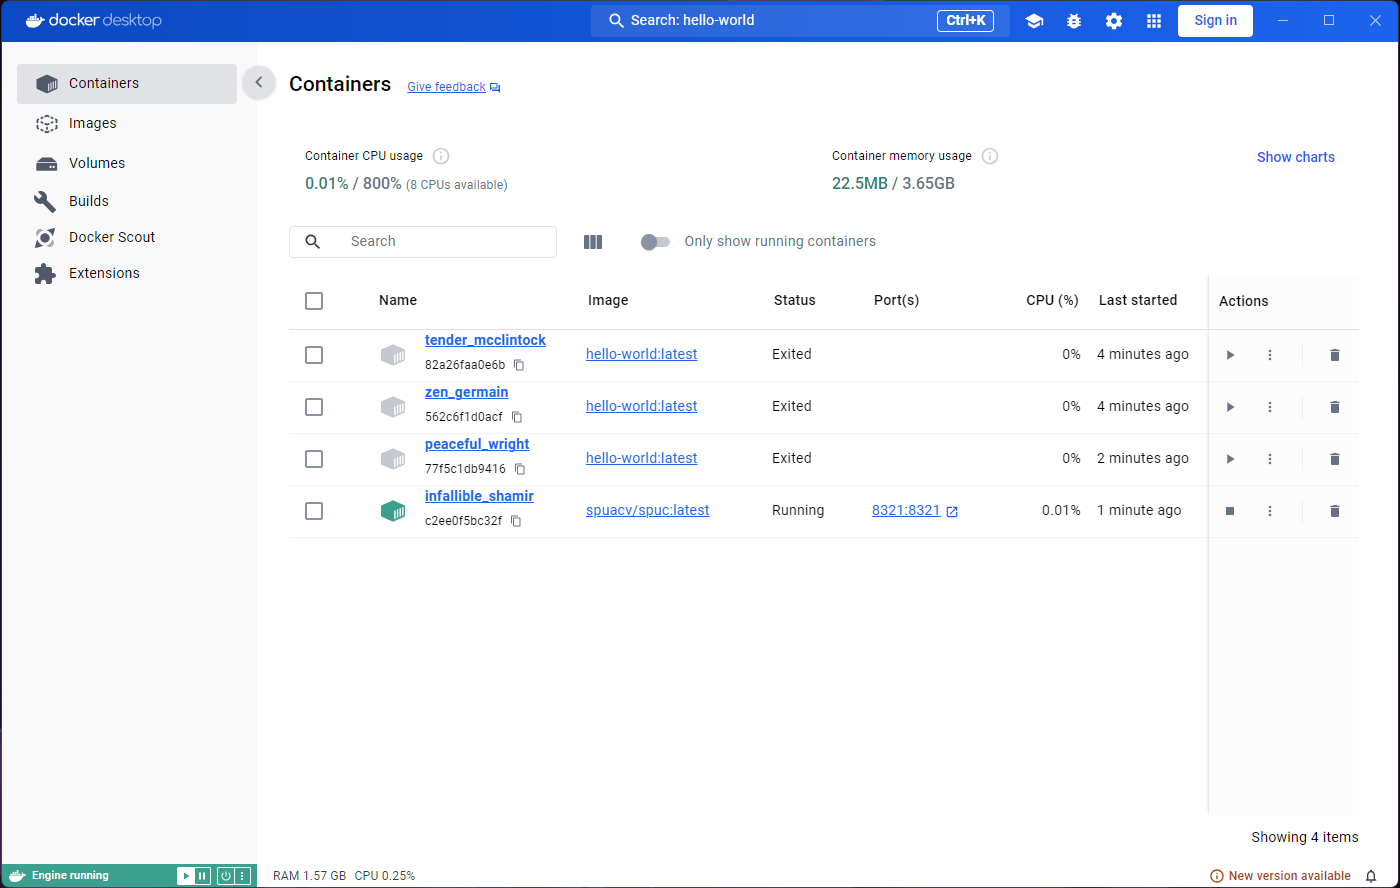
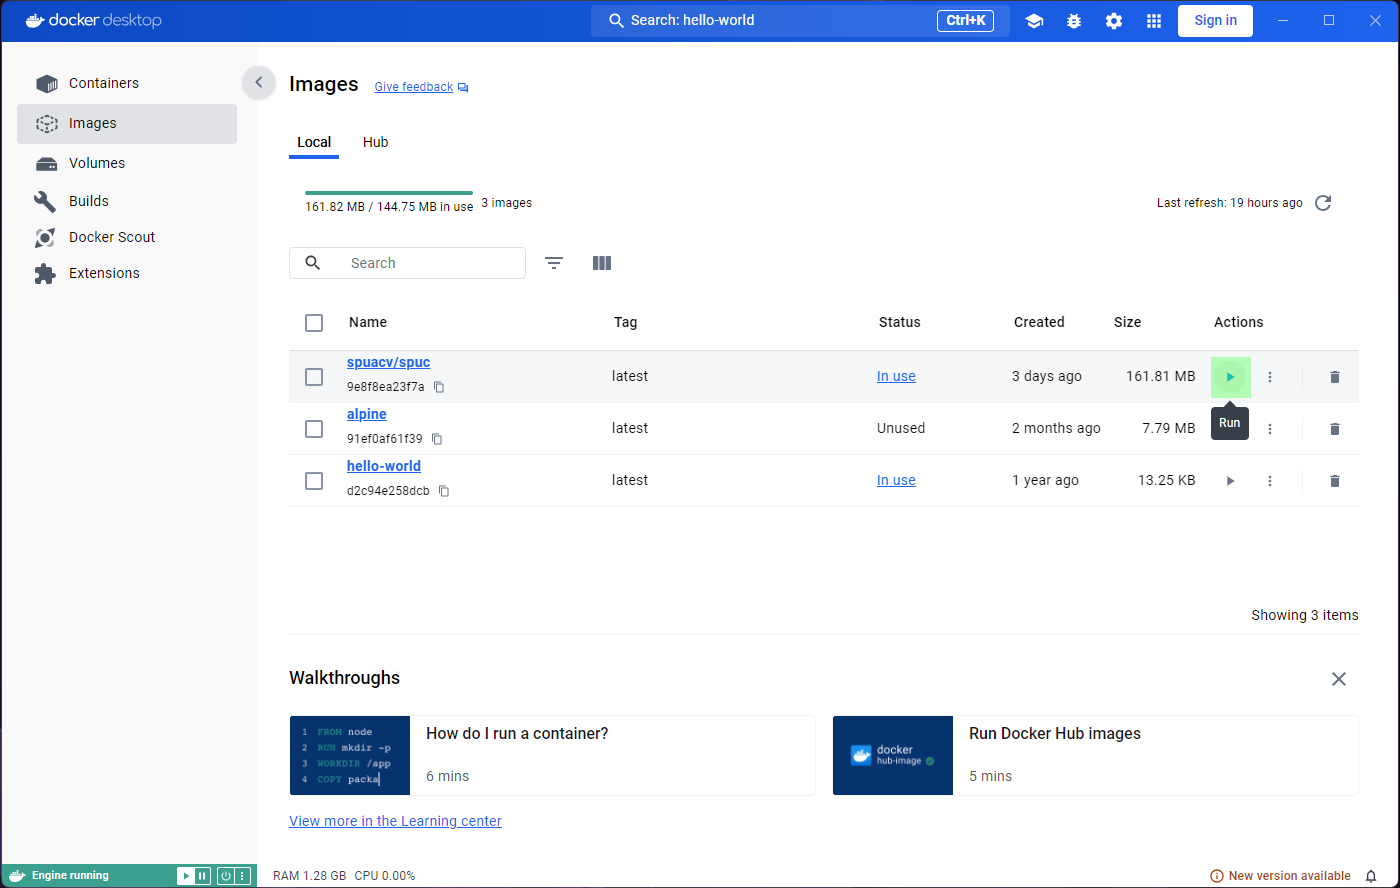
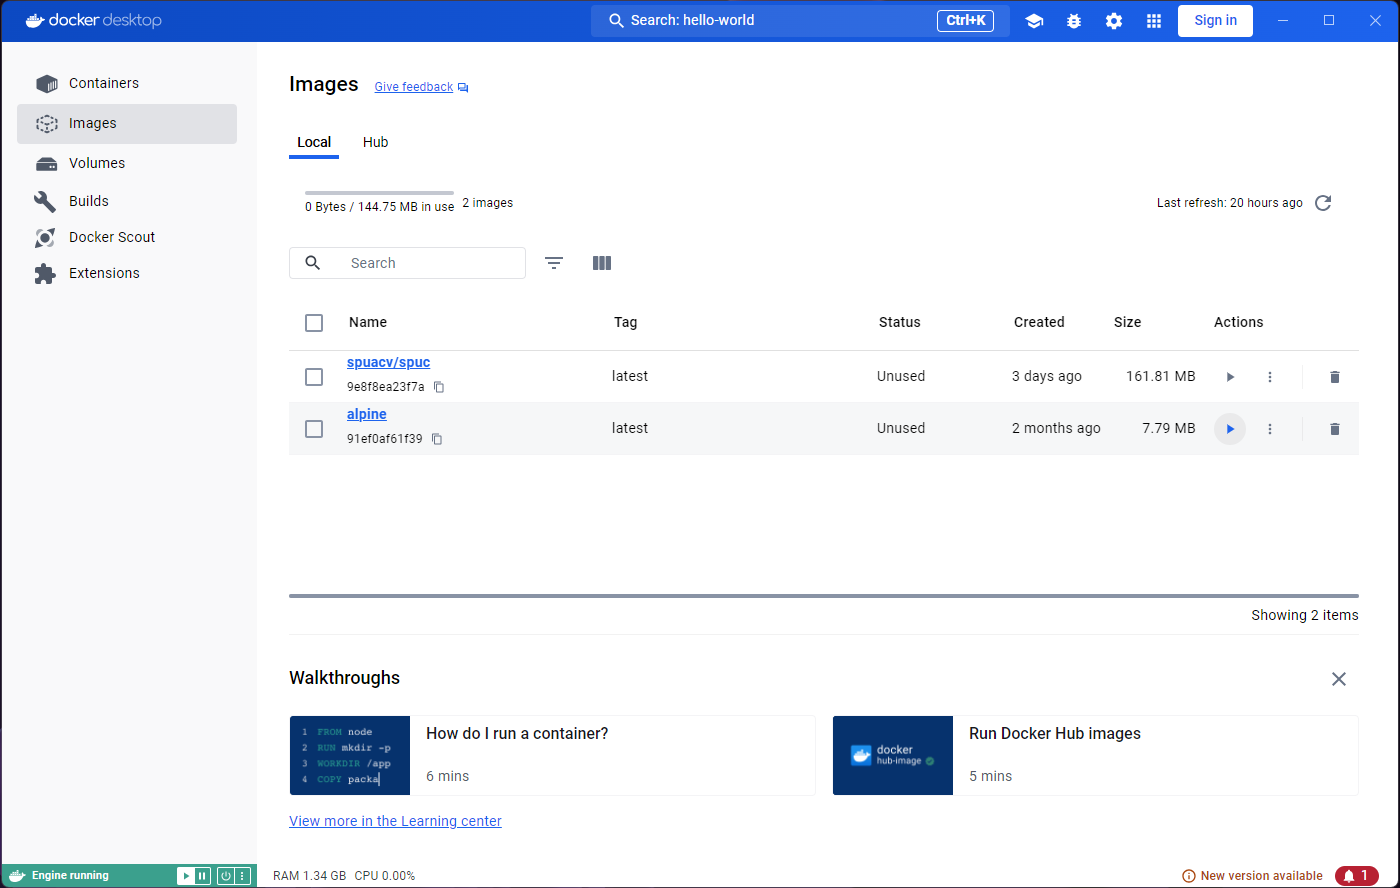
One of the useful features of Docker Desktop is the ability to search and analyze container images.
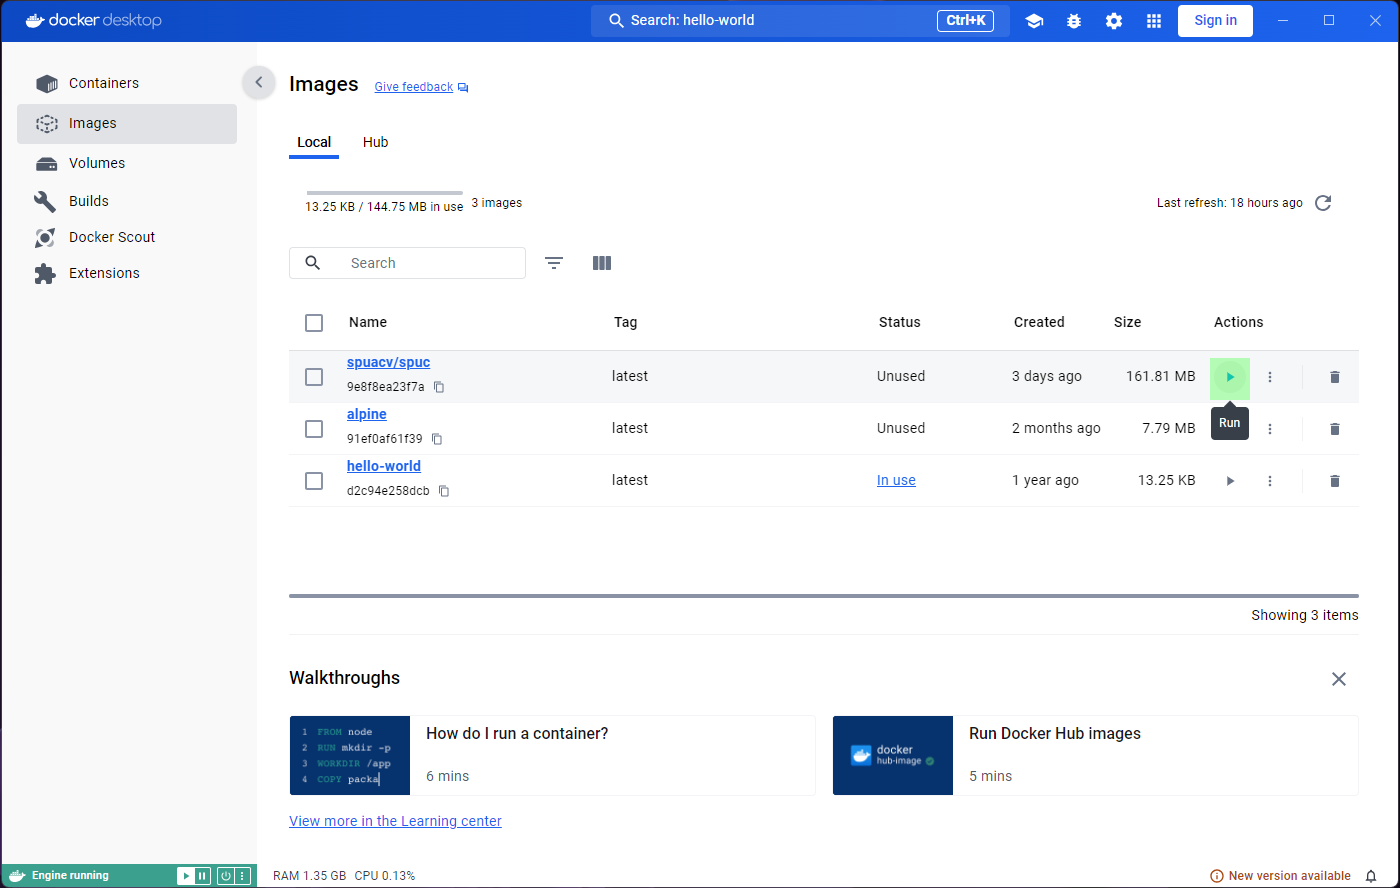
If you open the application you will likely see something like this:
You’ll notice that the panel on the left has a tab for ‘Images’ and another for ‘Containers’. These will be the focus for the episode, and we will ignore most other features.
On the top blue bar you’ll also find a search icon, which allows us to search for container images.
Lets go ahead and select this search box, and search for
spuacv/spuc.
You may have noticed that it already shows some information about the image. If you click on the image you’ll be shown more information. You should be able to see the documentation, and it lets you select a tag (version) from the dropdown menu.
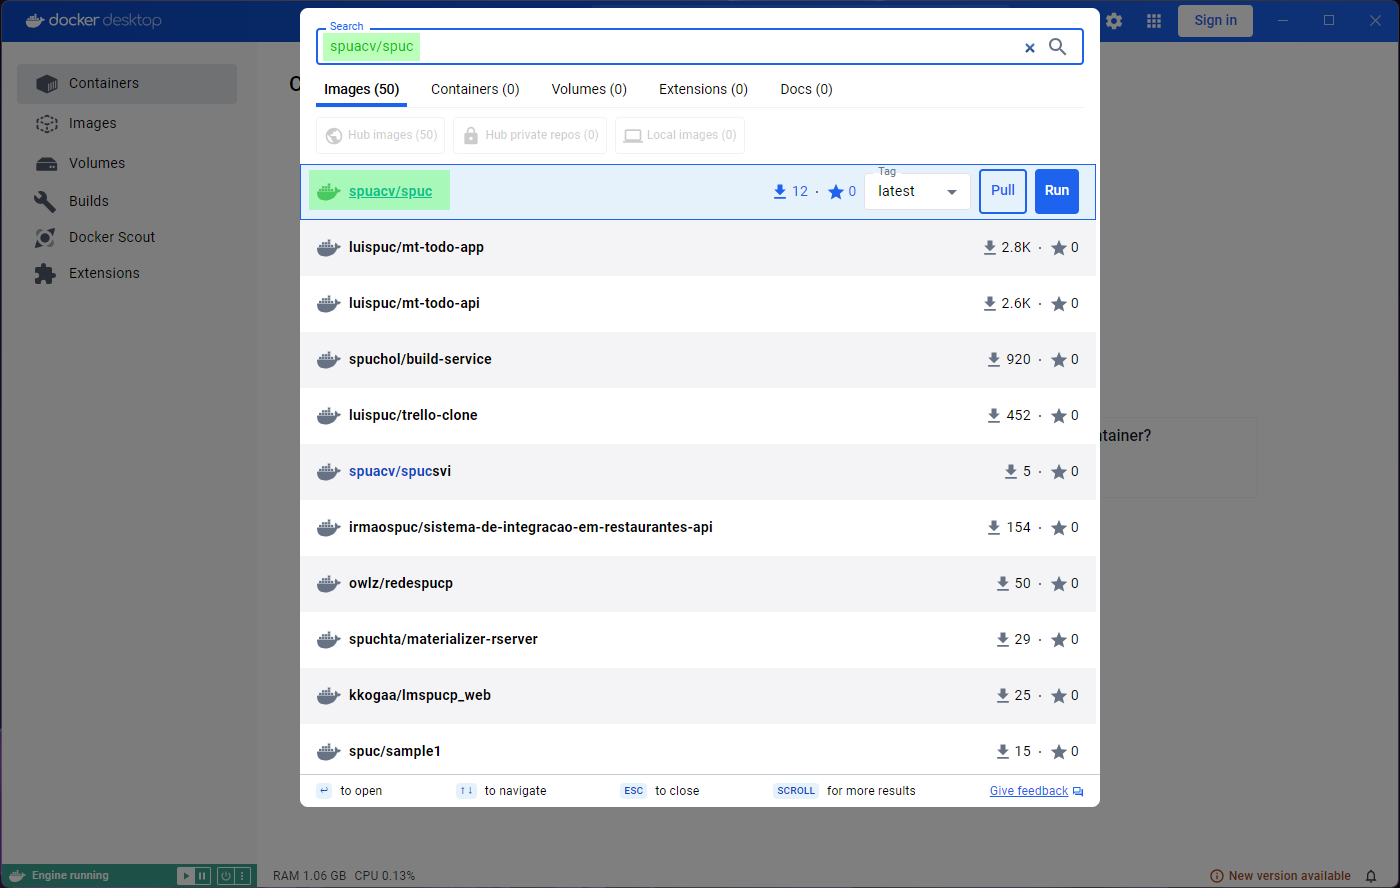
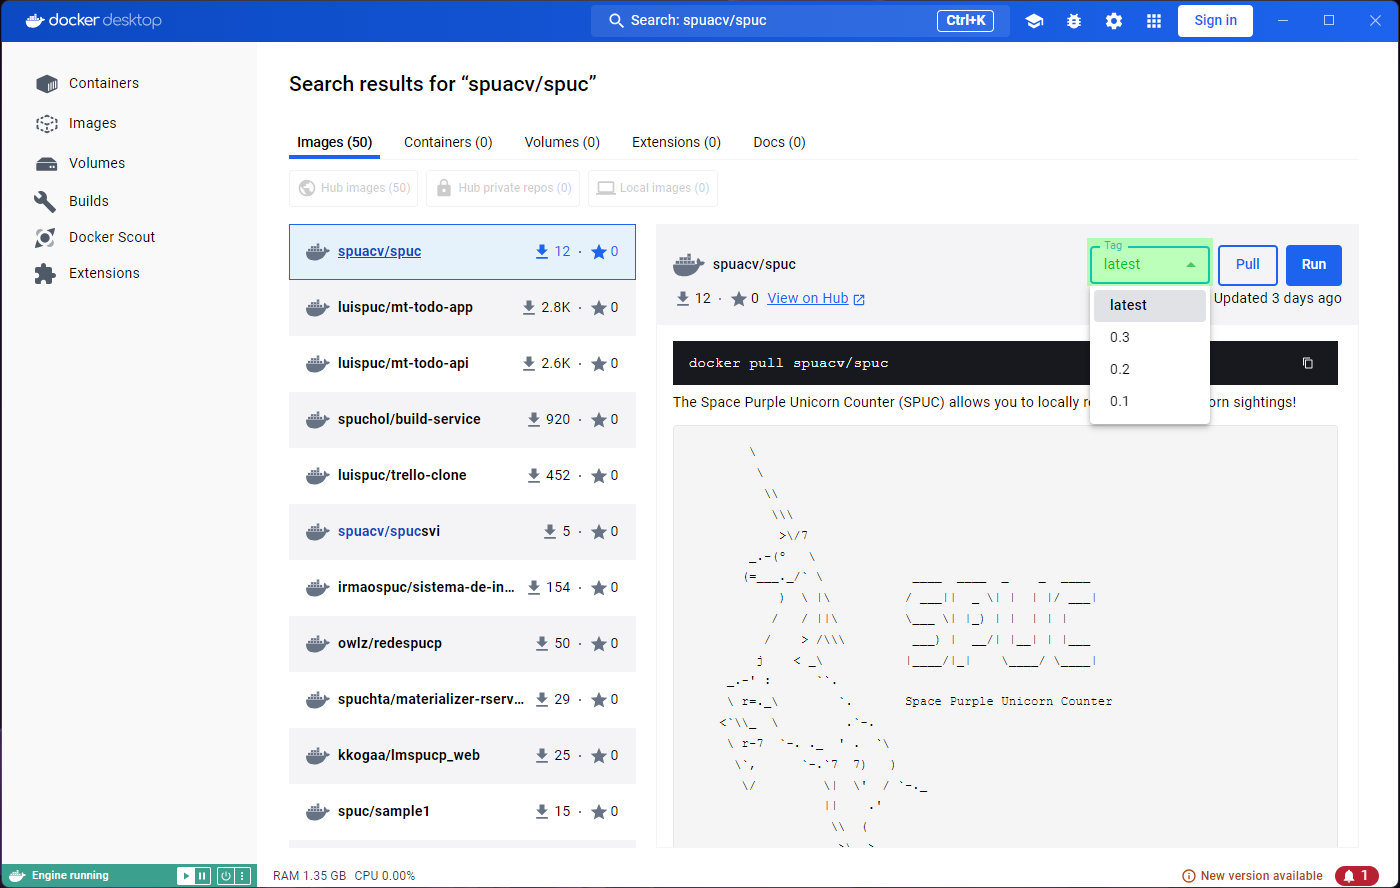
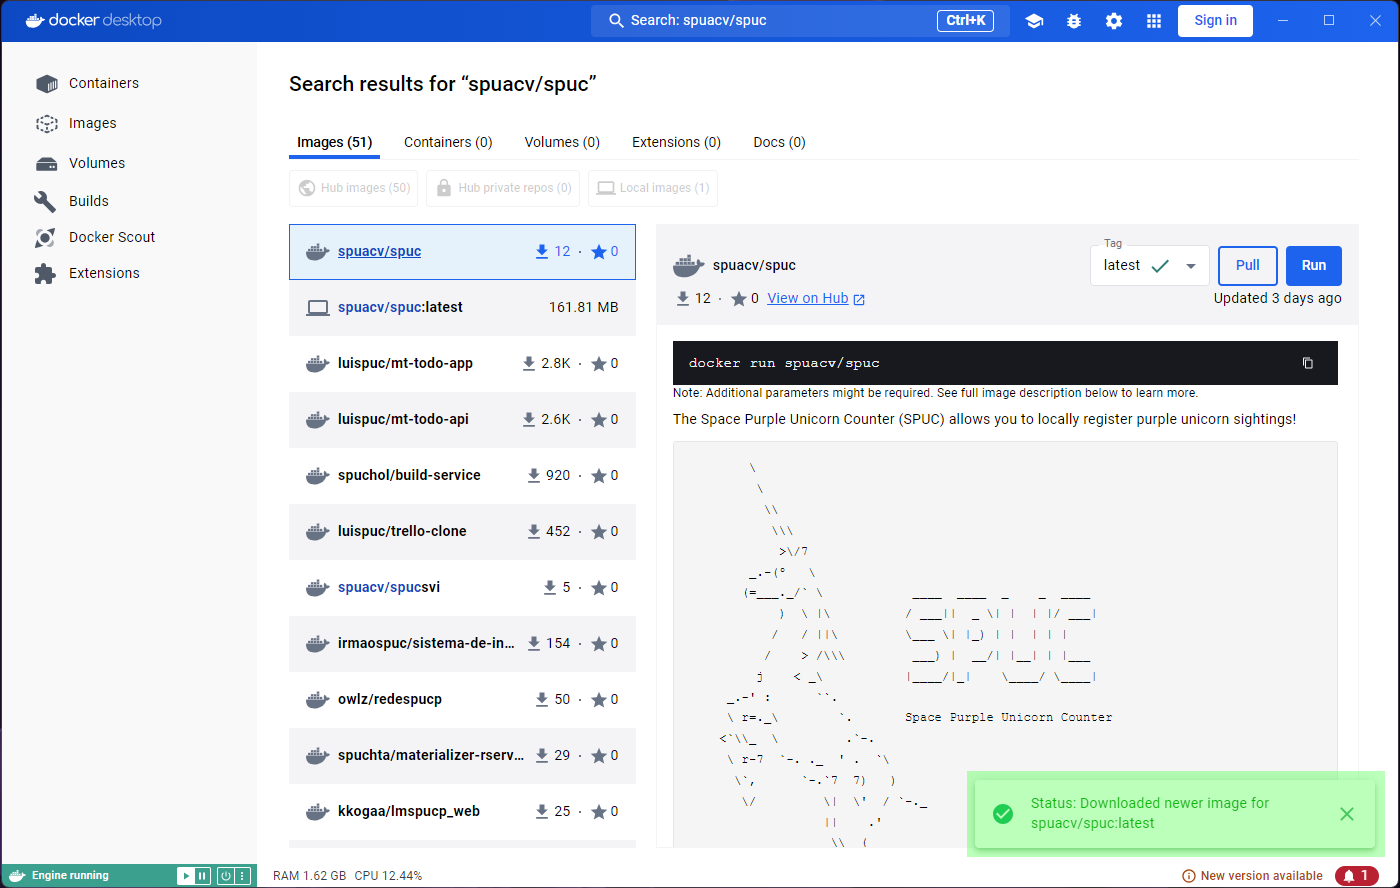
Once you find the image you were looking for, you can either download it (pull), or directly run it.
We’ll start by downloading the latest version. Go ahead and click on
the Pull button.
Lets also pull the hello-world and alpine
images, which will help us explore features and issues with Docker
Desktop.
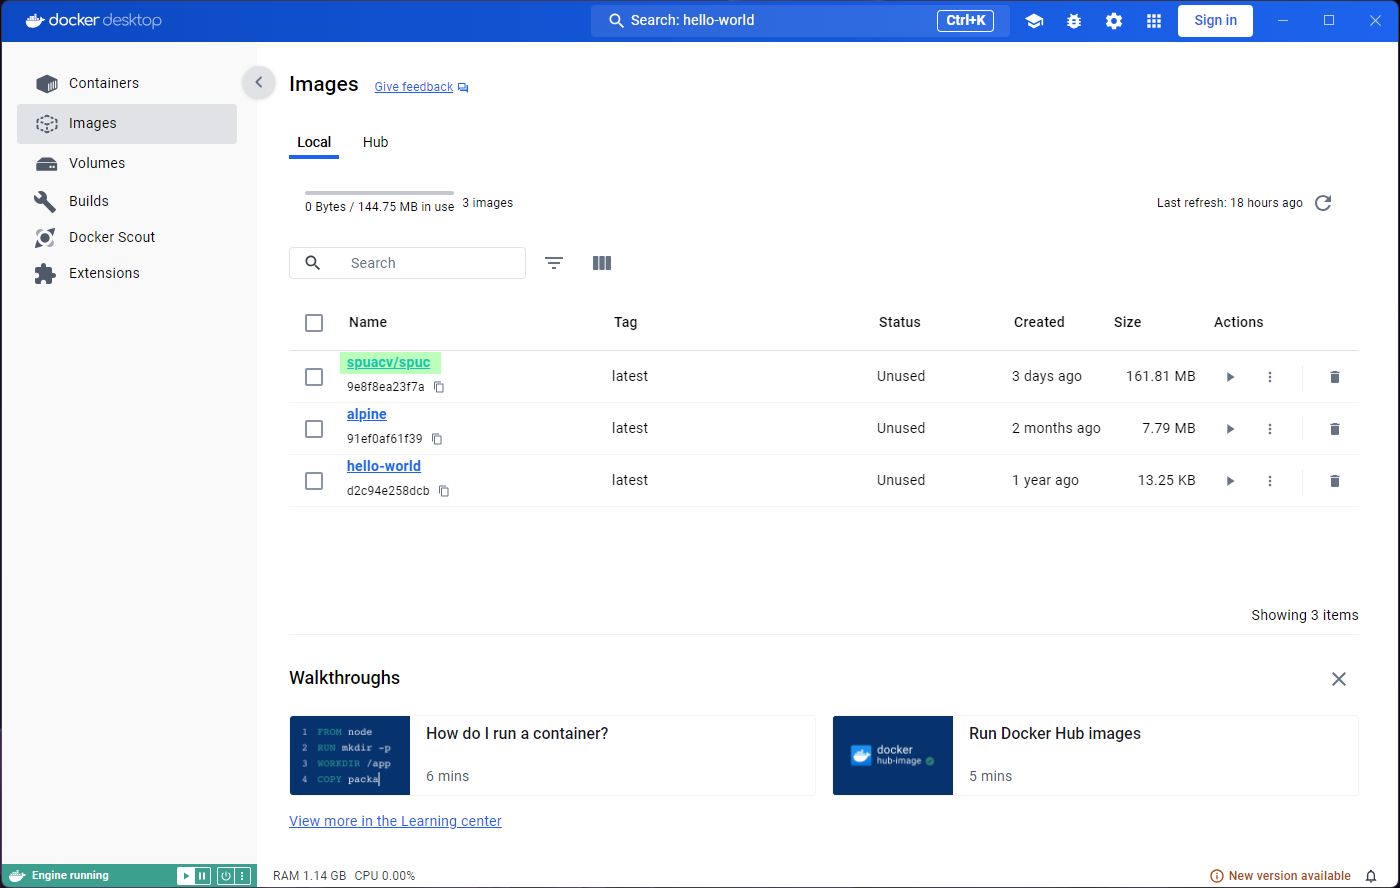
Inspecting images
Lets now go to the Images tab on the left panel. This
shows a list of all the images in your system, so you will be able to
see spuc and the other two images here.

The list already shows some information about the images, like their tag, size, and when they were created. It is also the place where you can run the images, or delete them. However, before we go any further, we want to inspect the images.
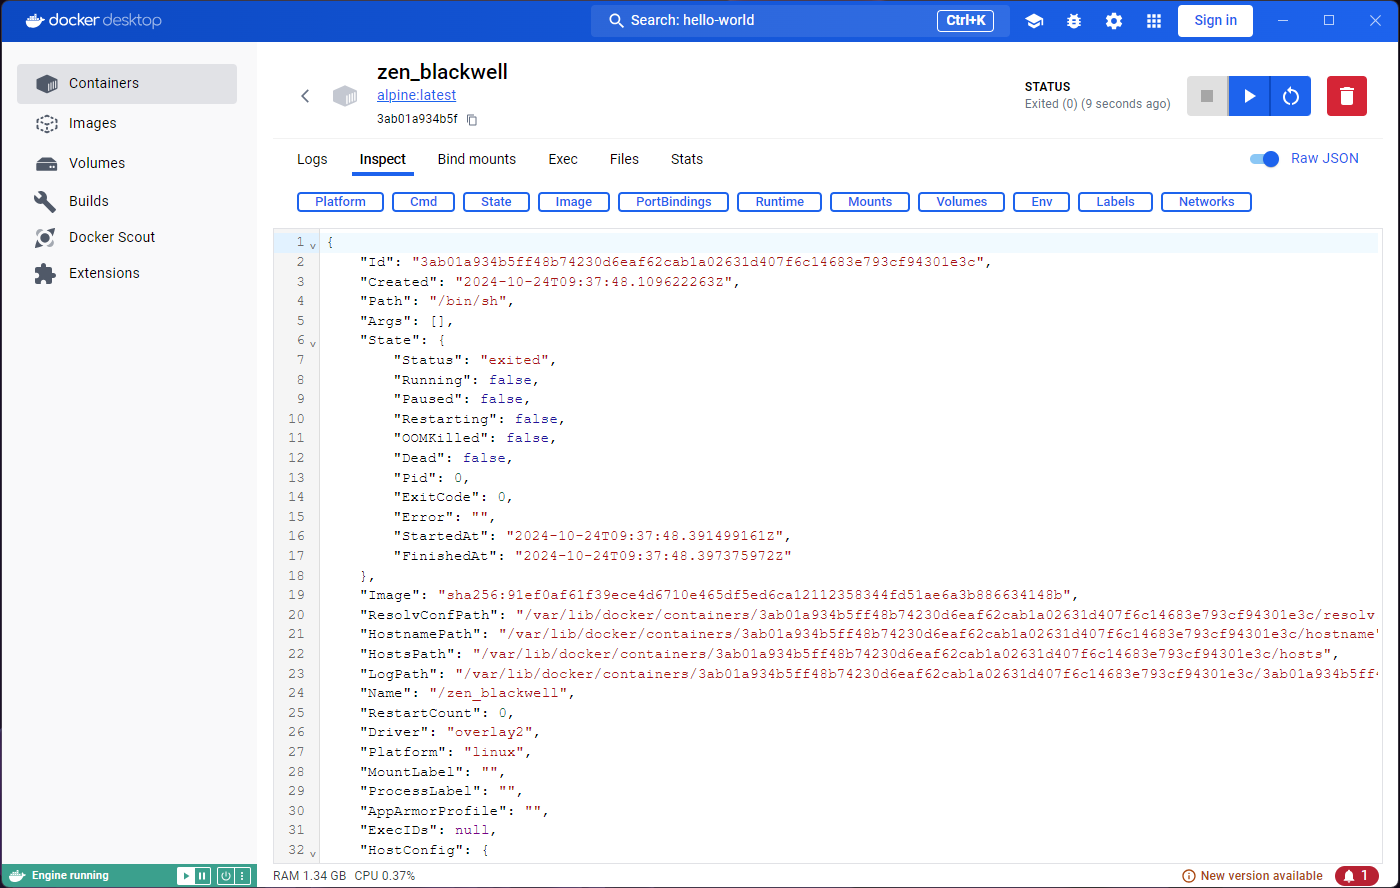
Clicking on the image will open a window with information on how the
image is built, and examine its packages and vulnerabilities. If any of
the building blocks of the image are vulnerable, we can see which, and
where they come from (Image hierarchy). For example, the vulnerabilities
in the spuc image come from its base image,
`python3-slim”.
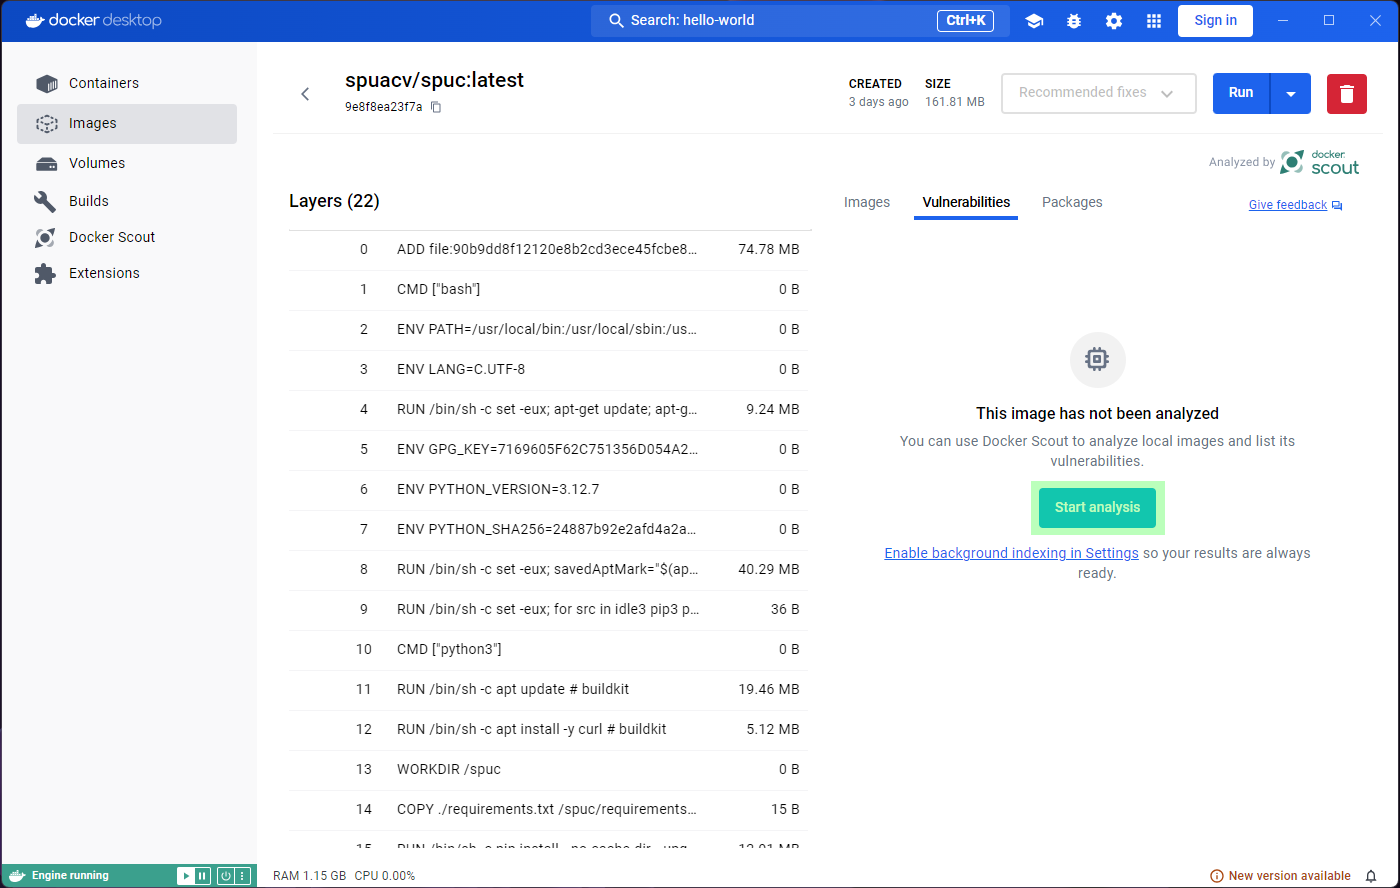
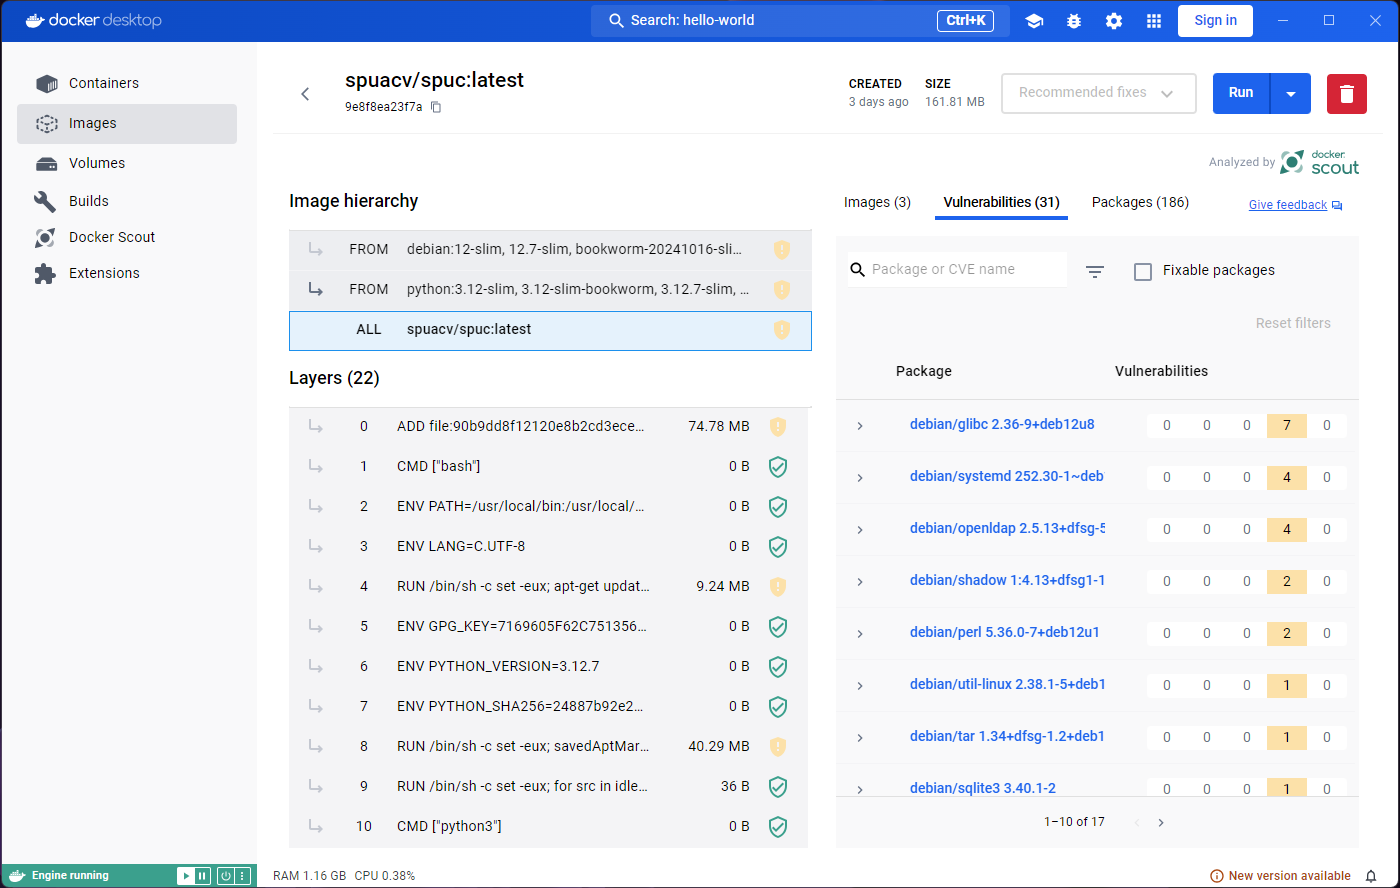
This all looks rather scary, and it is important that we are careful
with the images that we download. It is therefore quite useful to be
able to analyse them like this. The python:3-slim image, in
particular, comes from a verified publisher, so it is unlikely to be
malicious.
Another interesting thing to look at is the last few lines, which usually show the command that will be run when the container is started.
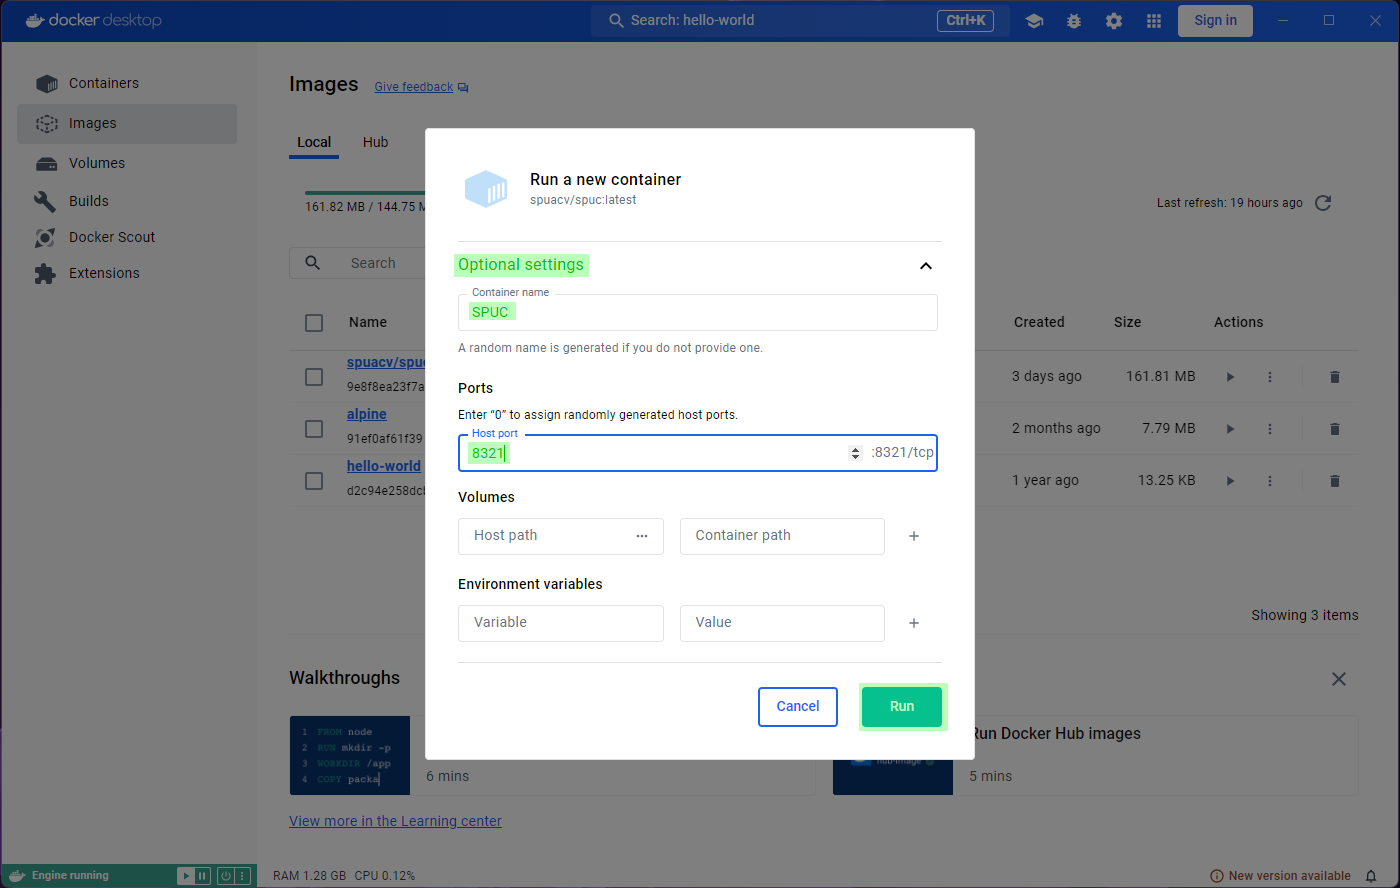
Running containers
The images that we just downloaded are immutable snapshots of an
environment, distributed to be used as templates to create
containers. Containers are executions of the image, and
because they are running, they become mutable.
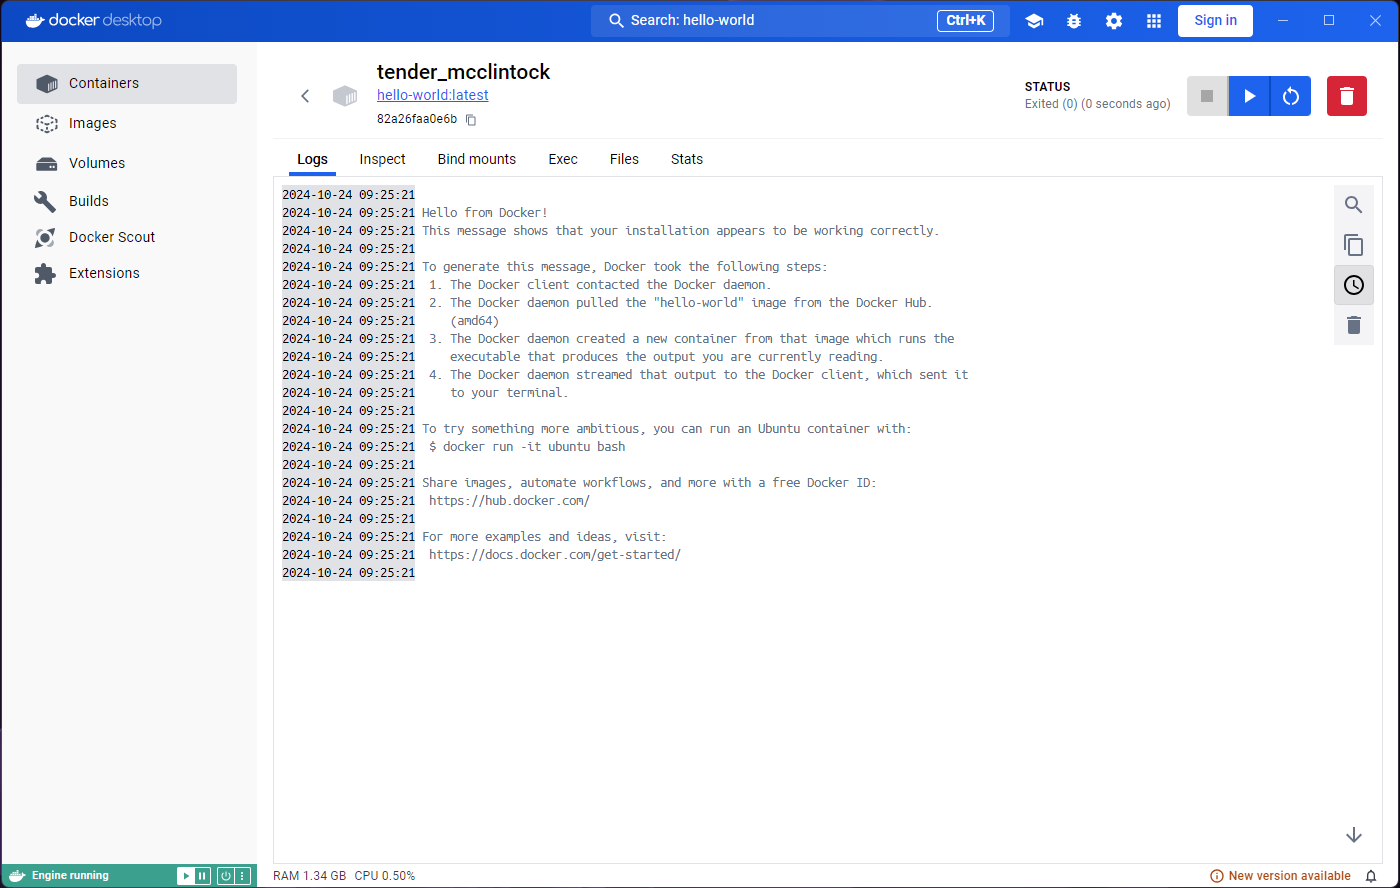
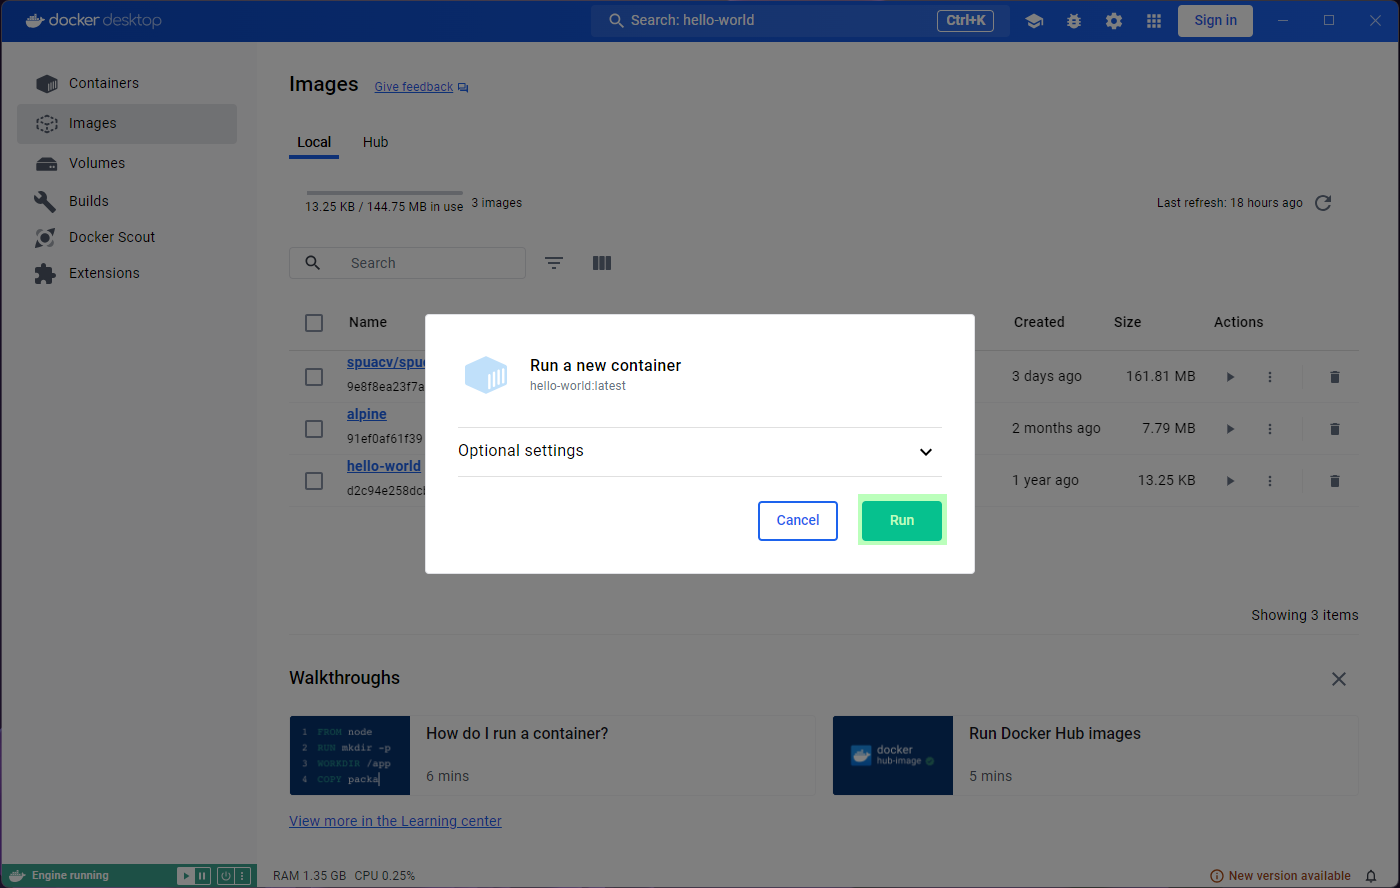
Let’s run the hello-world image by clicking the
Run button in the Actions column, from the
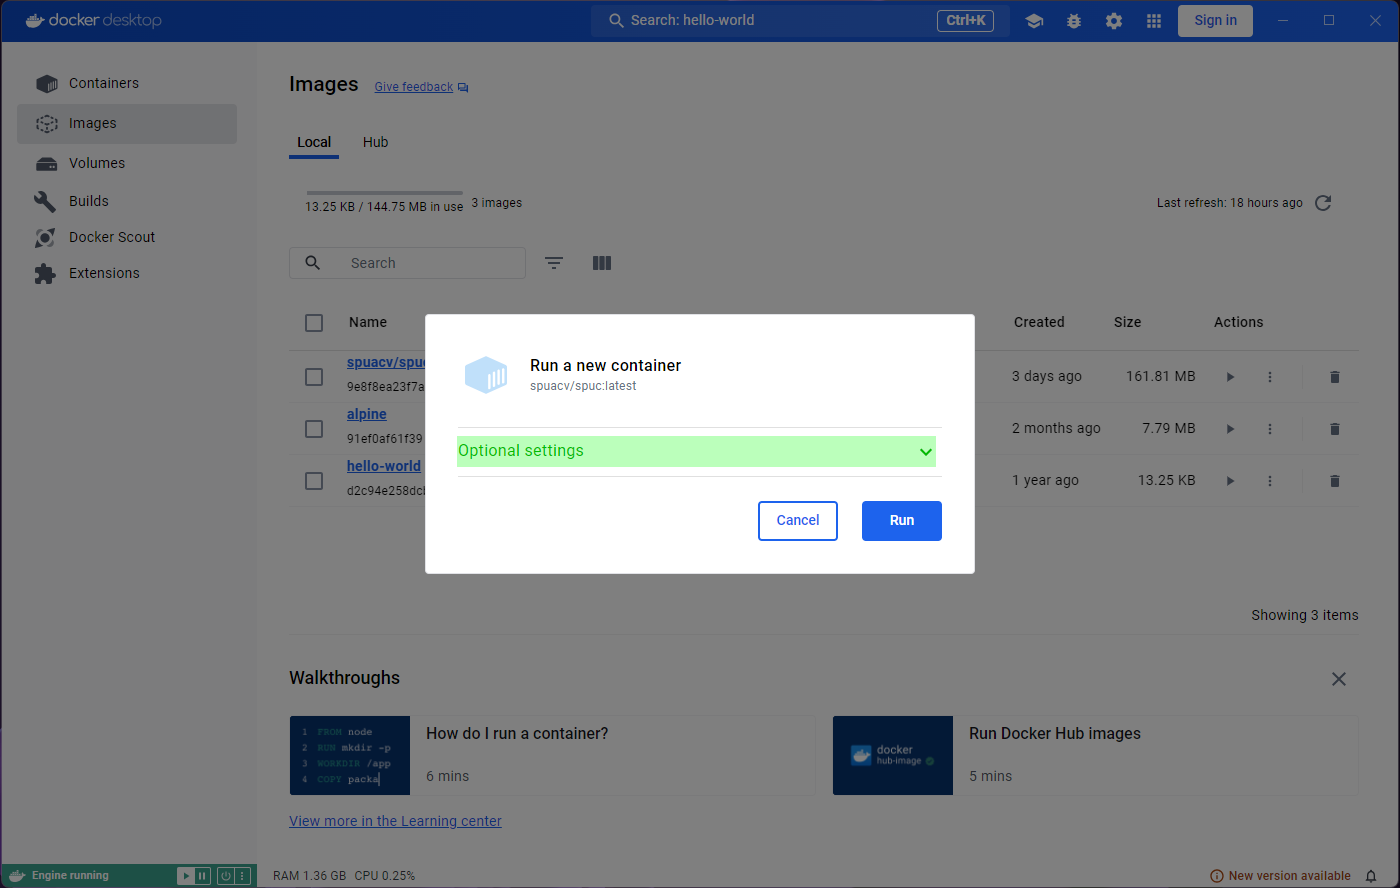
Images tab.
A prompt will ask you to confirm Run or modify some
optional settings. For now, lets just confirm with Run.

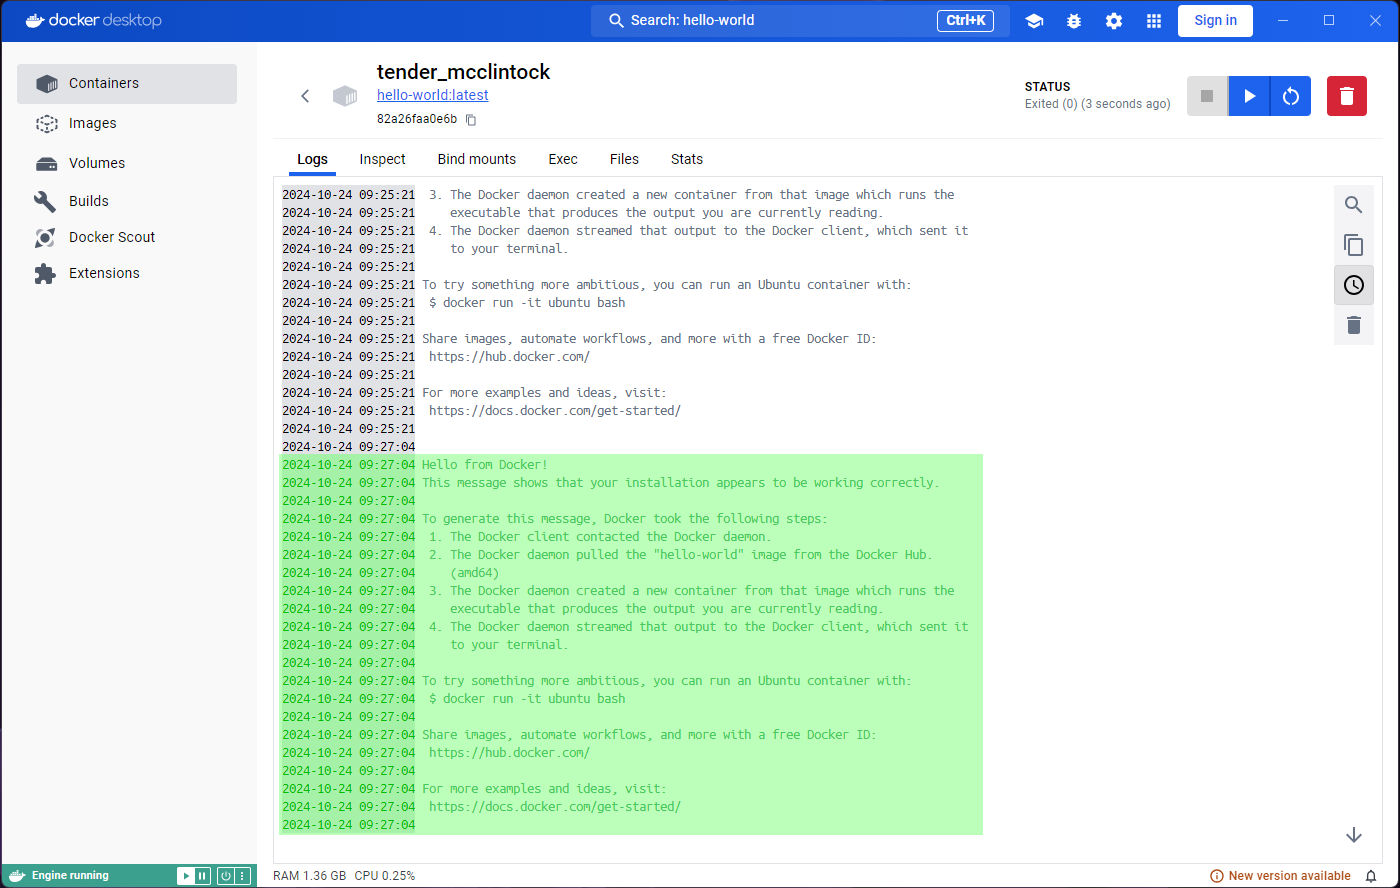
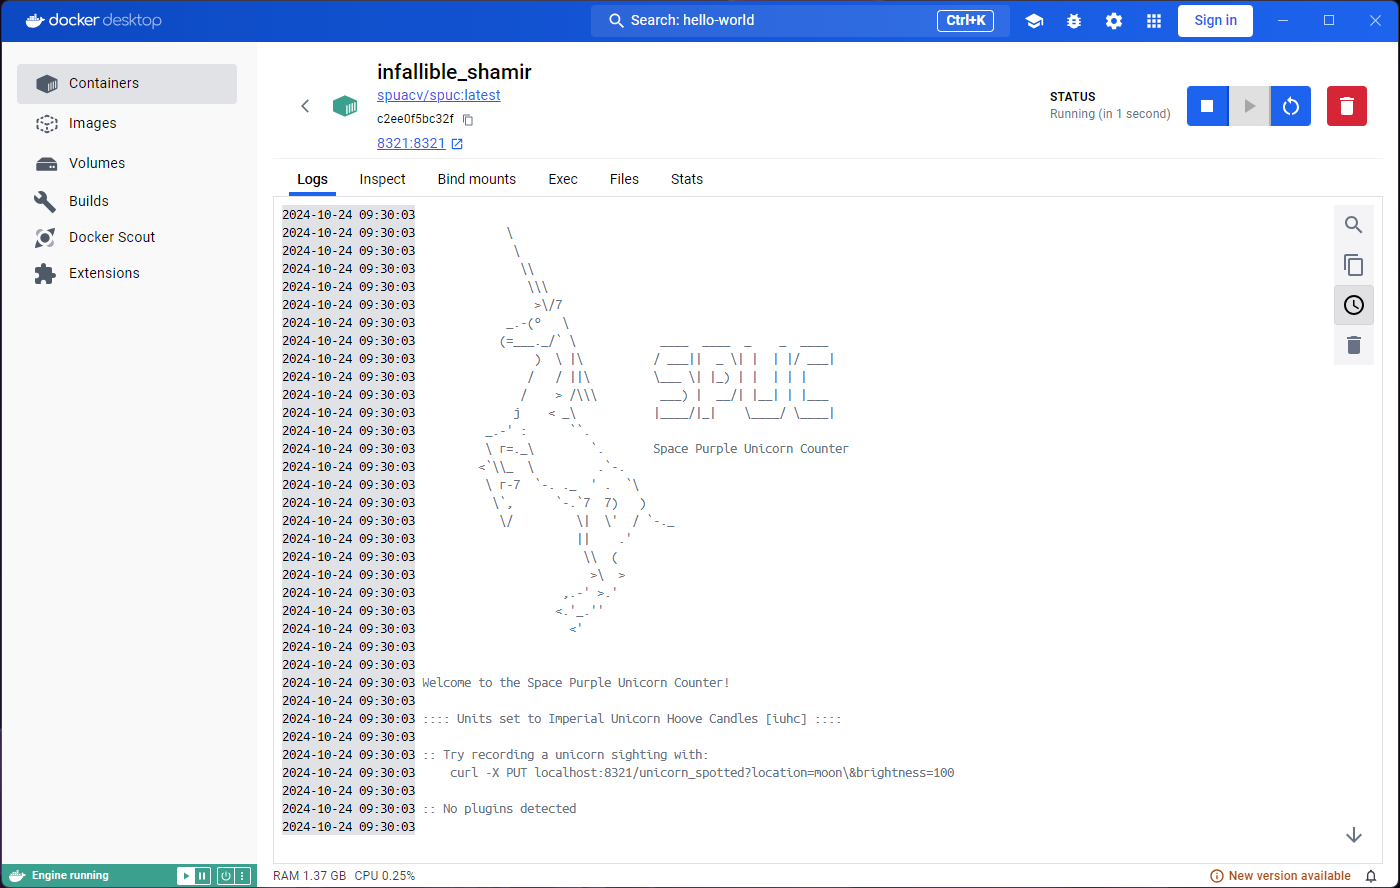
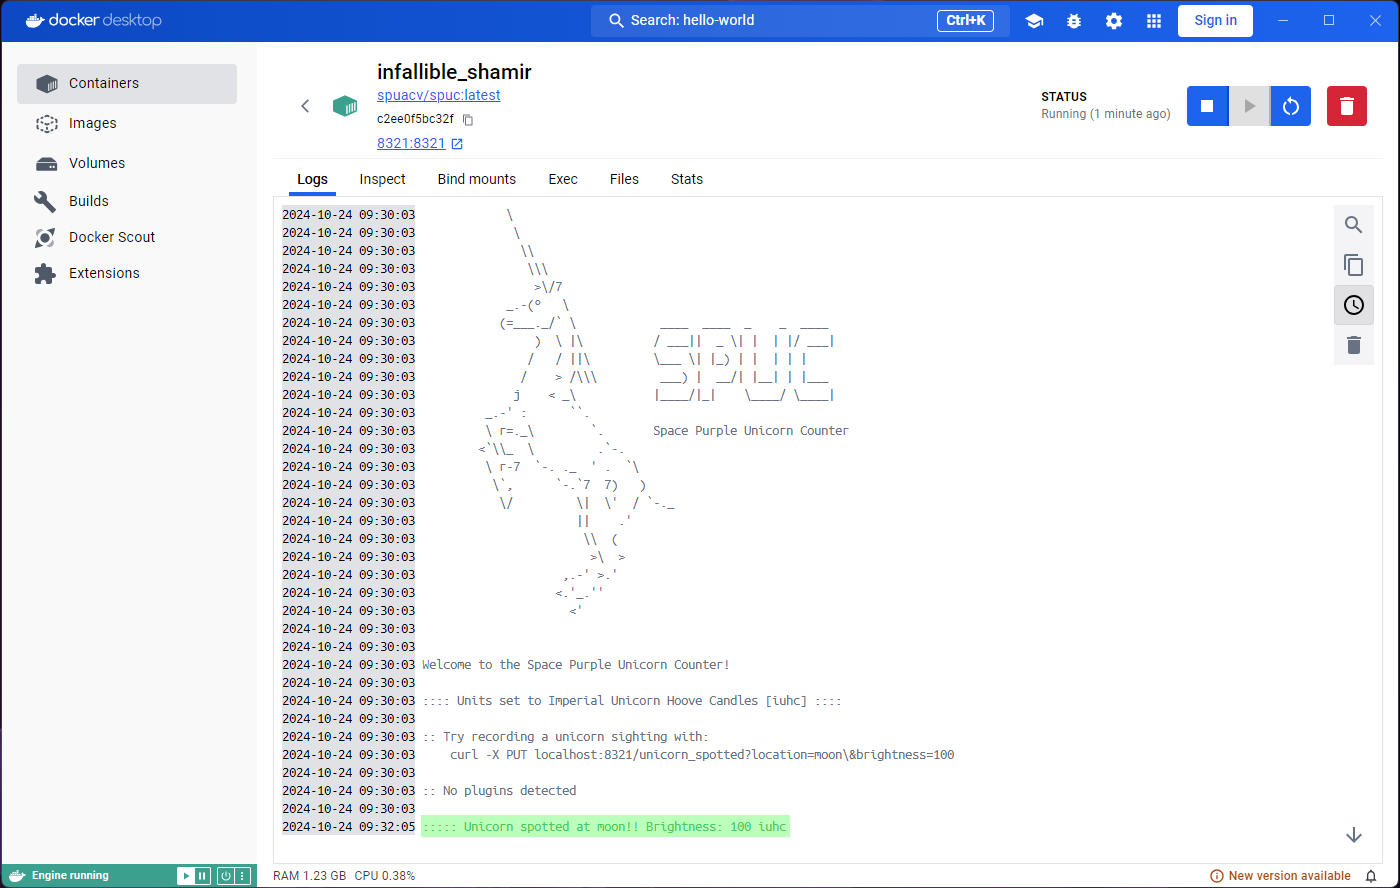
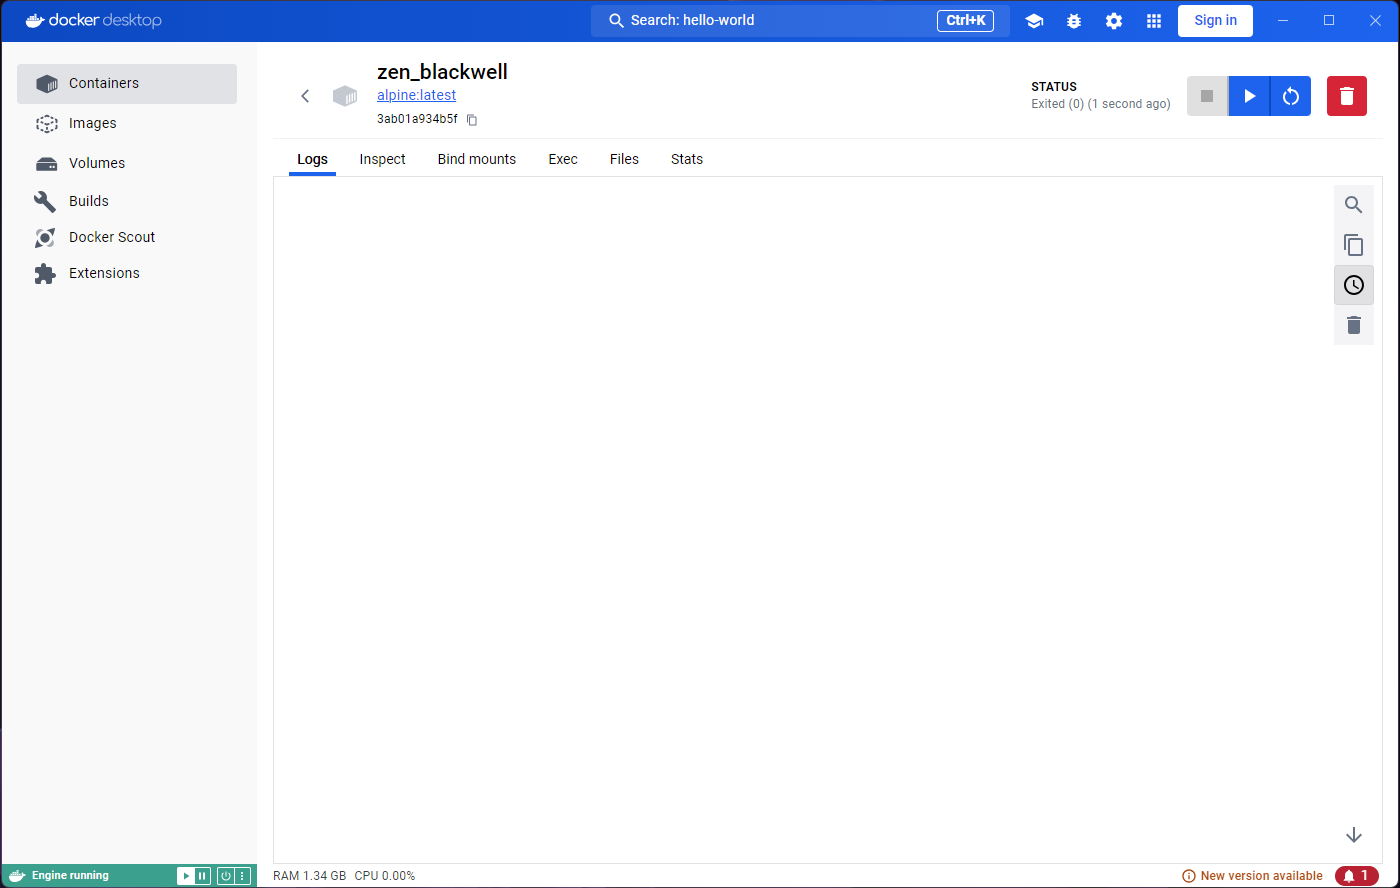
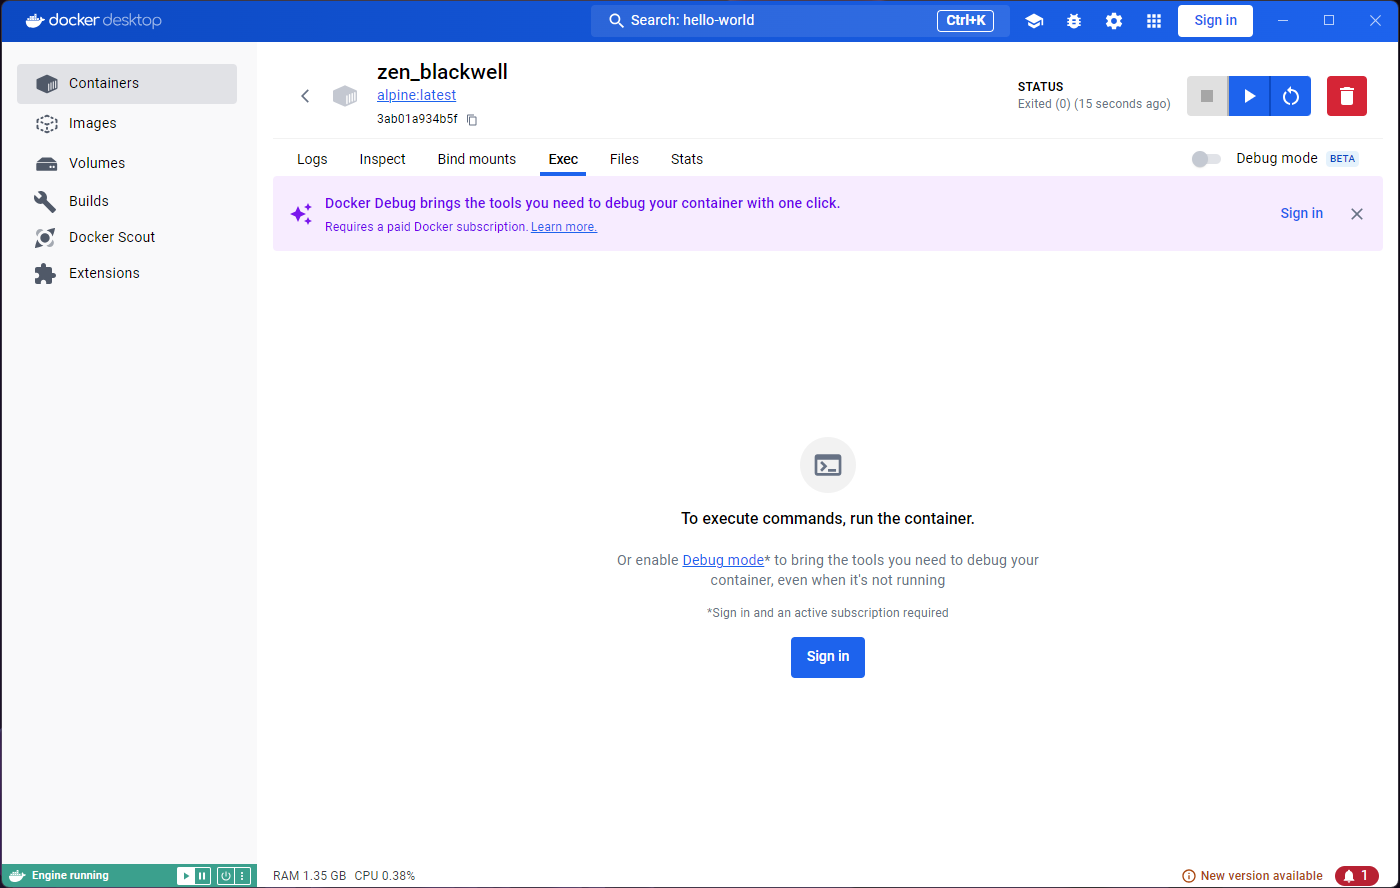
You will be taken to a Logs tab inside the container
that you just ran. The logs show the output of this particular image,
“Hello from Docker!” among other things.
If you look carefully, the Containers tab on the left is
highlighted. We are looking at a container now, not an image, and so we
were re-located.
You might also find the heading in this page strange. Unless you specify a name for the container (which we could have done in the optional settings), Docker will generate a random name for it, which is what we see here.
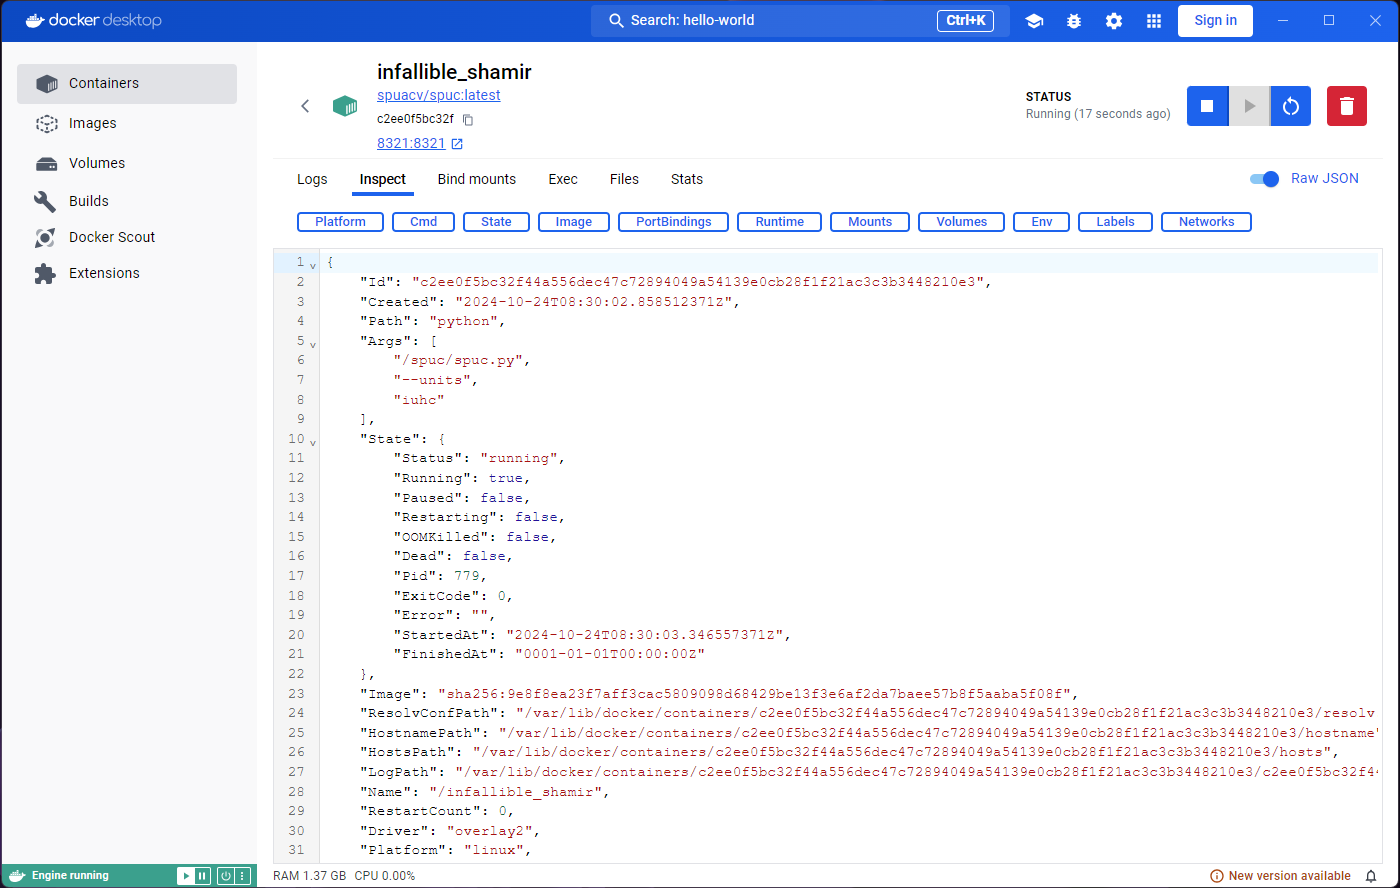
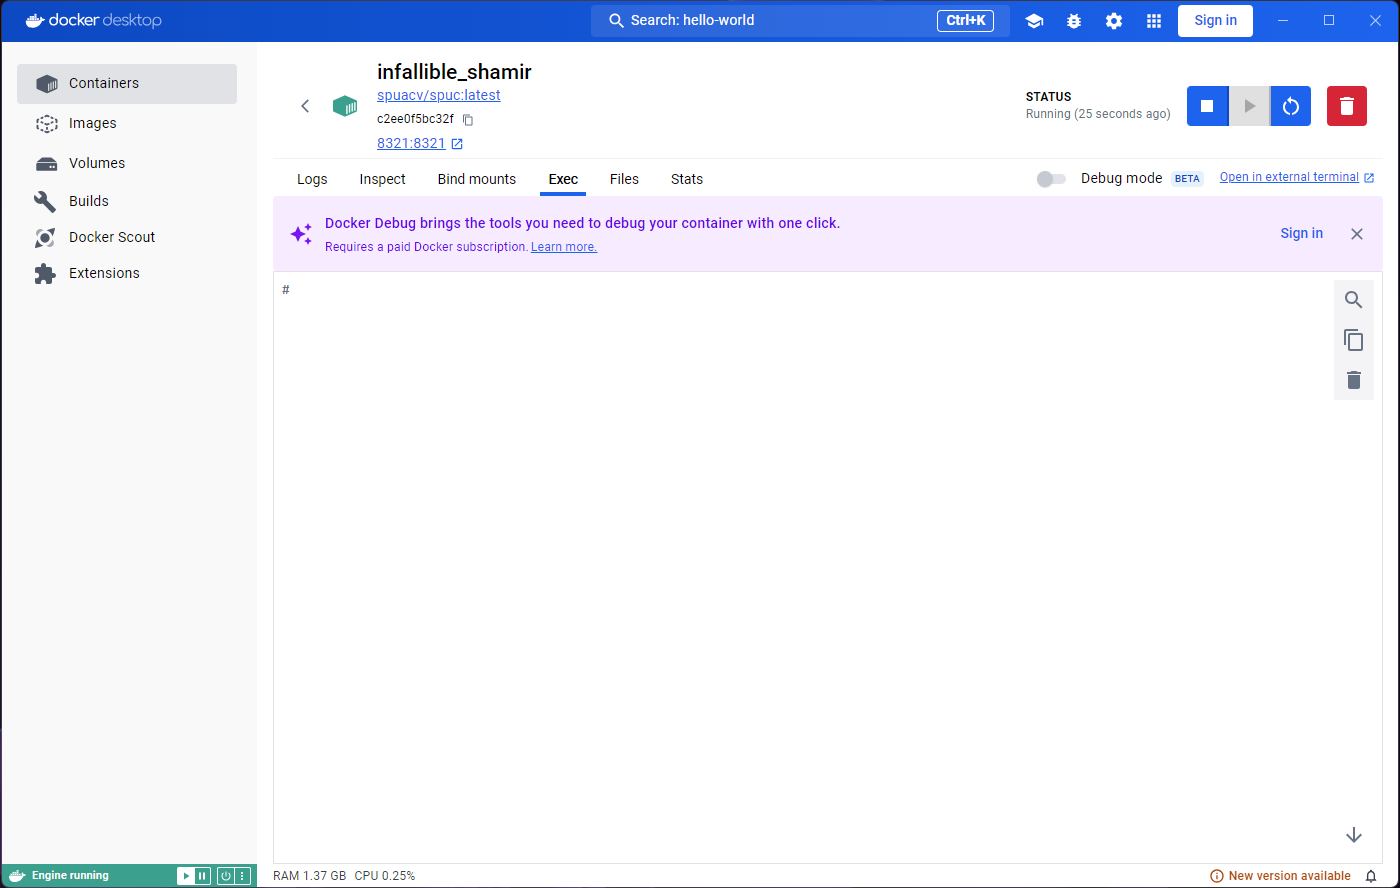
Exploring the Inspect tab will show us some information,
but for now we are more interested in what the Exec and
Stats tabs have to say. They both seem to indicate that we
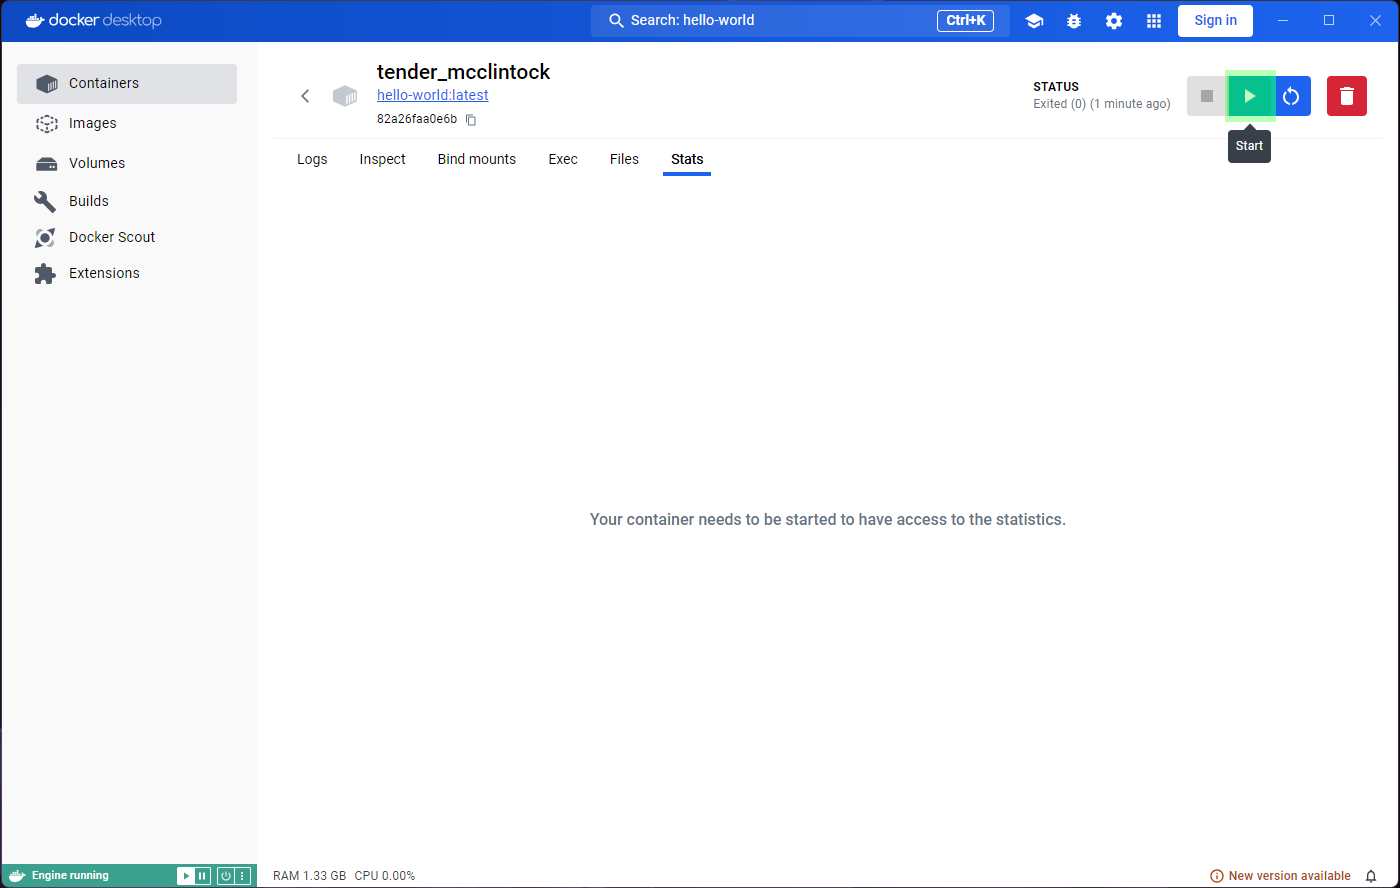
need to run or start the container.
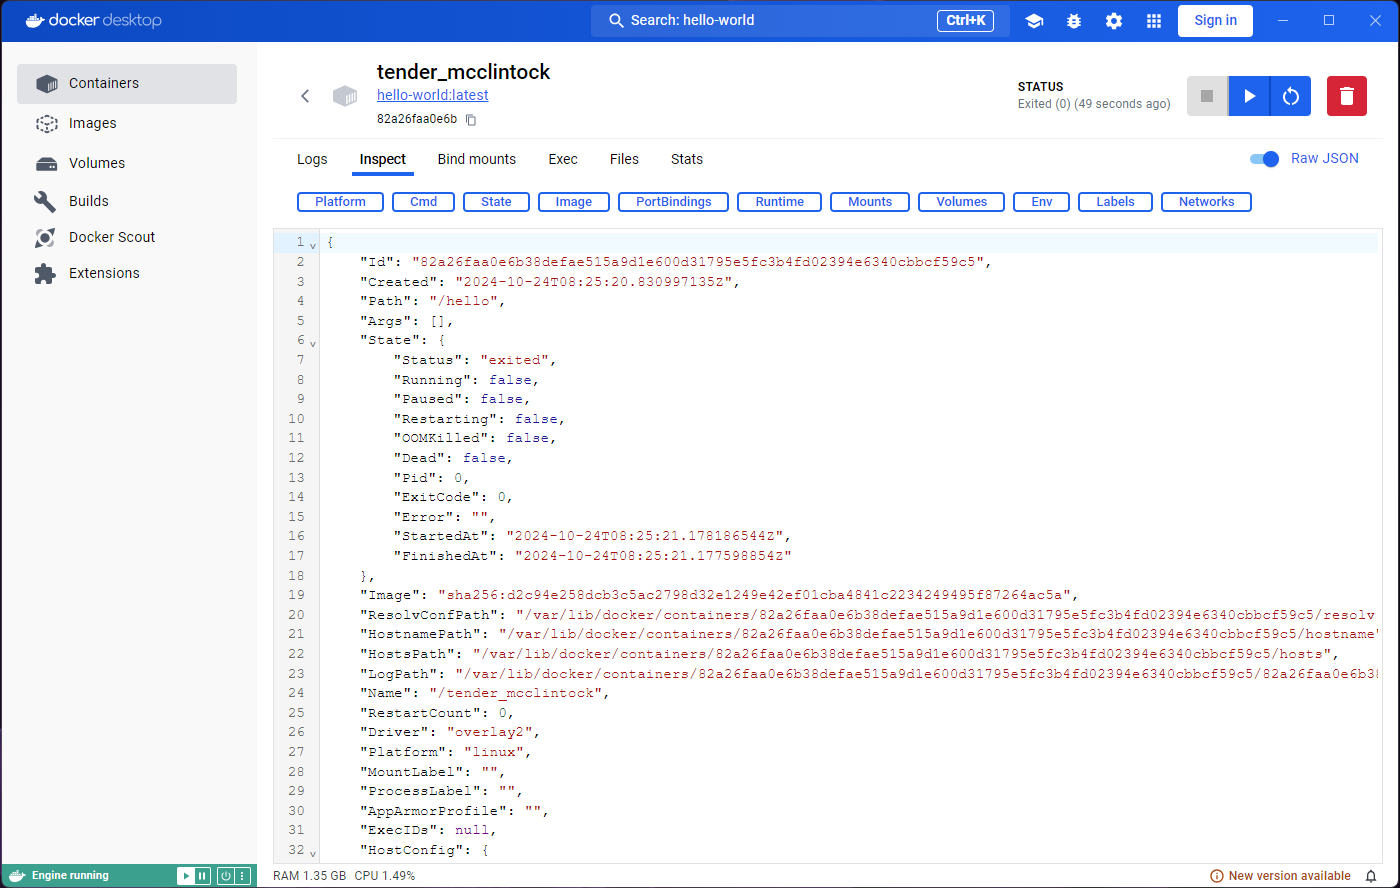
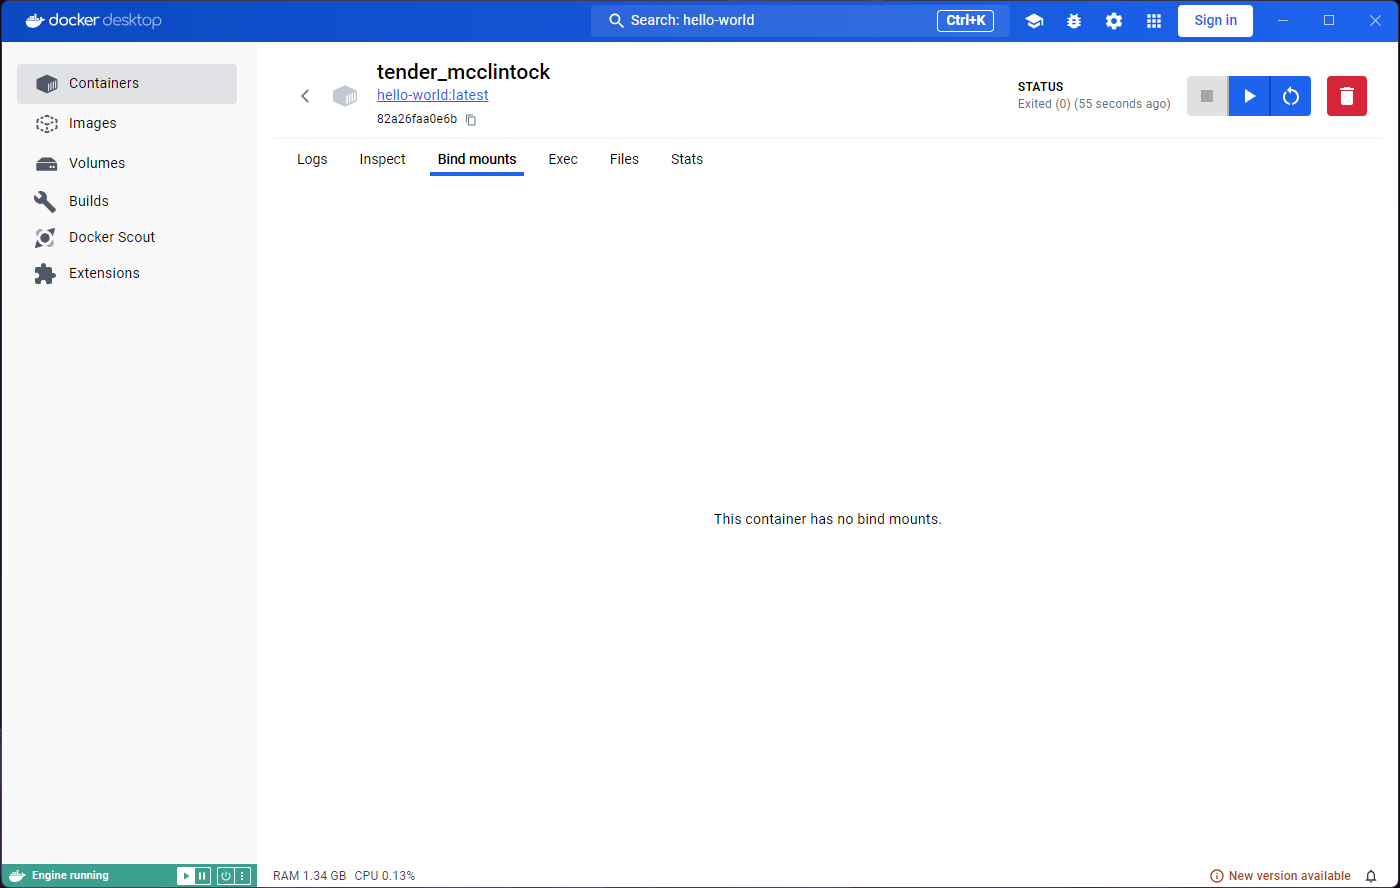
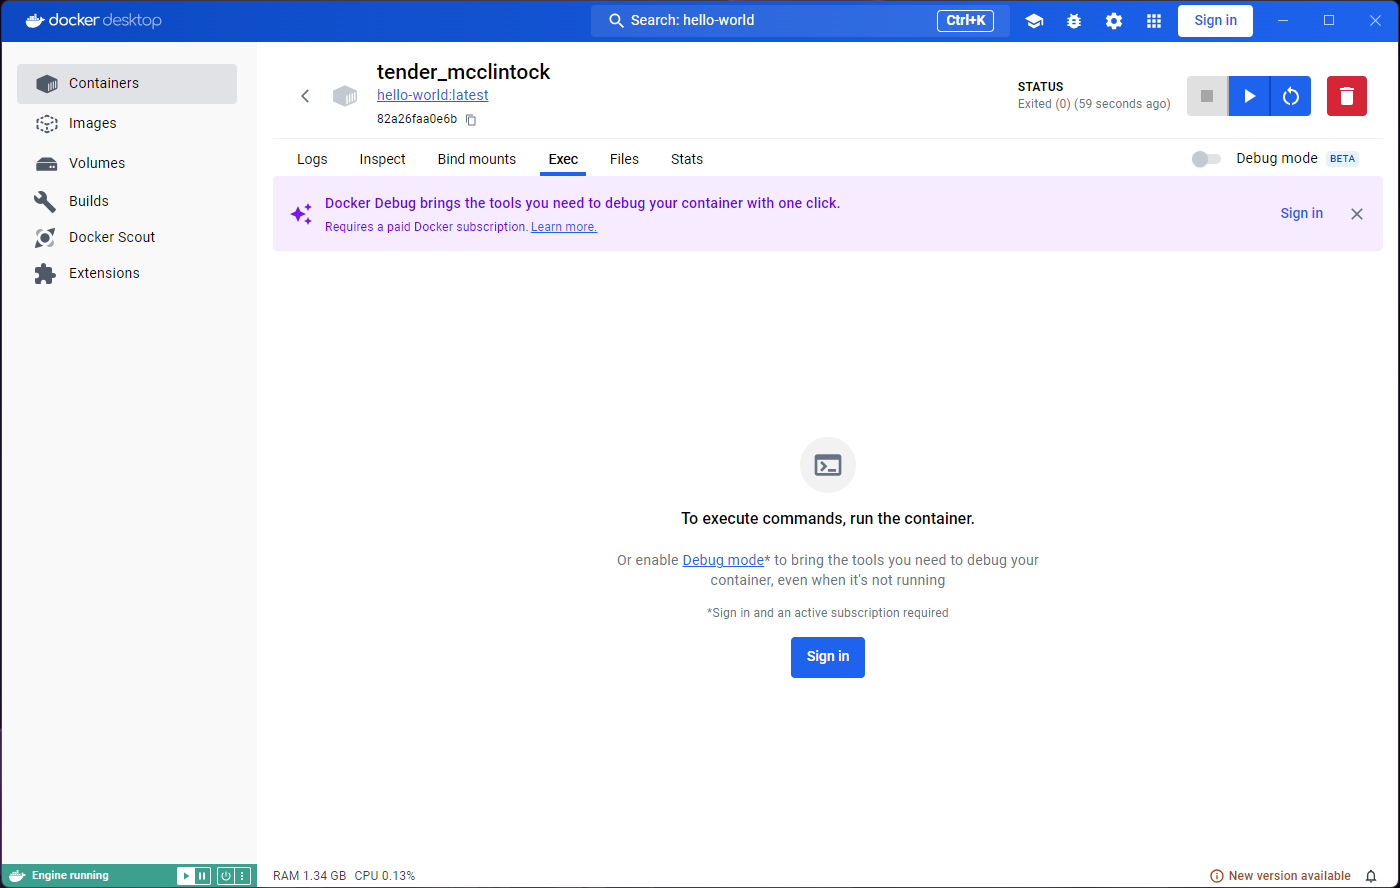
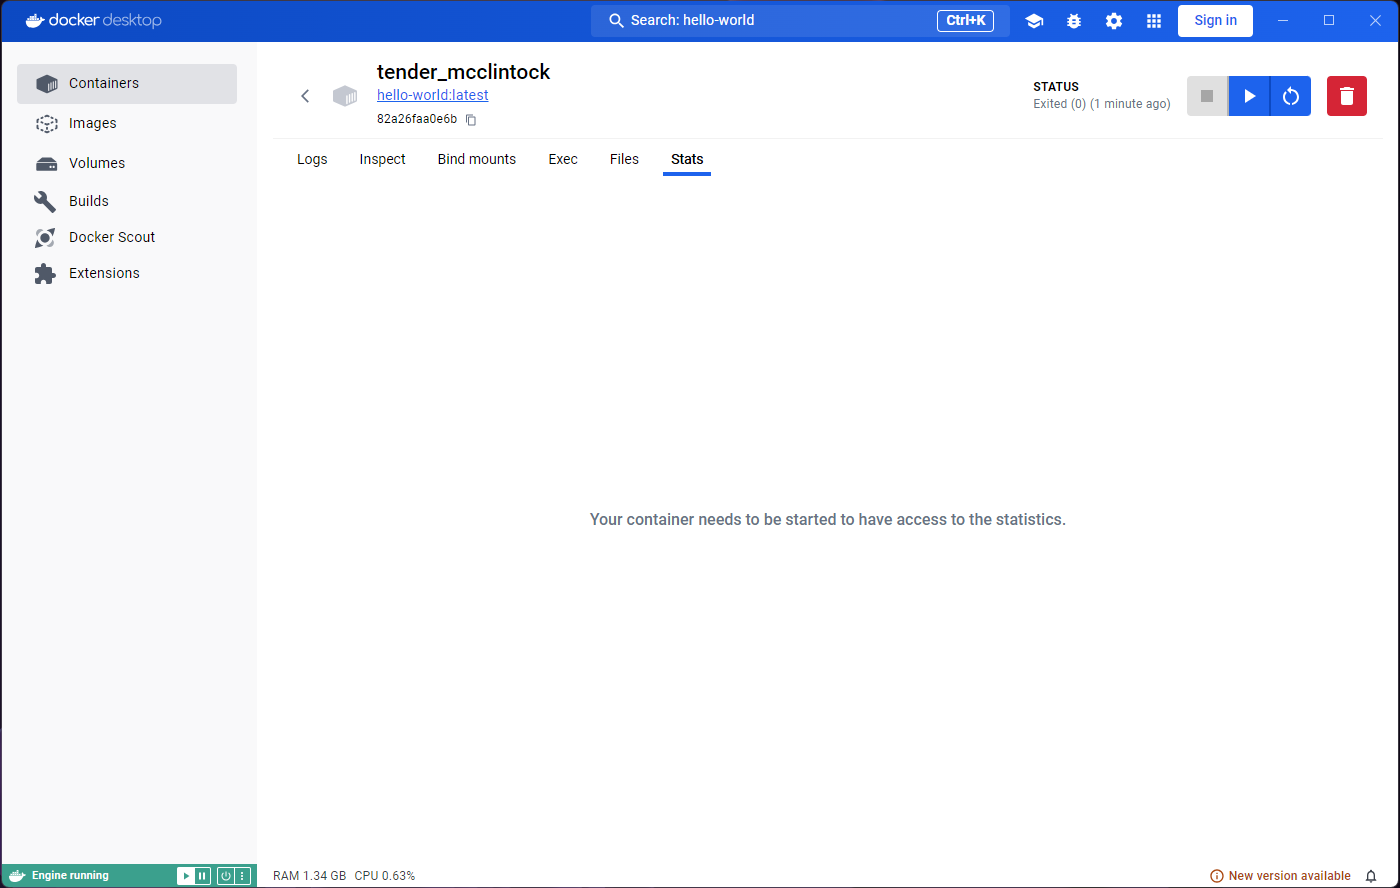
Indeed, if we look carefully, we will find an ‘Exited (0)’ status
under the container name, and a Start button near the
top-right corner. However, if we click on that button we will see the
output duplicated in the logs, and the Exited (0) status
again.
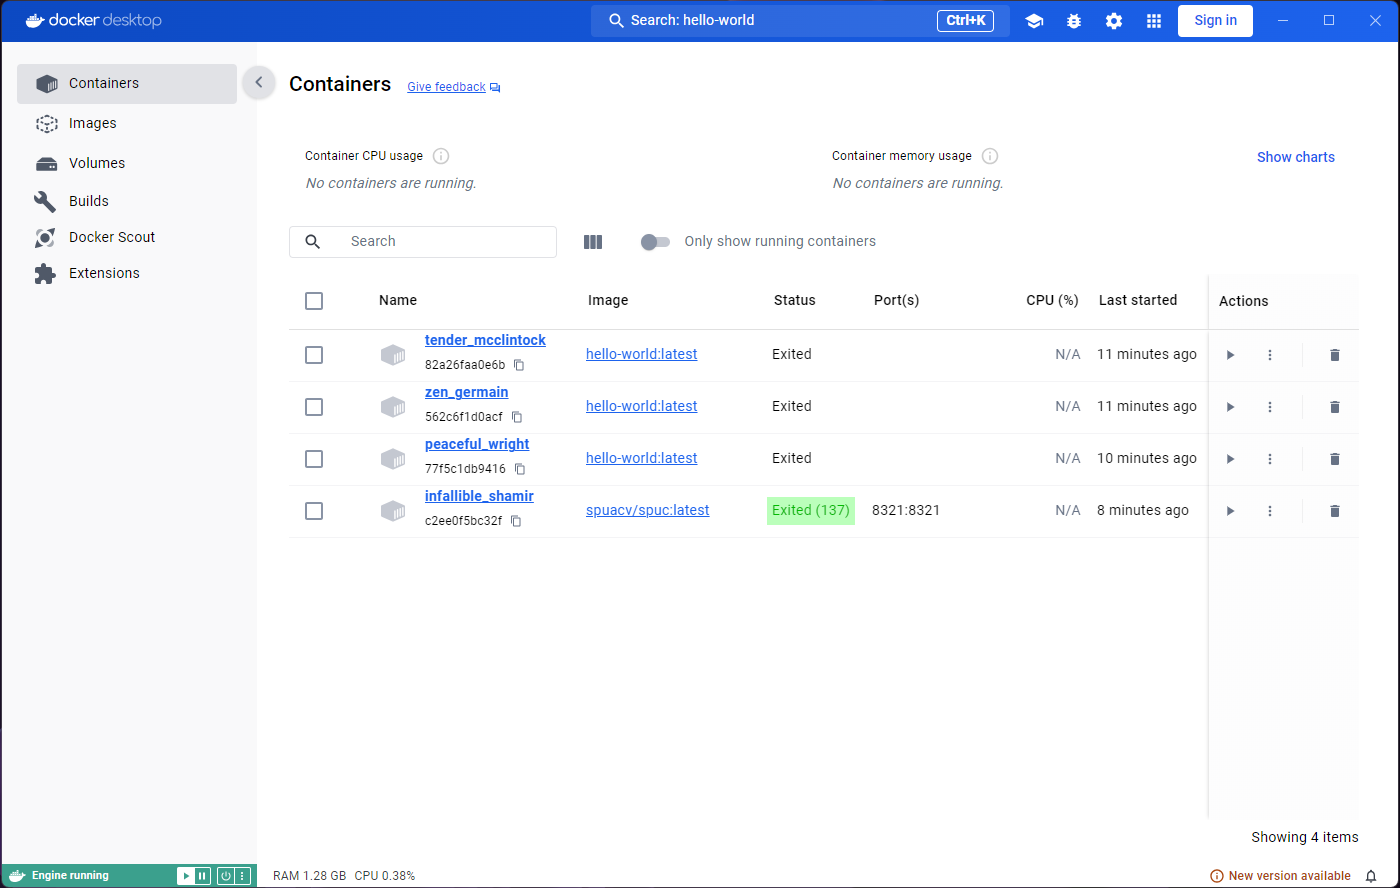
If we go back to the images tab and run the image again, we’ll see that the same thing happens. We get the “Hello from Docker!”, and the container (with a new random name) exits.


The nature of most containers is ephemeral.
They are meant to execute a process, and when the process is
completed, they exit. We can confirm this by clicking on the
Containers tab on the left. This will exit the container
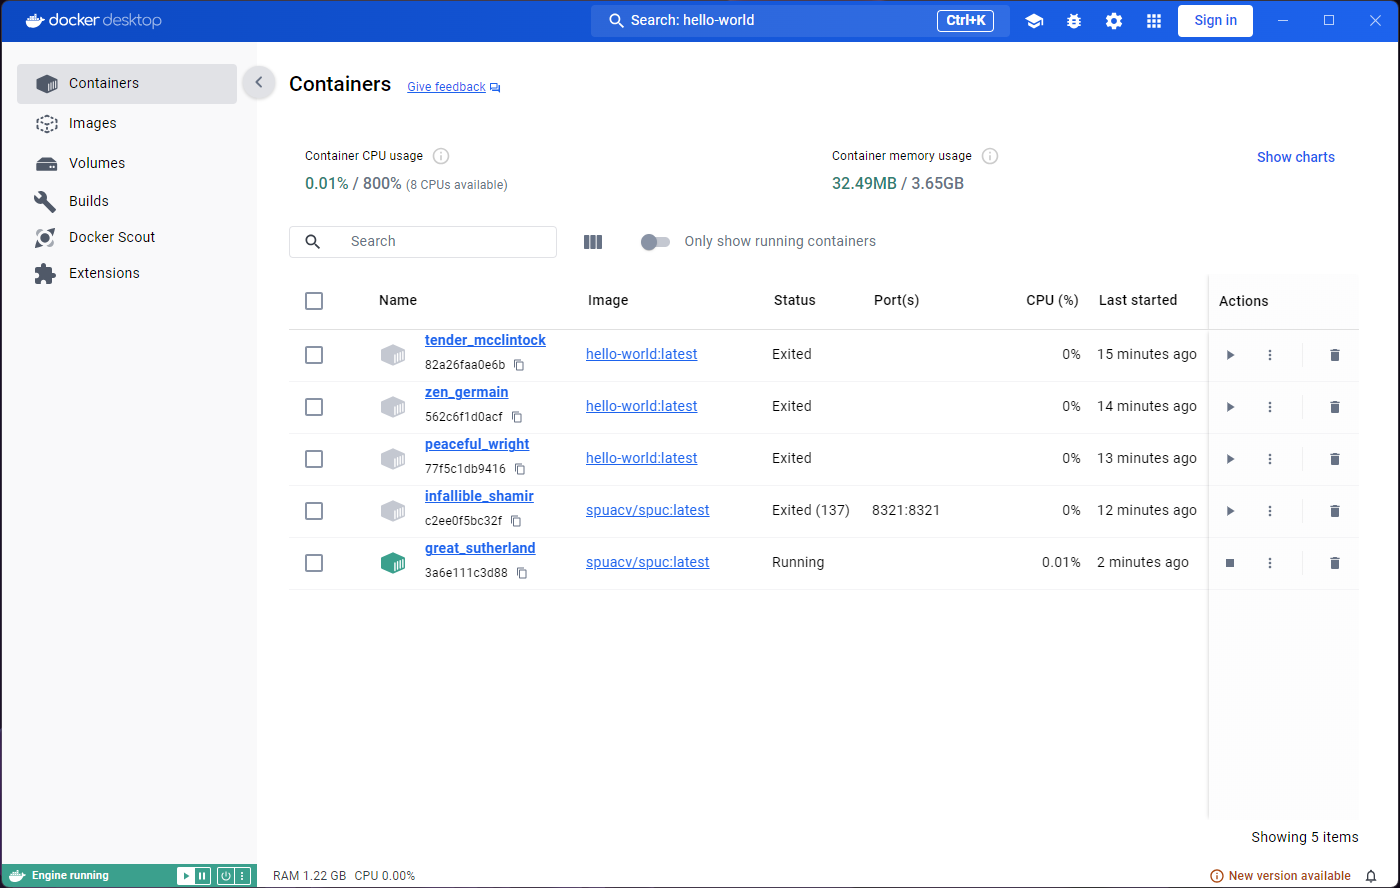
inspection and show us all the containers.
We have only run the hello-world image, but you can see
there are two containers. Both containers in the list have a status
‘Exited’.
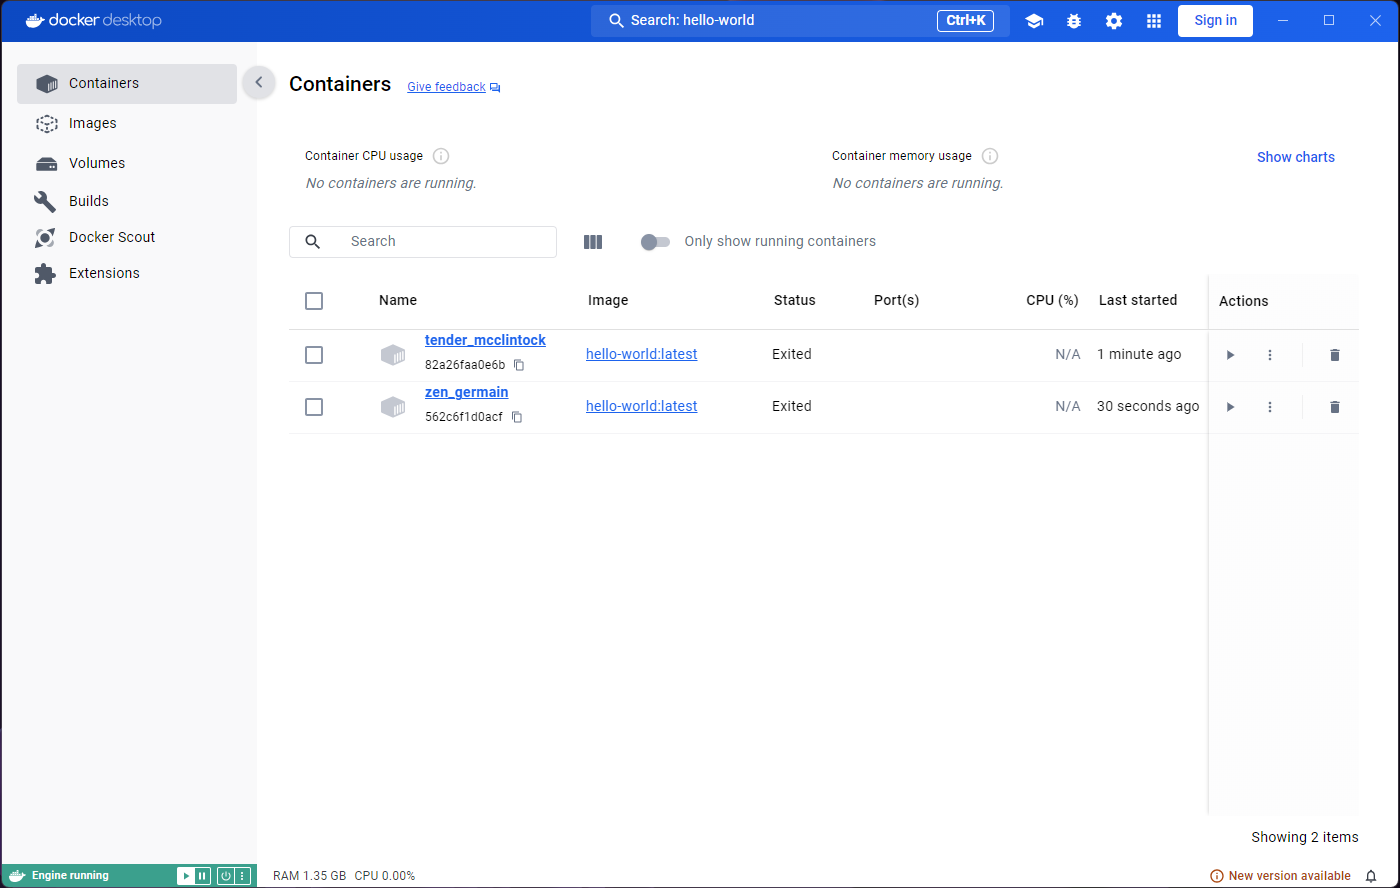
You may be wondering why there are two containers, and not just one, given that we only used one image. As mentioned before, the image is used as a template, and as many containers as we want can be created from it. Every time we run the image, a new container is created.
So why are there not three containers then? When we ran the image from the container inspection window, we were running the command on the same container. That’s why there’s only two, even though we saw the container in action three times.
If we go back to the Images tab and run
hello world again, we’ll see a new container appear. All
the containers are still there, and they are not deleted automatically.
This can actually become problematic, and we will deal with it in a
bit.
Interacting with containers
Not all containers are as short lived as the ones from the
hello-world image. Lets try running the
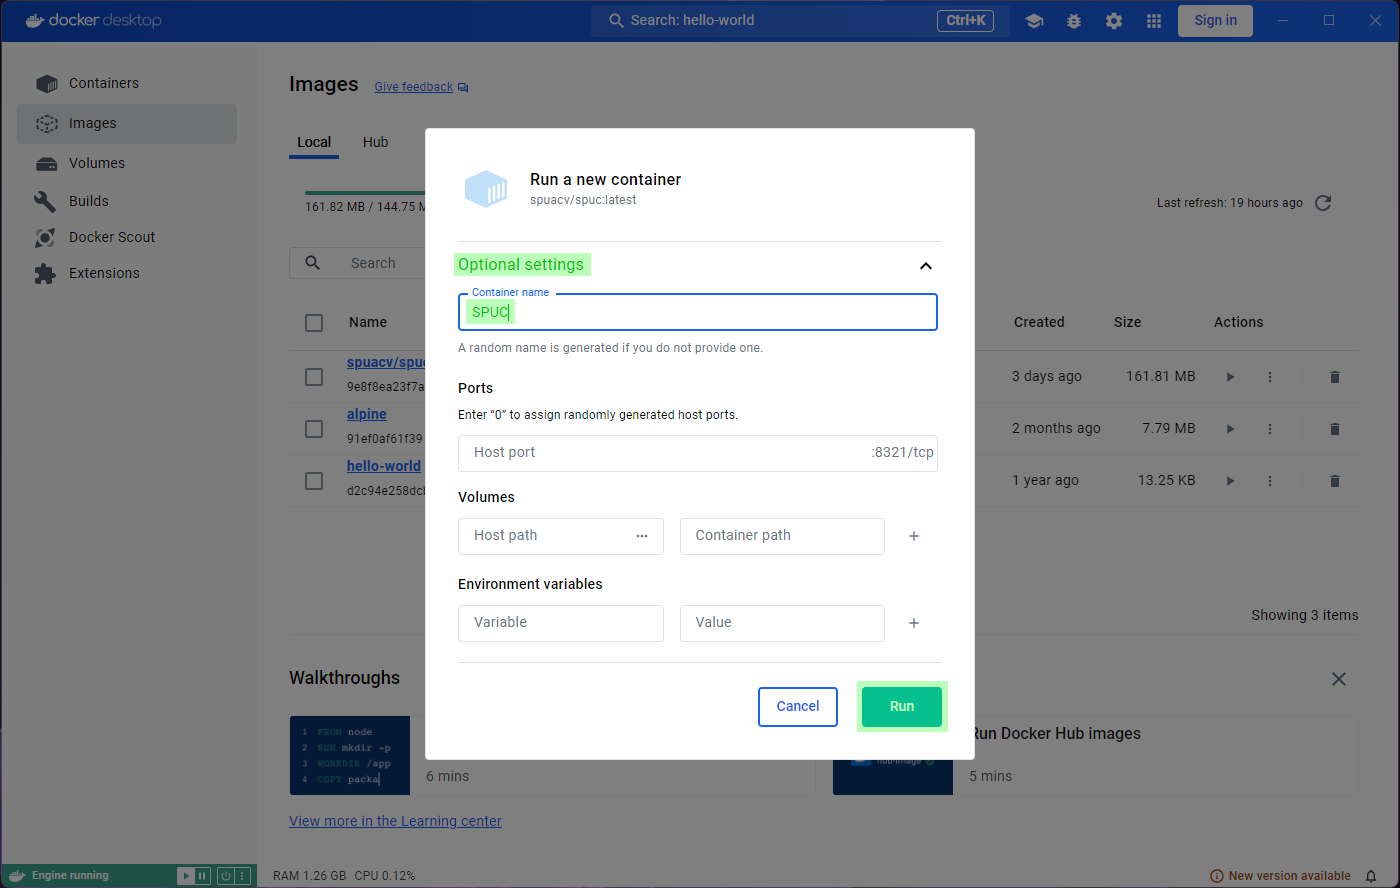
spuacv/spuc, but look at the optional settings this time.
If you remember, we were instructed to run the container and configure a
port. Lets add a map to the port 8321 in the local
machine.

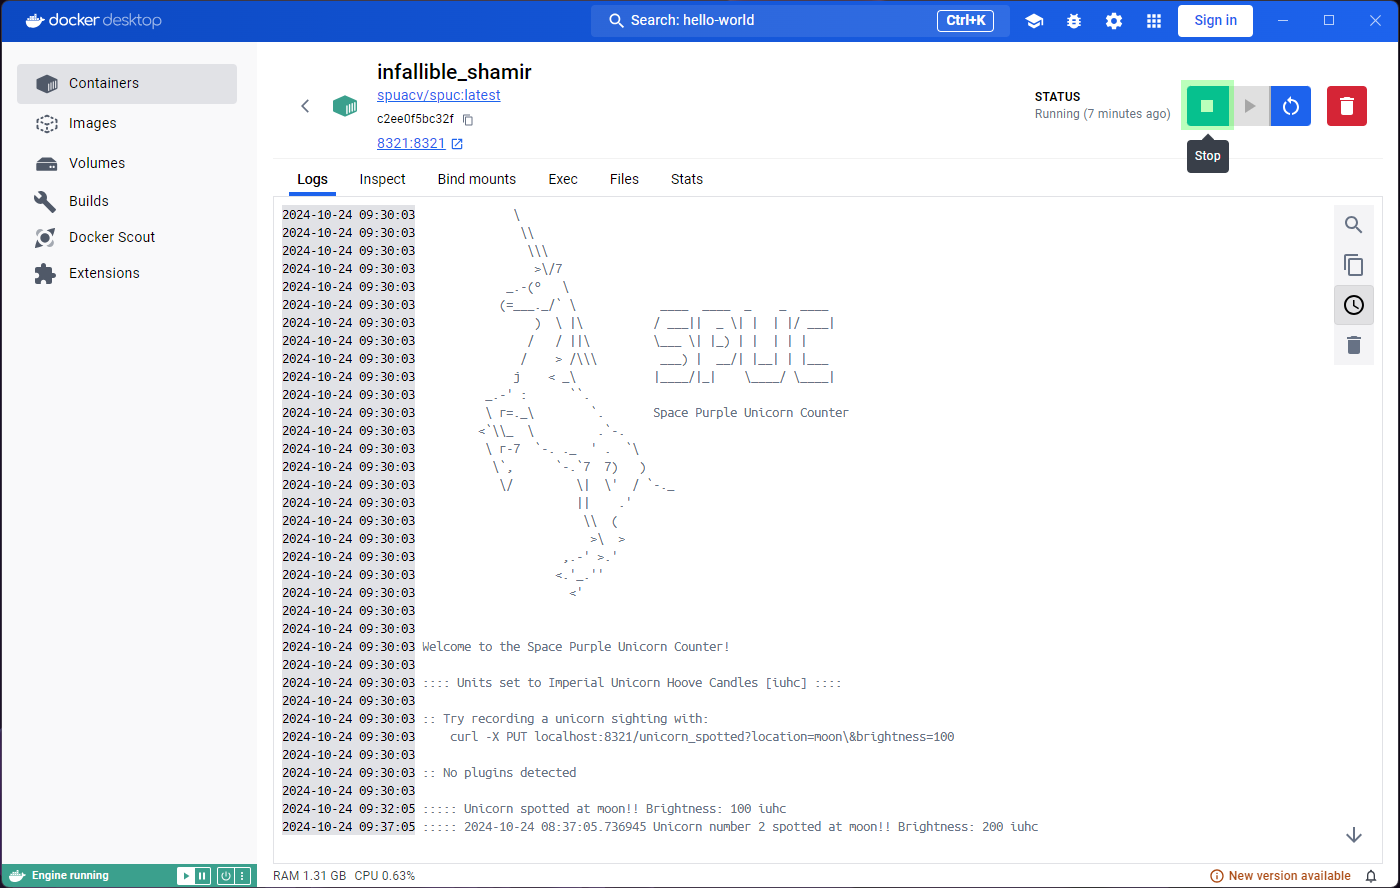
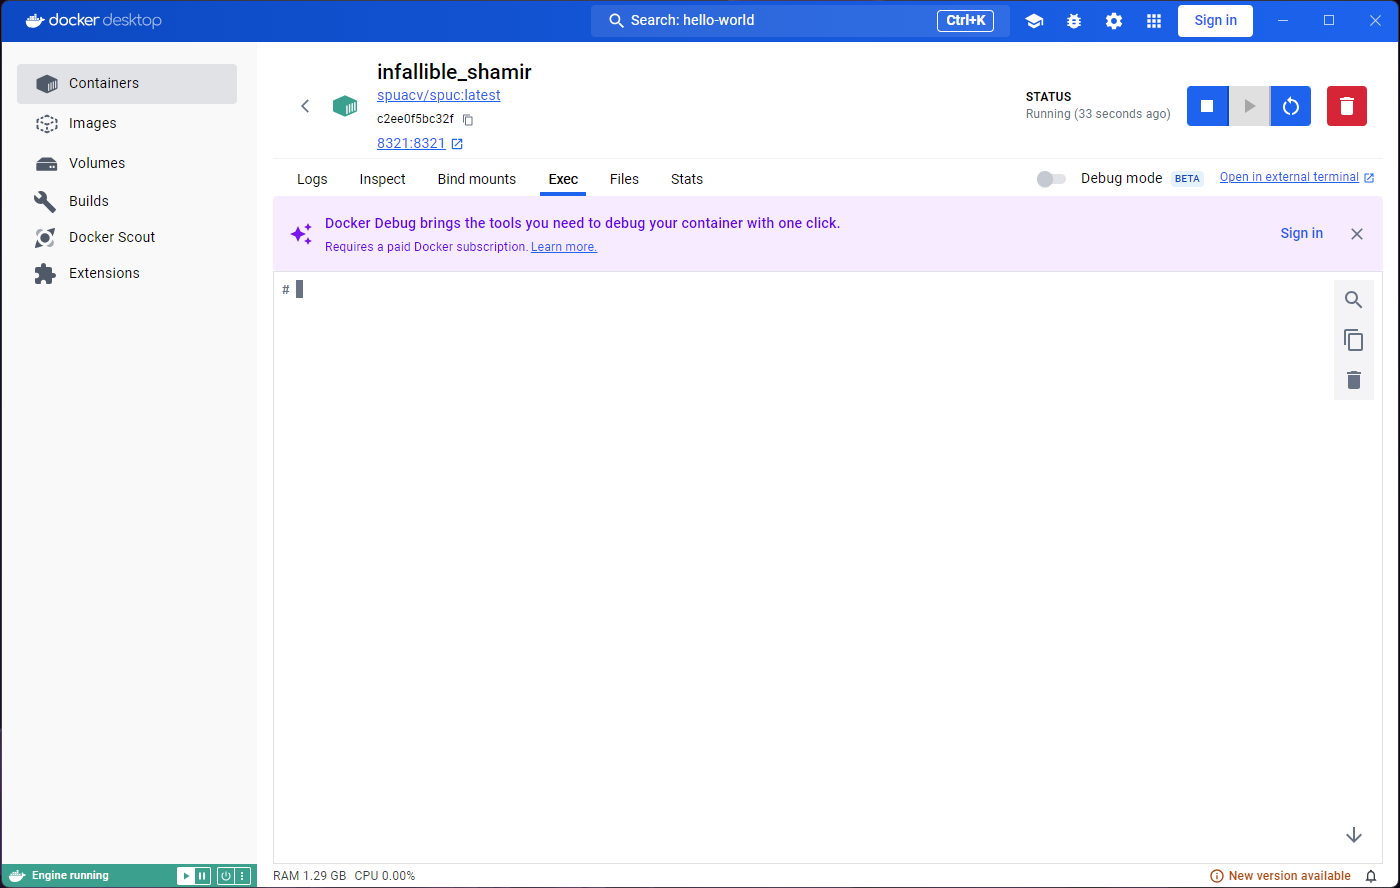
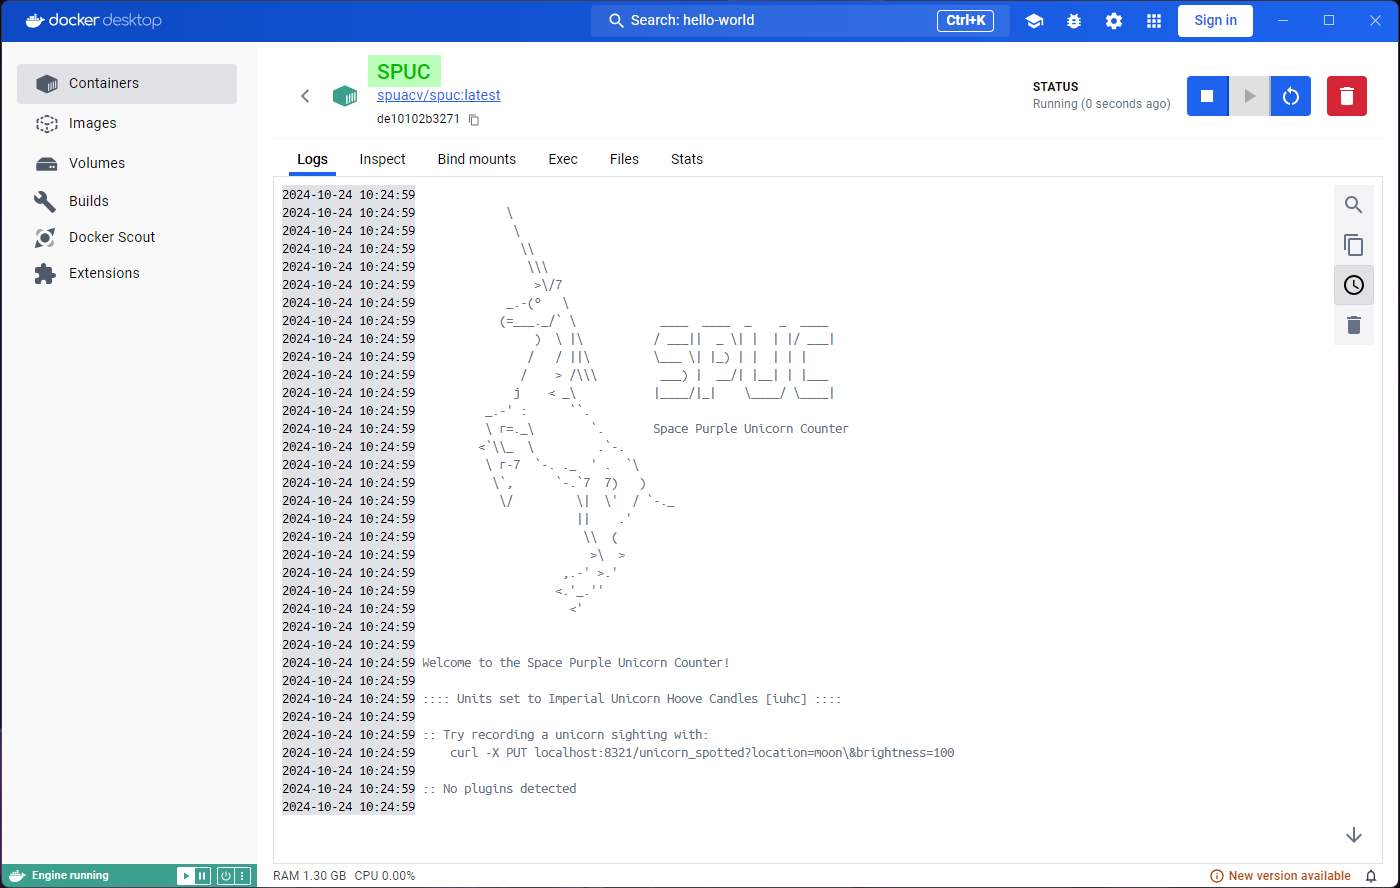
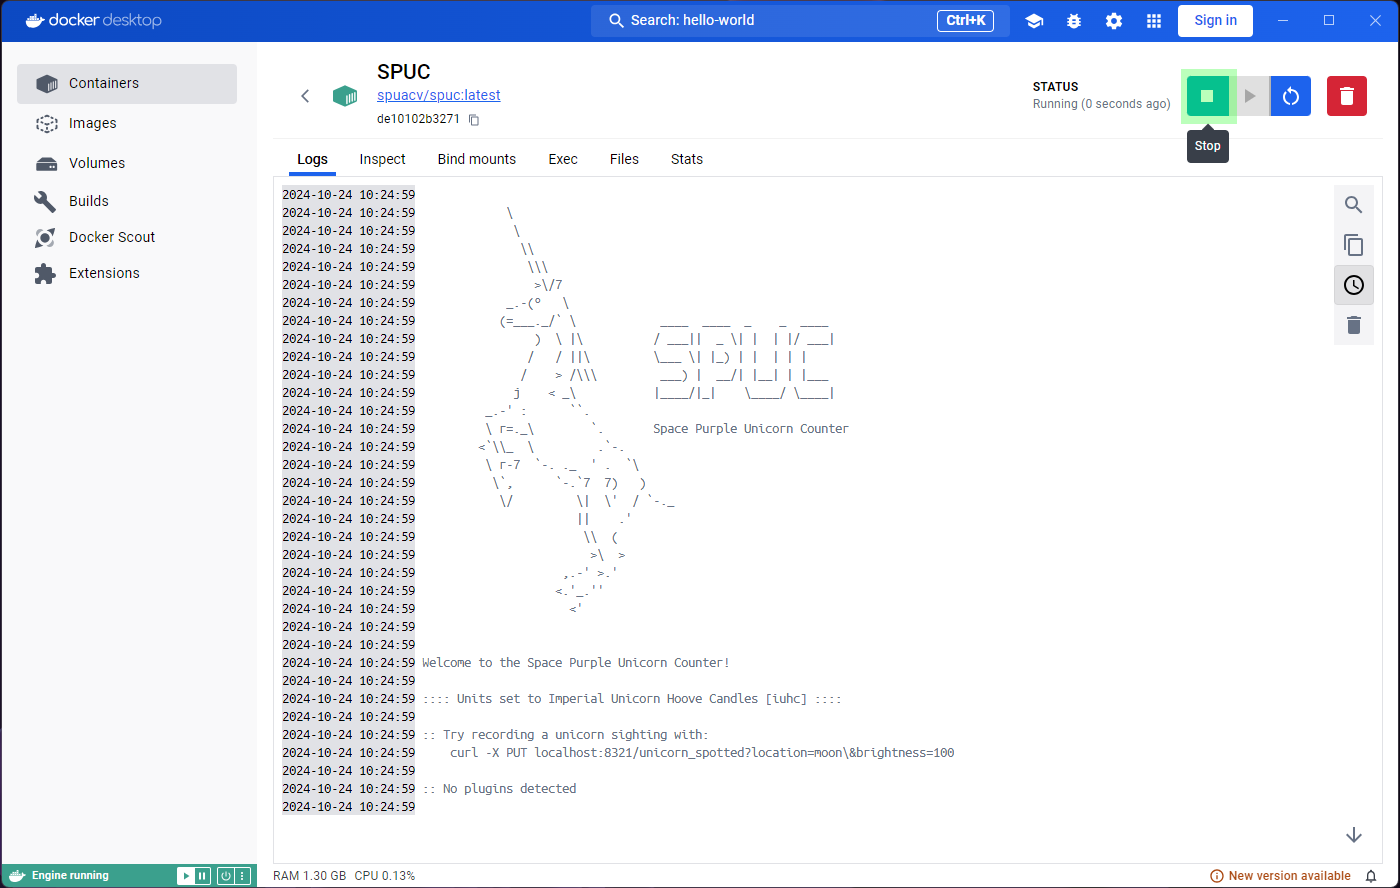
We are now ready to run it. You can immediately notice the status
under the container name is Running, and instead of an
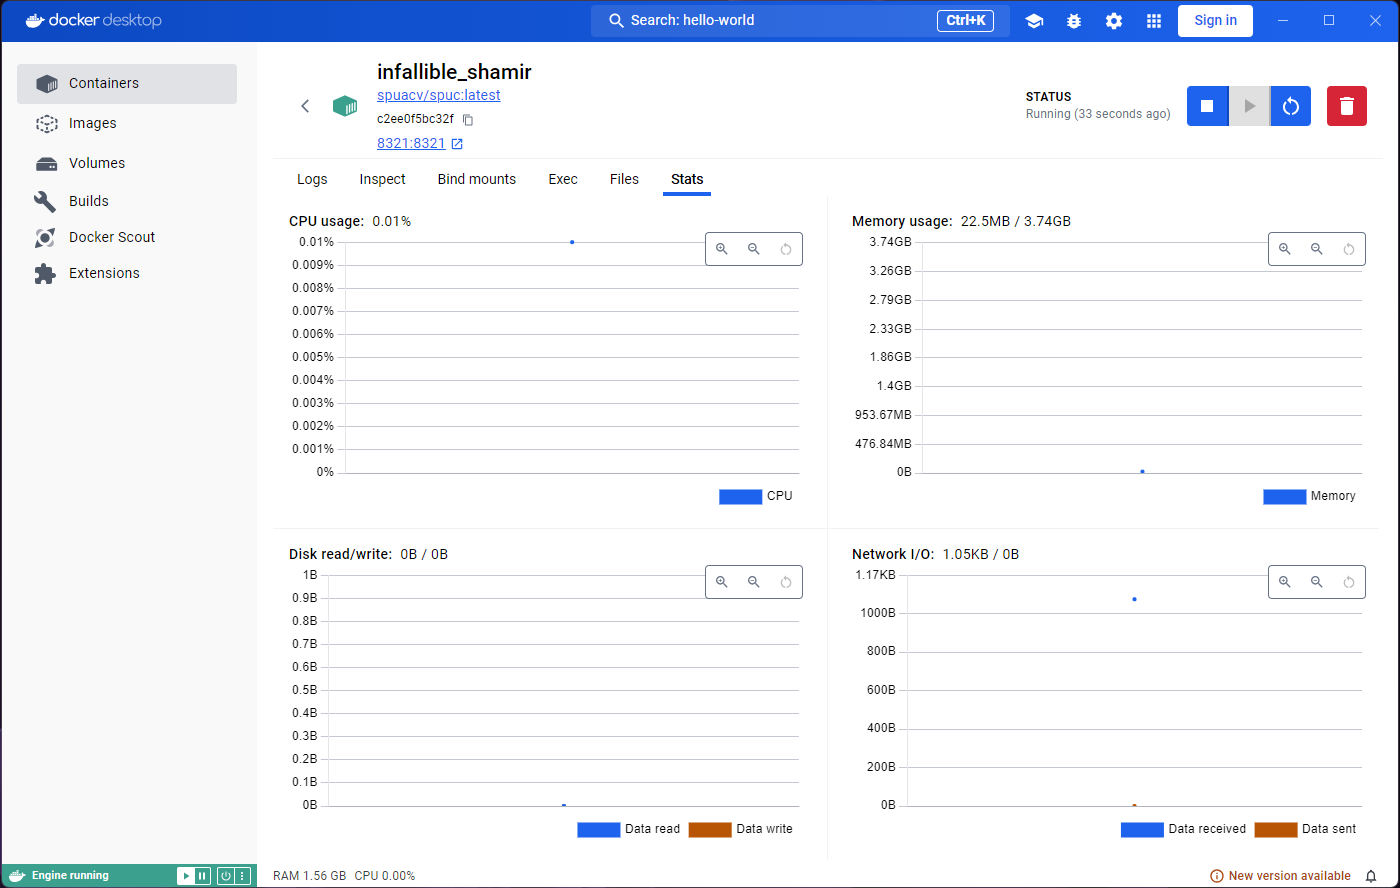
option to start the container, we now get the option to stop it. The
Logs tab is not too different, but the Stats
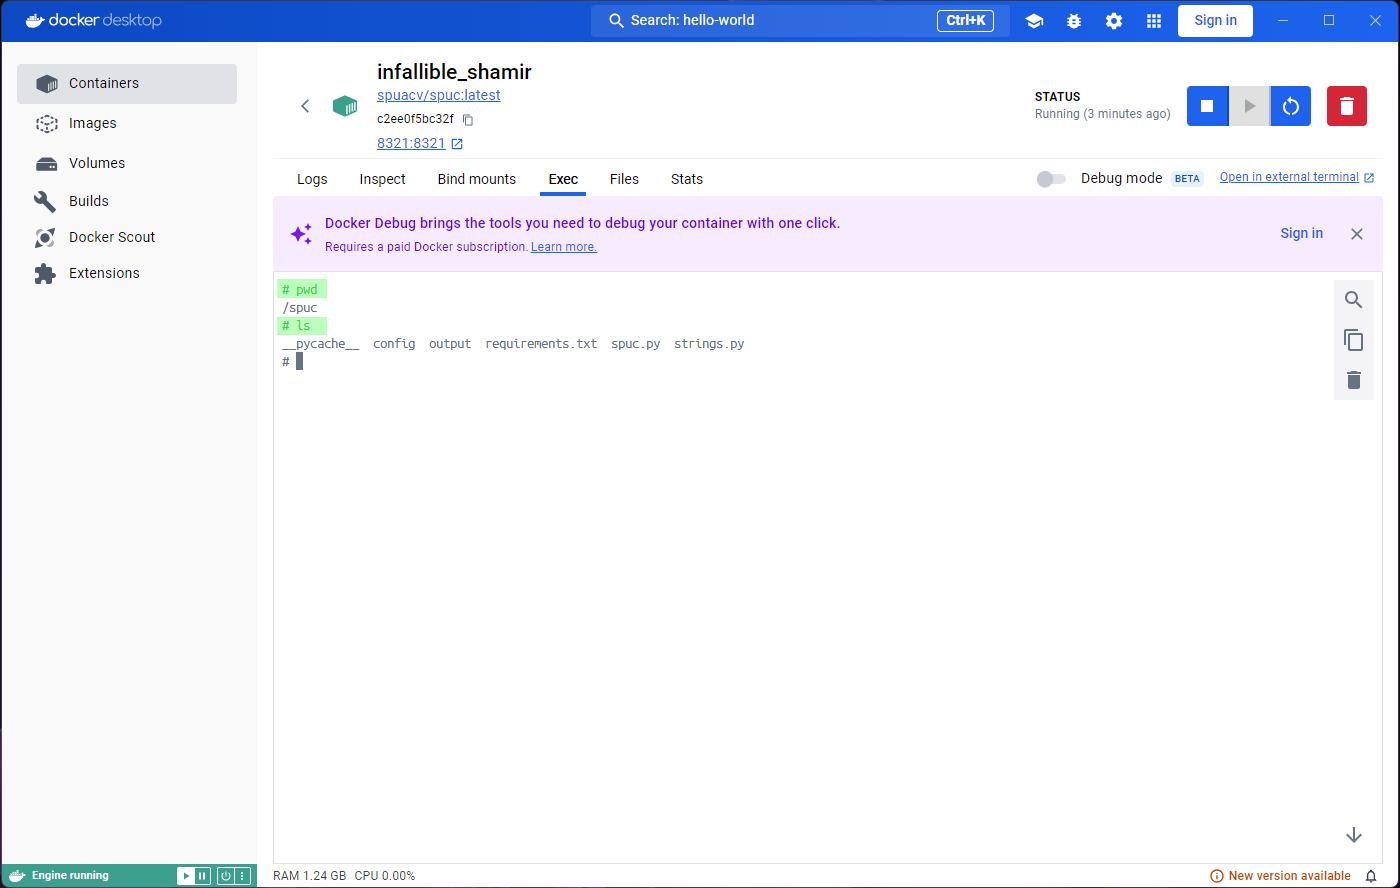
tab already shows more information. The Exec tab also looks
more interesting, we get access to a terminal inside the running
container.
Before trying to do anything in the terminal, let’s look at the
container list by clicking on the Containers tab on the
left. You’ll see the green icon of the container indicating that it is
still live, and indication of how long it’s been running for.
Clicking on the container name again will take us back to the
Logs tab in the container.
Spot a unicorn!
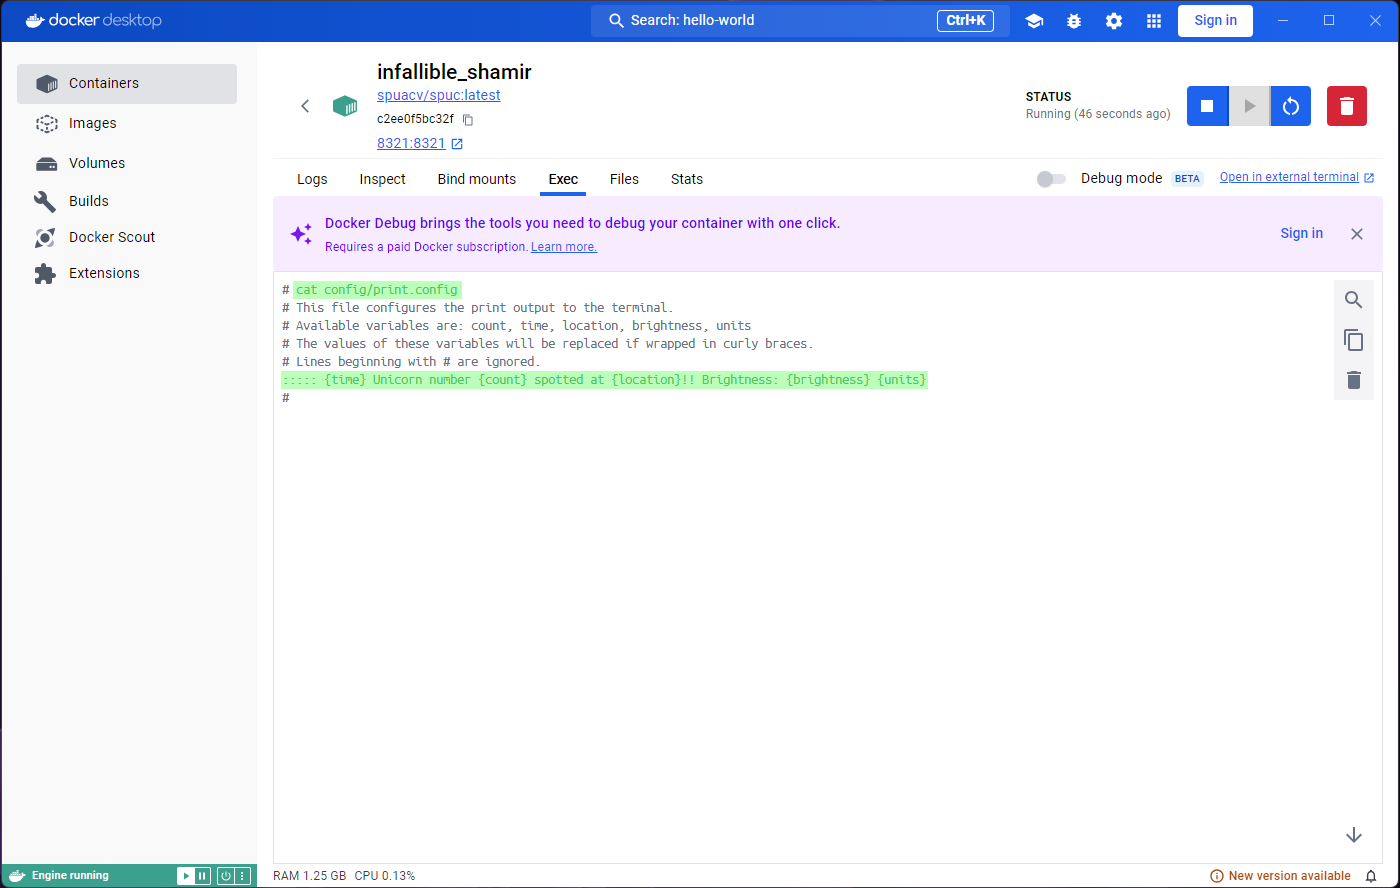
If you look at the logs, you’ll see that the SPUC container is instructing you on how to interact with it. Lets go ahead and try that. Open a terminal and run the command
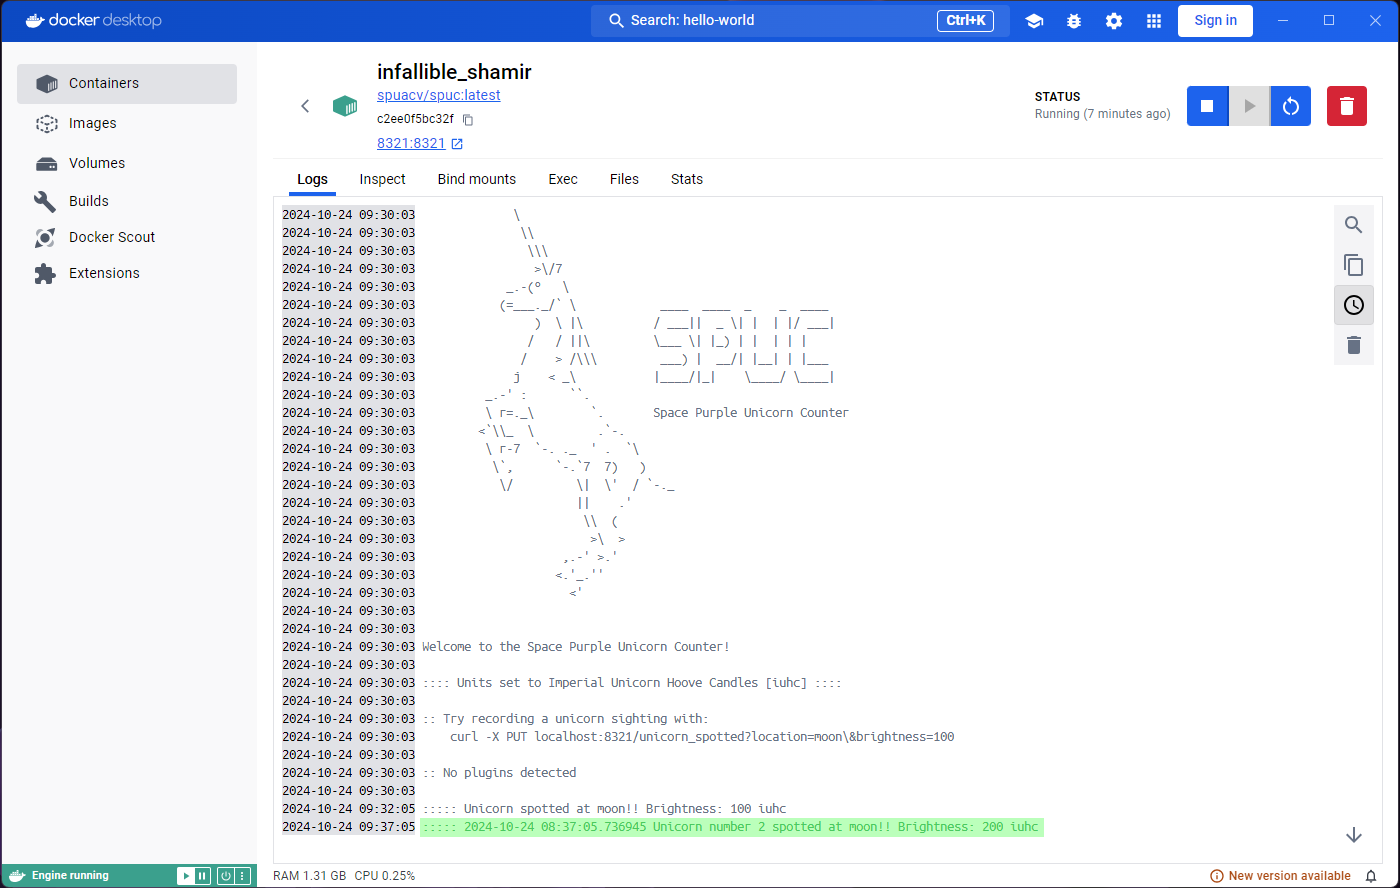
If you look at the logs again, you’ll see that the container has responded to your command with something like:
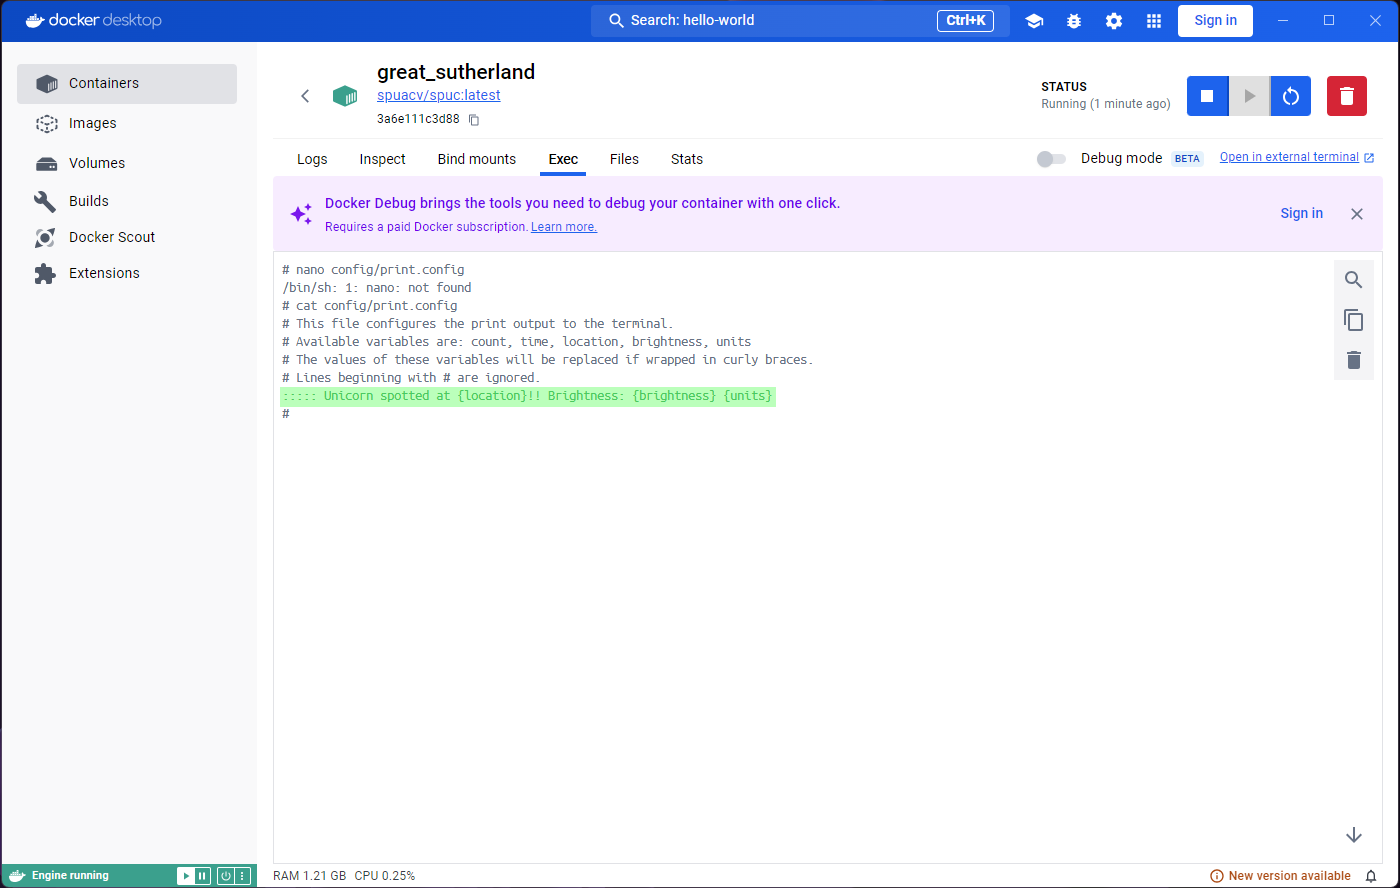
The documentation also mentioned that you can configure this print by
modifying the print.config file. How do we do that?
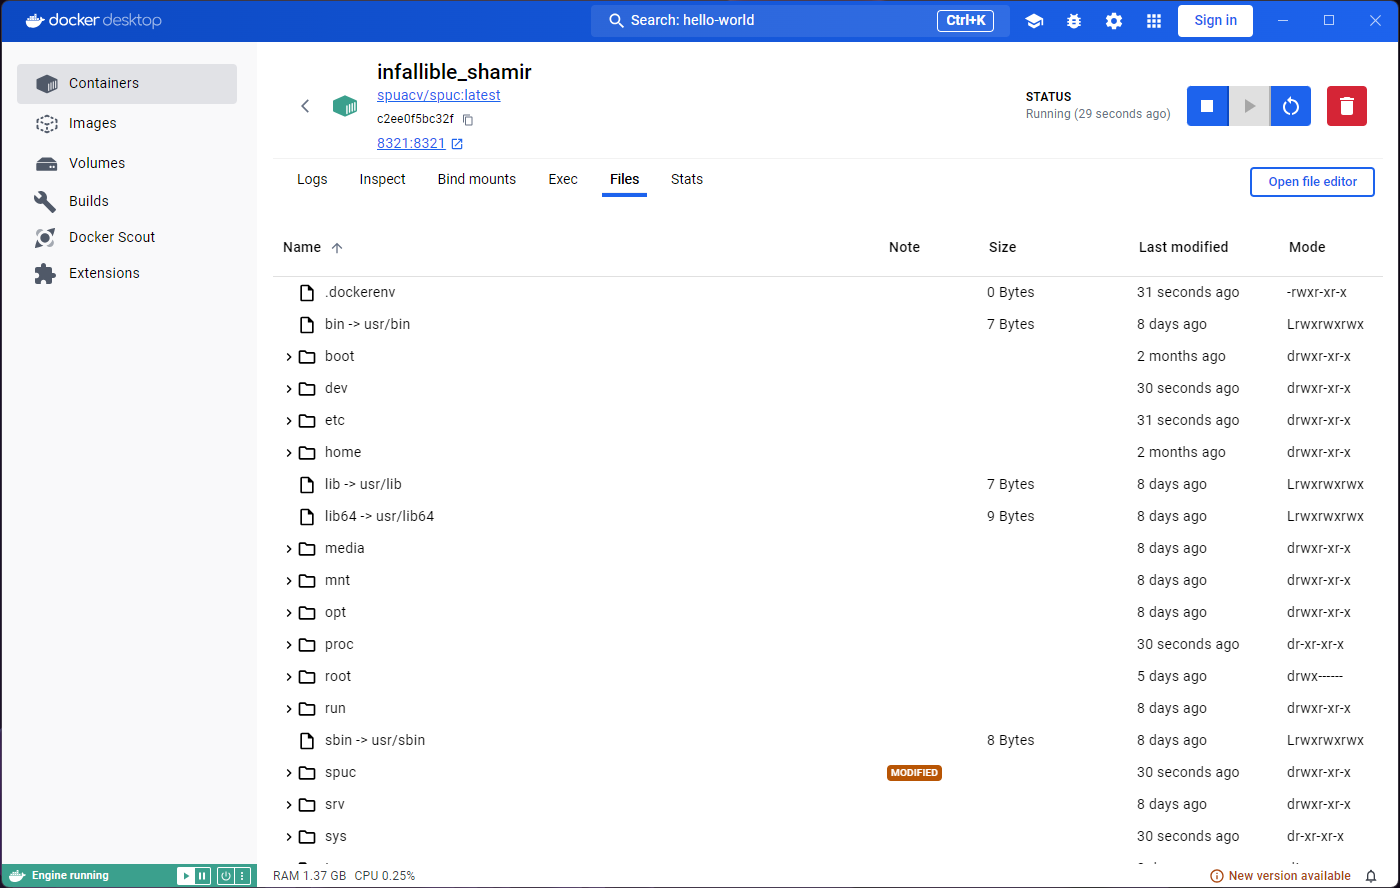
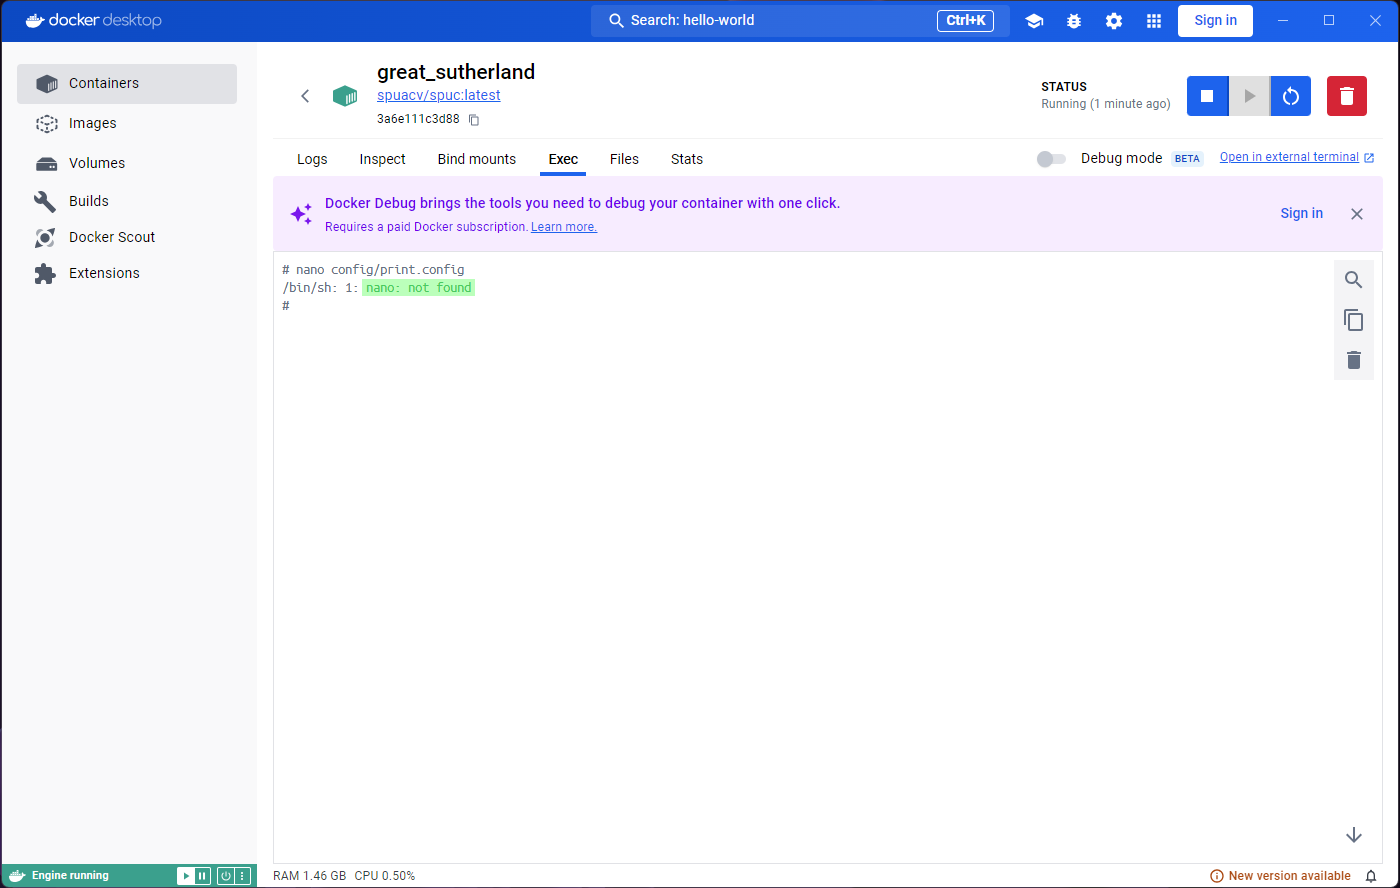
Let’s try and interact with the terminal inside the container.
If you print the working directory with pwd you’ll get
the app’s base directory: /spuc. You can also list the
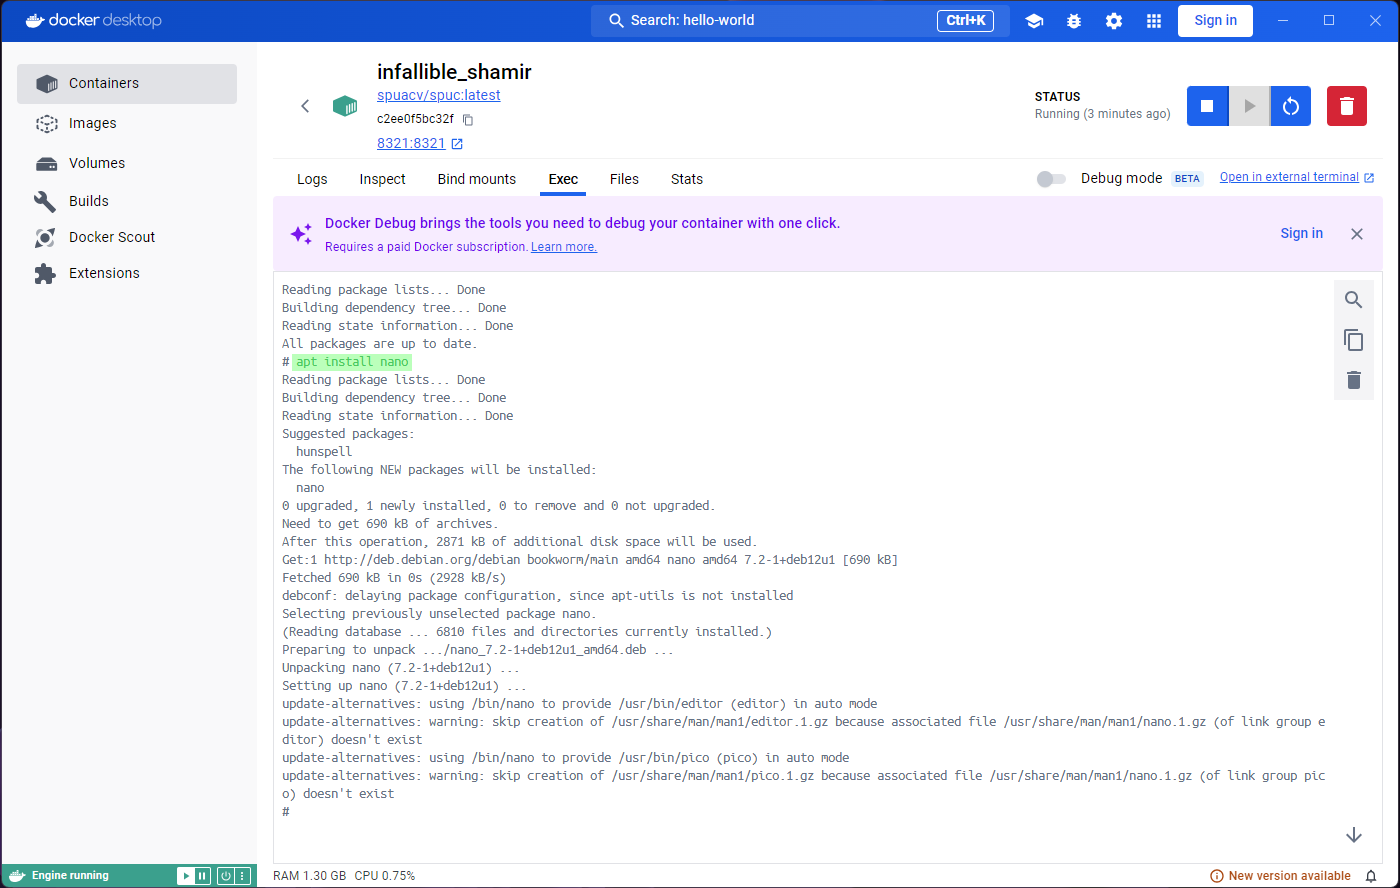
contents with ls, and look at the app’s code. We can even
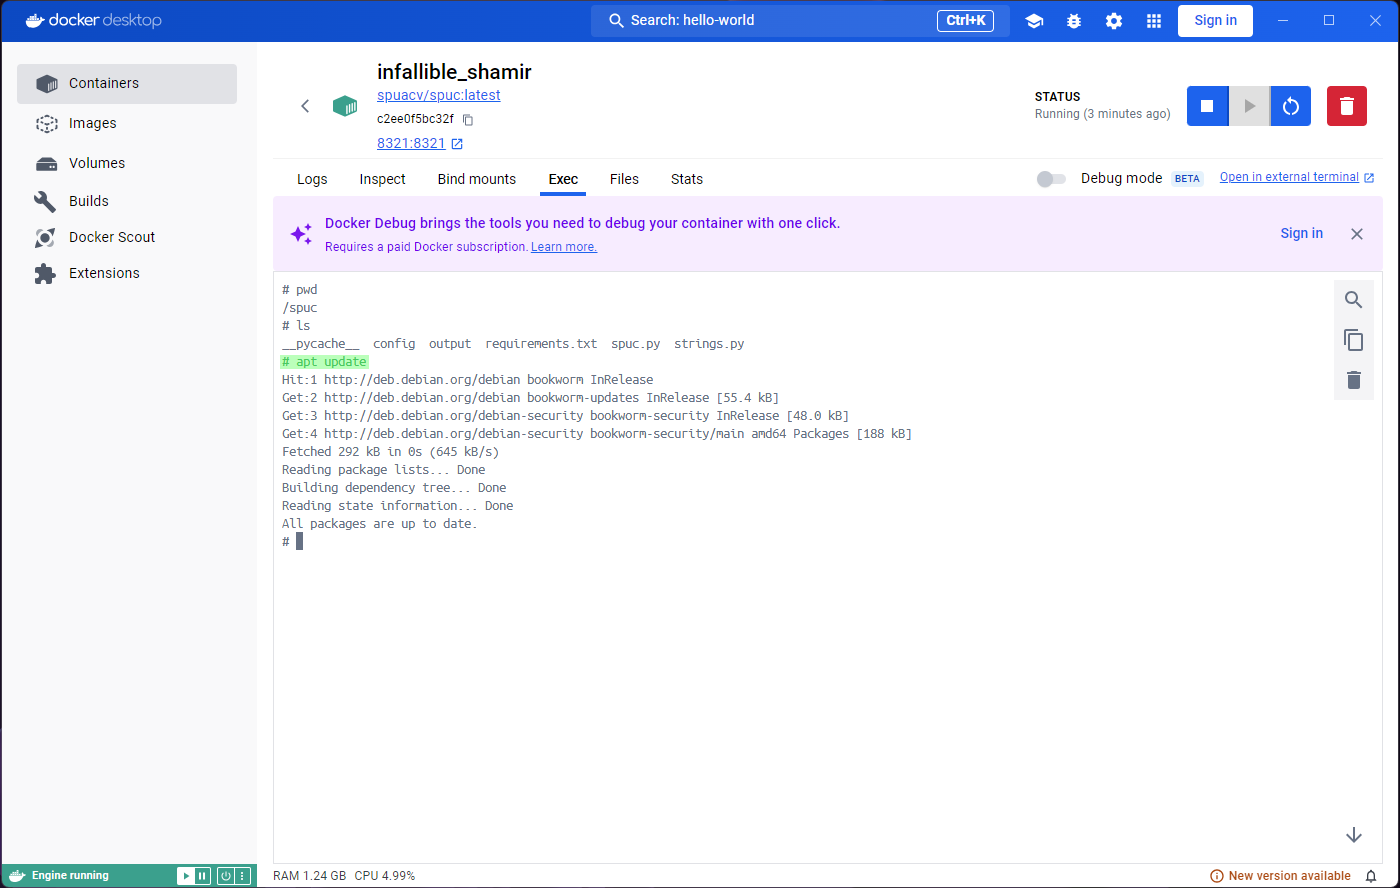
run apt update and install something; for example
apt install nano.
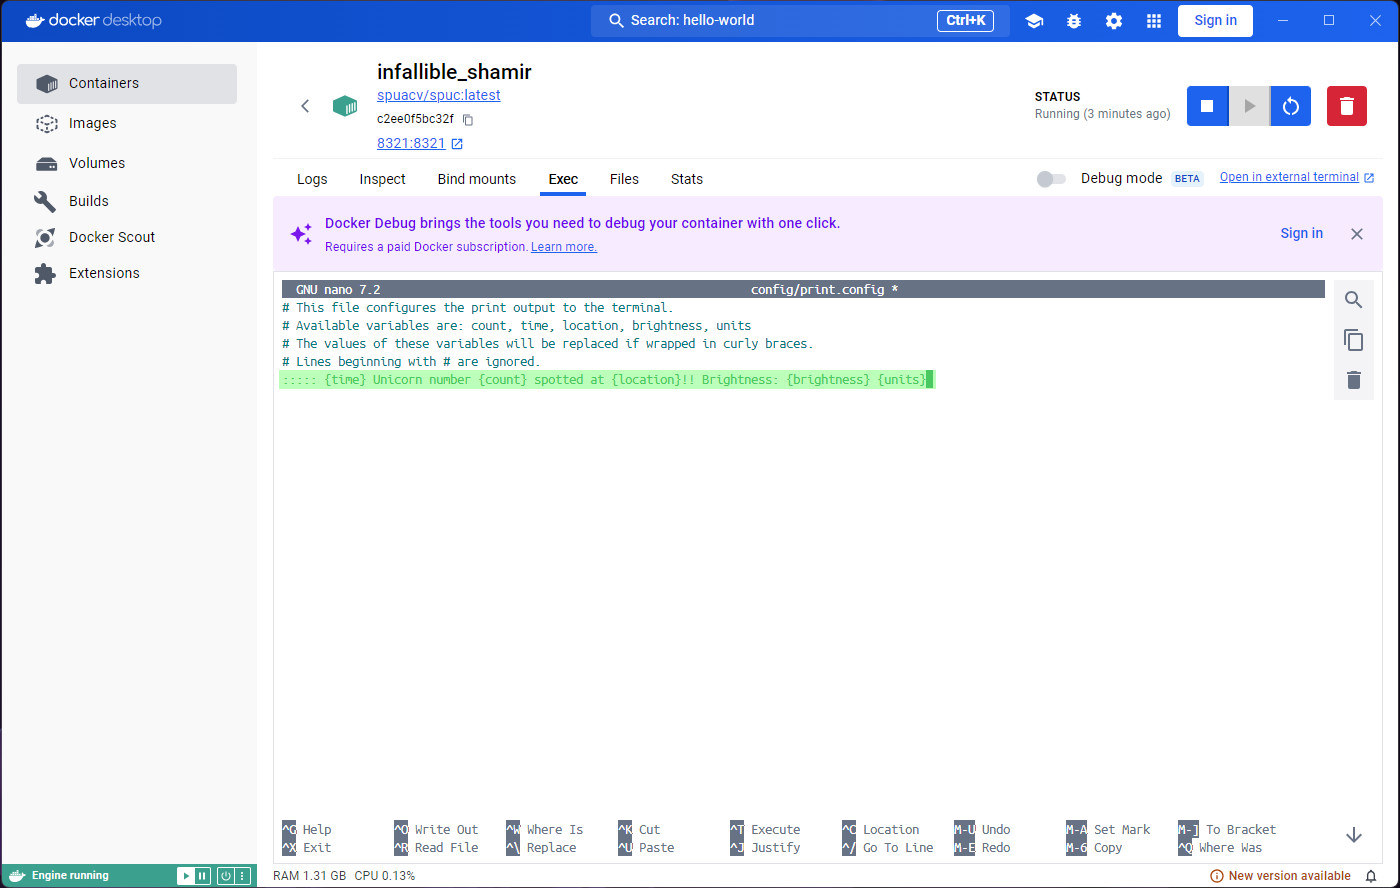
As you might expect, We can also modify things, like for example the
print.config file. Since we have installed nano, lets use
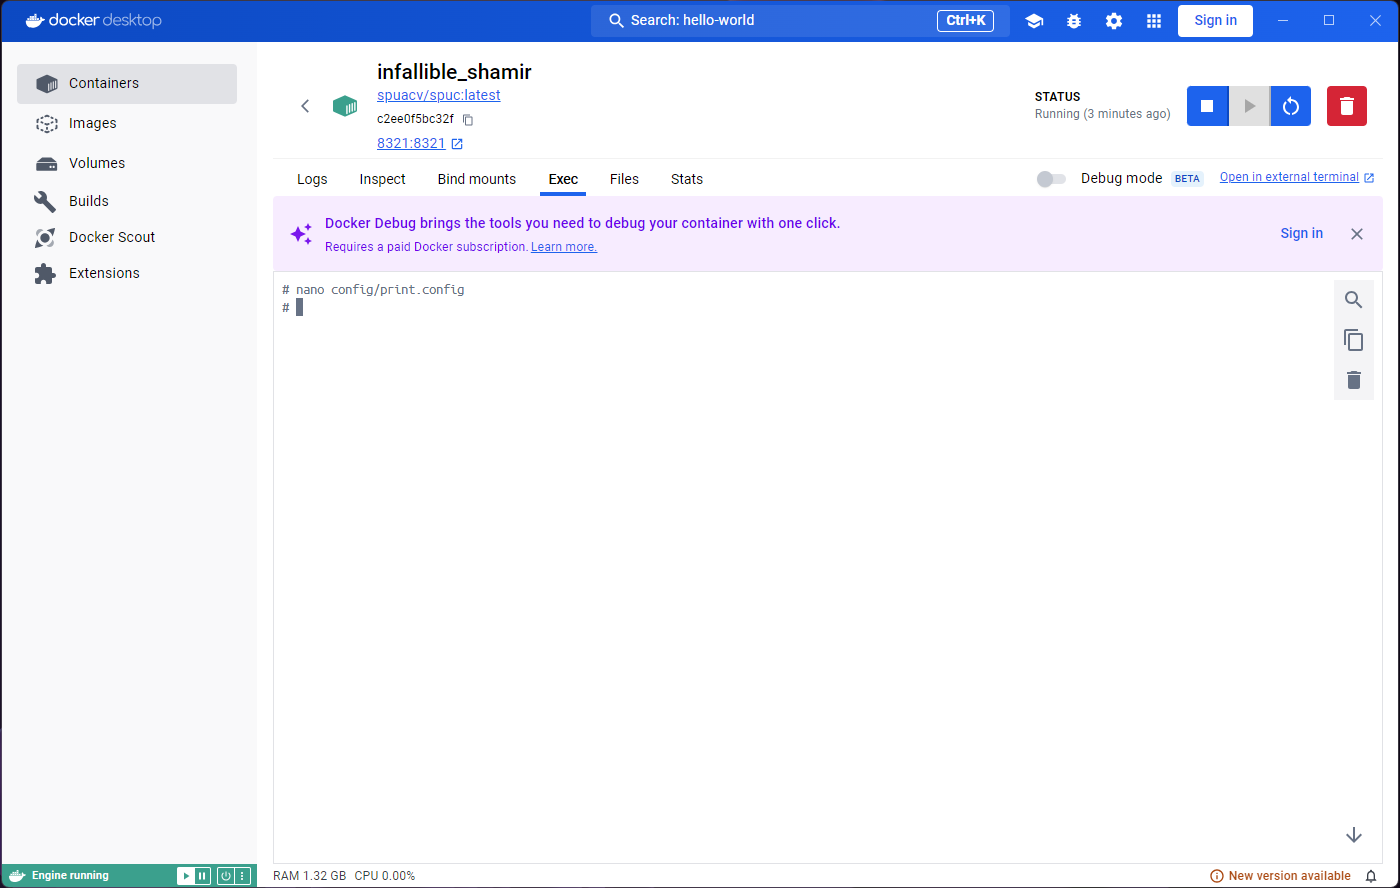
it to edit the file. Run nano config/print.config and
you’ll see the contents of the file. Replace the the print config line
with:
::::: {time} Unicorn number {count} spotted at {location}!! Brightness: {brightness} {units}Another curl now should show the changes we made to the
print.config file.

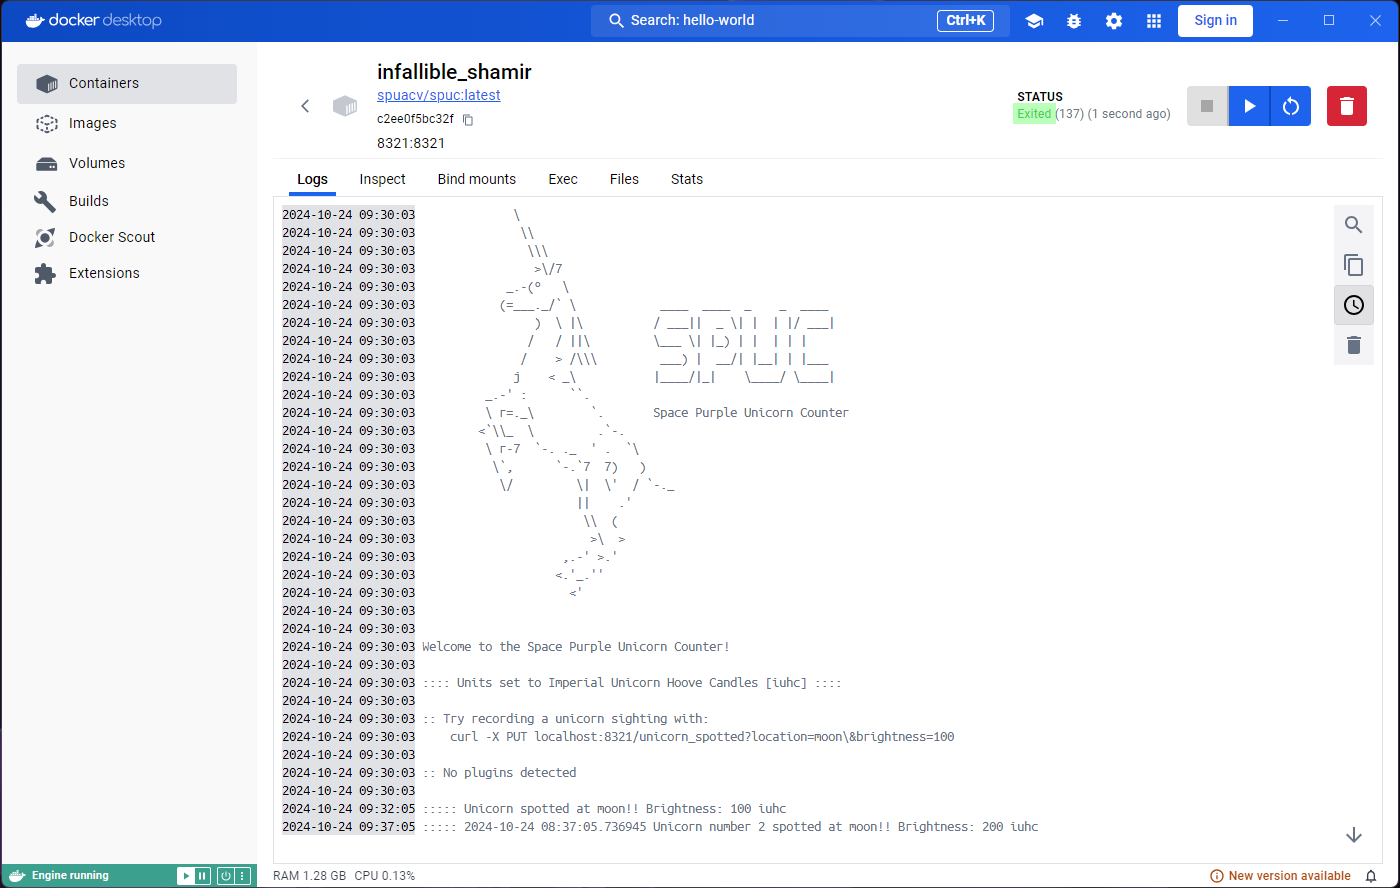
At this point, it seems like the container is very much like a virtual machine, and we can do whatever we want with it. However, as we’ve mentioned before, containers are meant to be ephemeral.
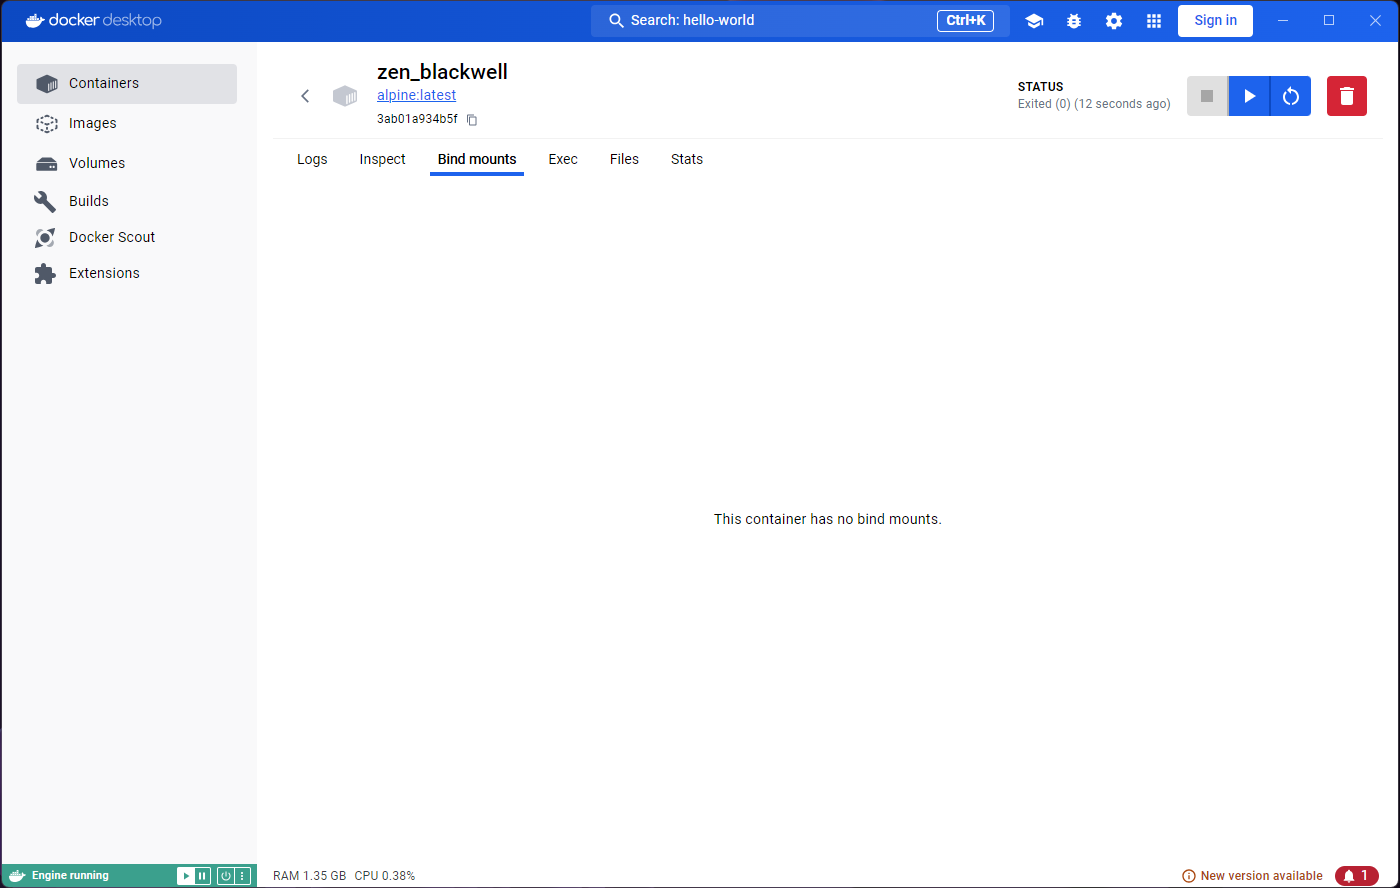
If we stop the container, we get a familiar empty tab in
Exec and Stats. The Containers
tab on the left will also show the container status as
Exited.
Lets go back to the Images tab, and run the
spuc image again. Now lets go to the Exec tab,
and try and edit the print.config file again. You’ll notice
that nano is not there anymore. If you look at the contents
of the file, for example with cat config/print.config,
you’ll see that the changes we made are gone.


When we re-ran the image, we created a new
container. The new container is created from the template saved
in the image, and so our changes have banished. This becomes very clear
when we go back to the Containers tab on the left. We can
see that the first container we created from the spuc image
is there, next to the new container (which is still running, by the
way).
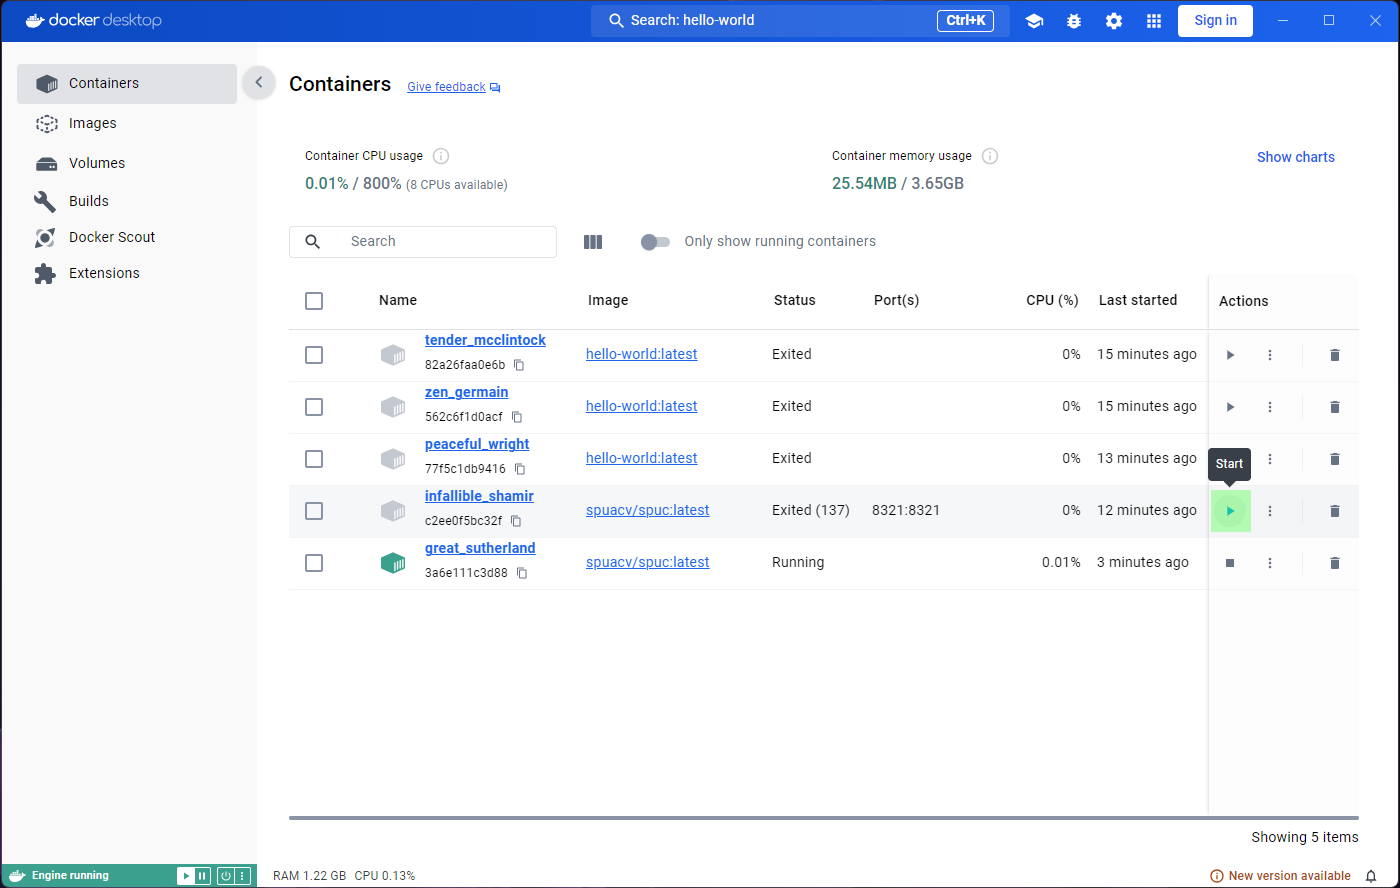
Reviving containers
We can get the old container running again, although this is rarely something we’d want to do.
In Docker Desktop, all we need to do is click on the
Start button from the Containers list. The
terminal will appear empty, because it is a new session, but you will be
able to see the changes we made before.

Naming containers
We’ve been a bit sloppy with the containers, and they all have random names. It is possible to name the containers when we run them, and this can be very useful. However, it can also cause us problems.
Lets run the spuc image again, and name the container
SPUC.

If we look at the container list, it is much easier to find it, so the name is useful!
However, we forgot to map the port. So lets stop this container, and launch another one. This time we’ll map the port, and use the name we wanted.
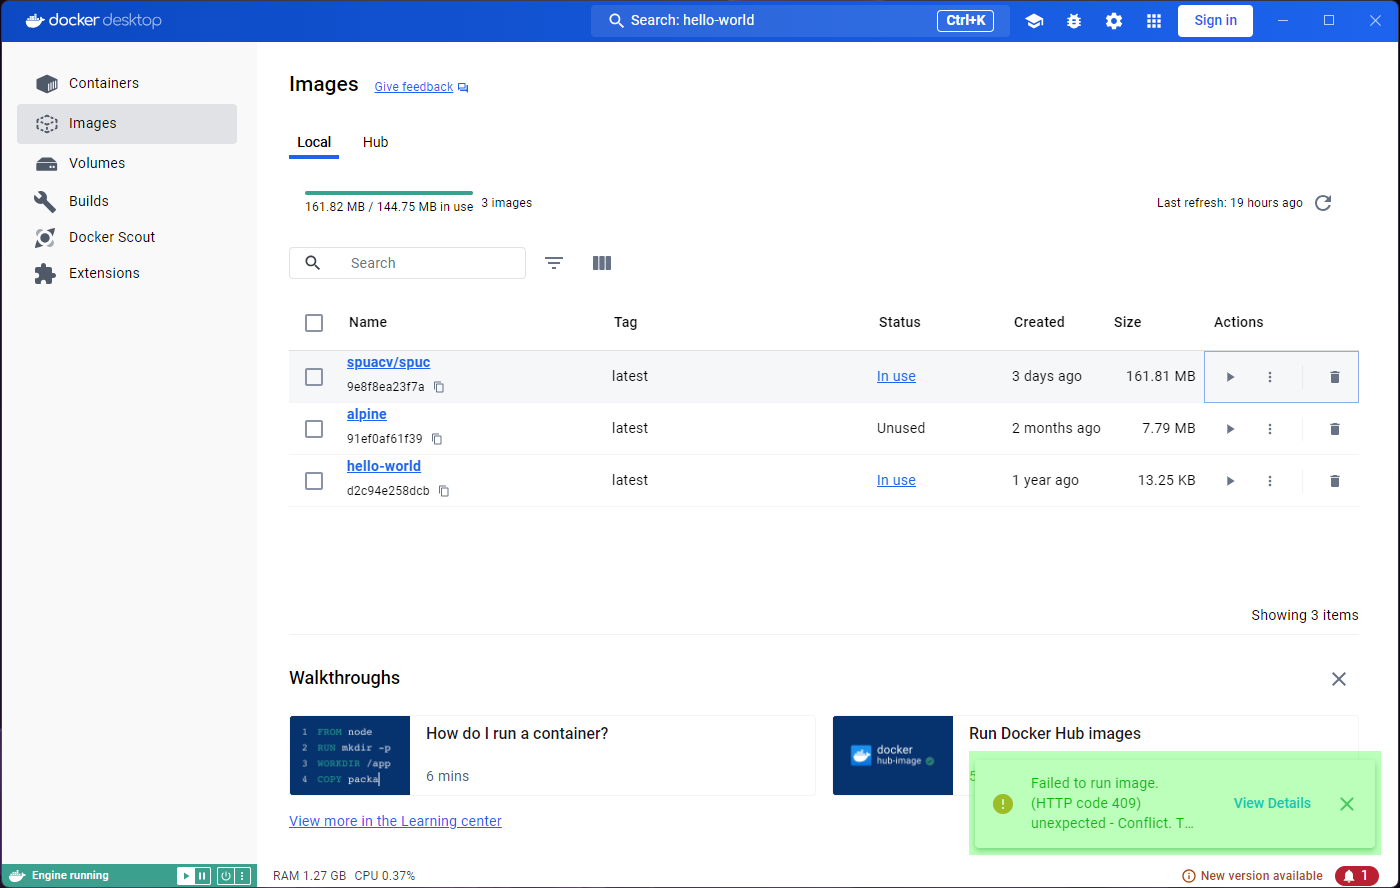
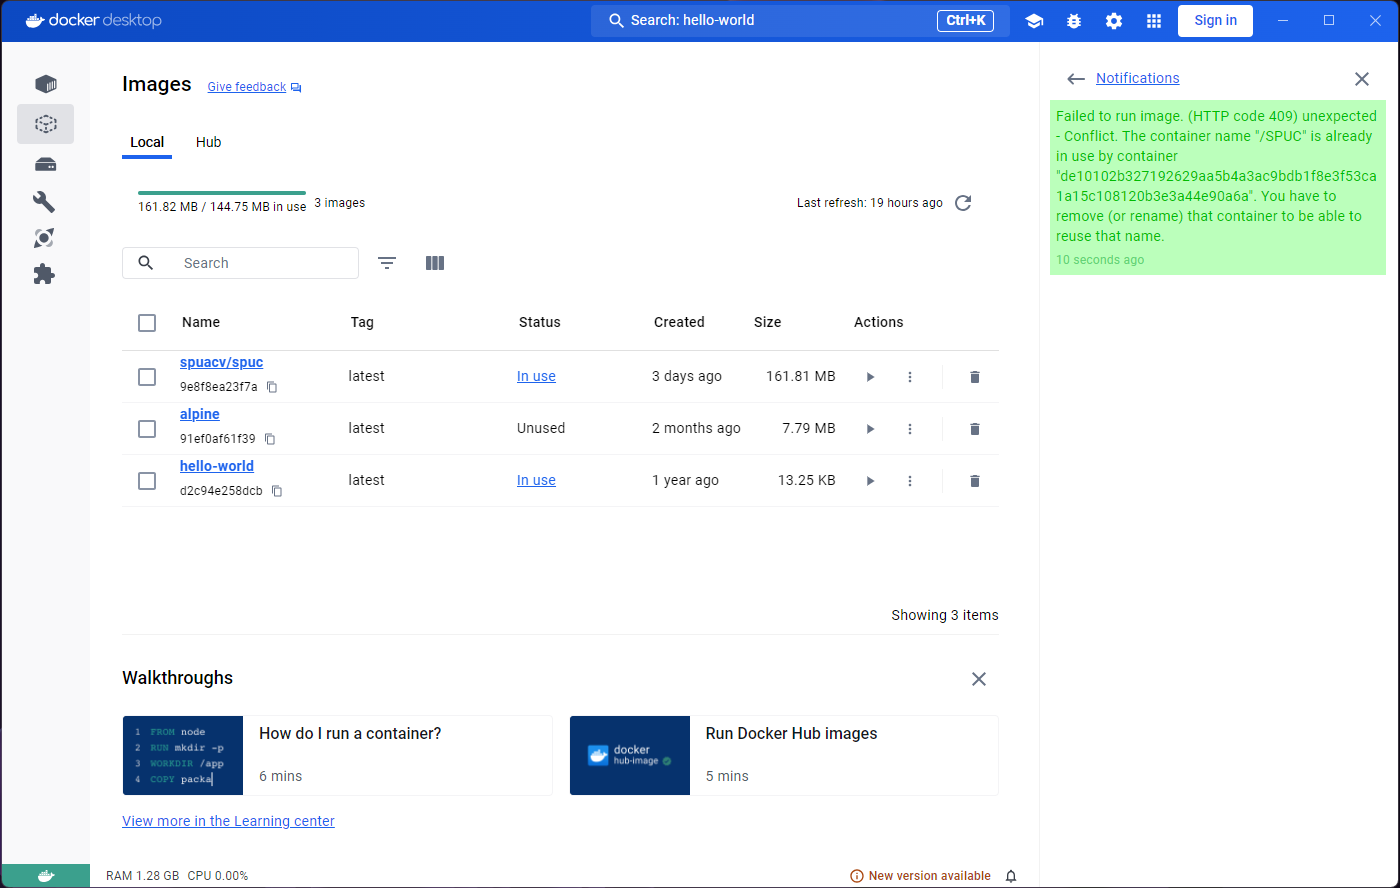
This time we got an error! This is because the name SPUC
is already “in use” by another container. If we want the same name,
we’ll have to delete the old container first.
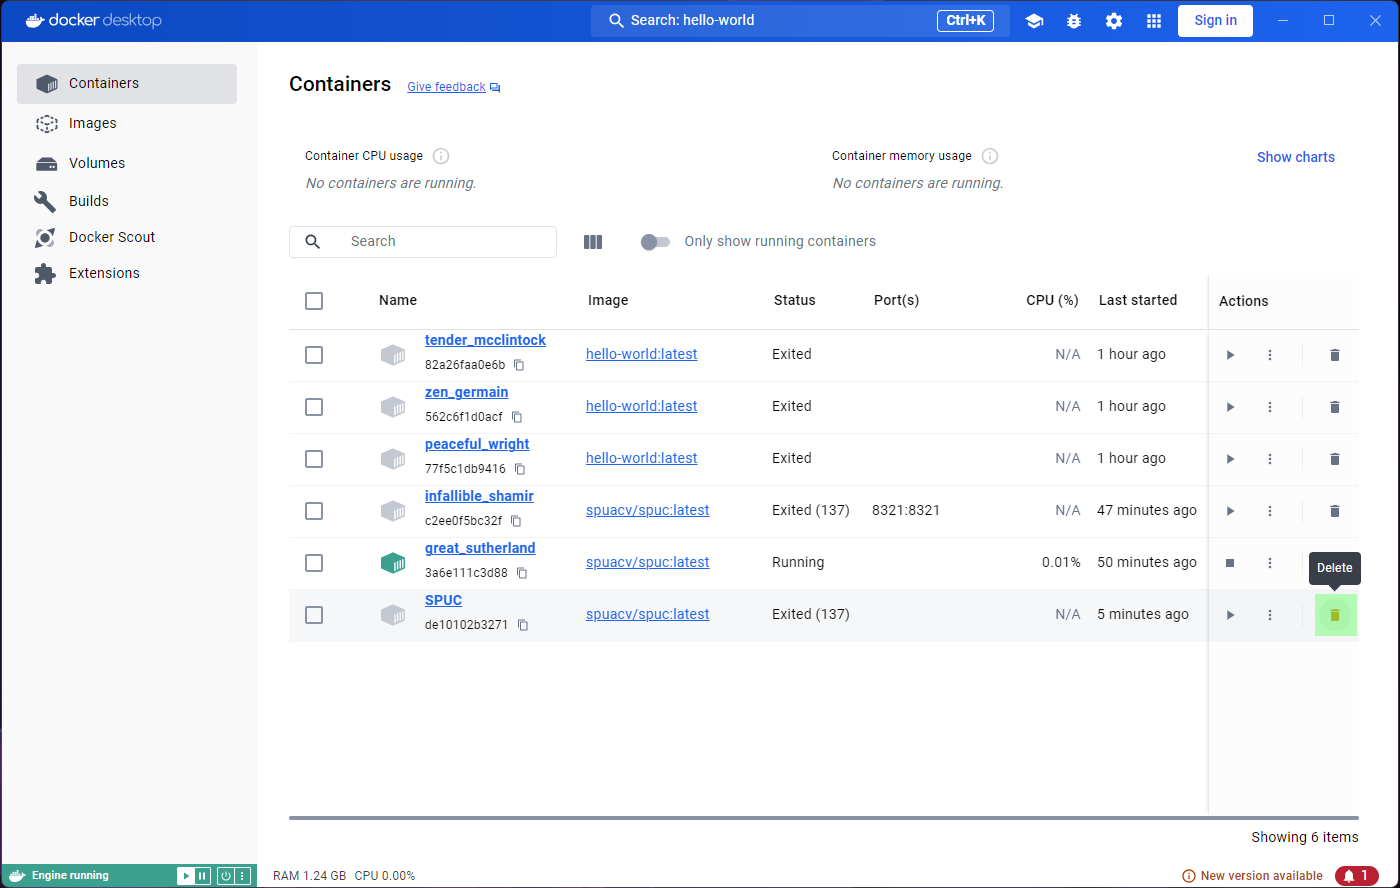
Cleaning up
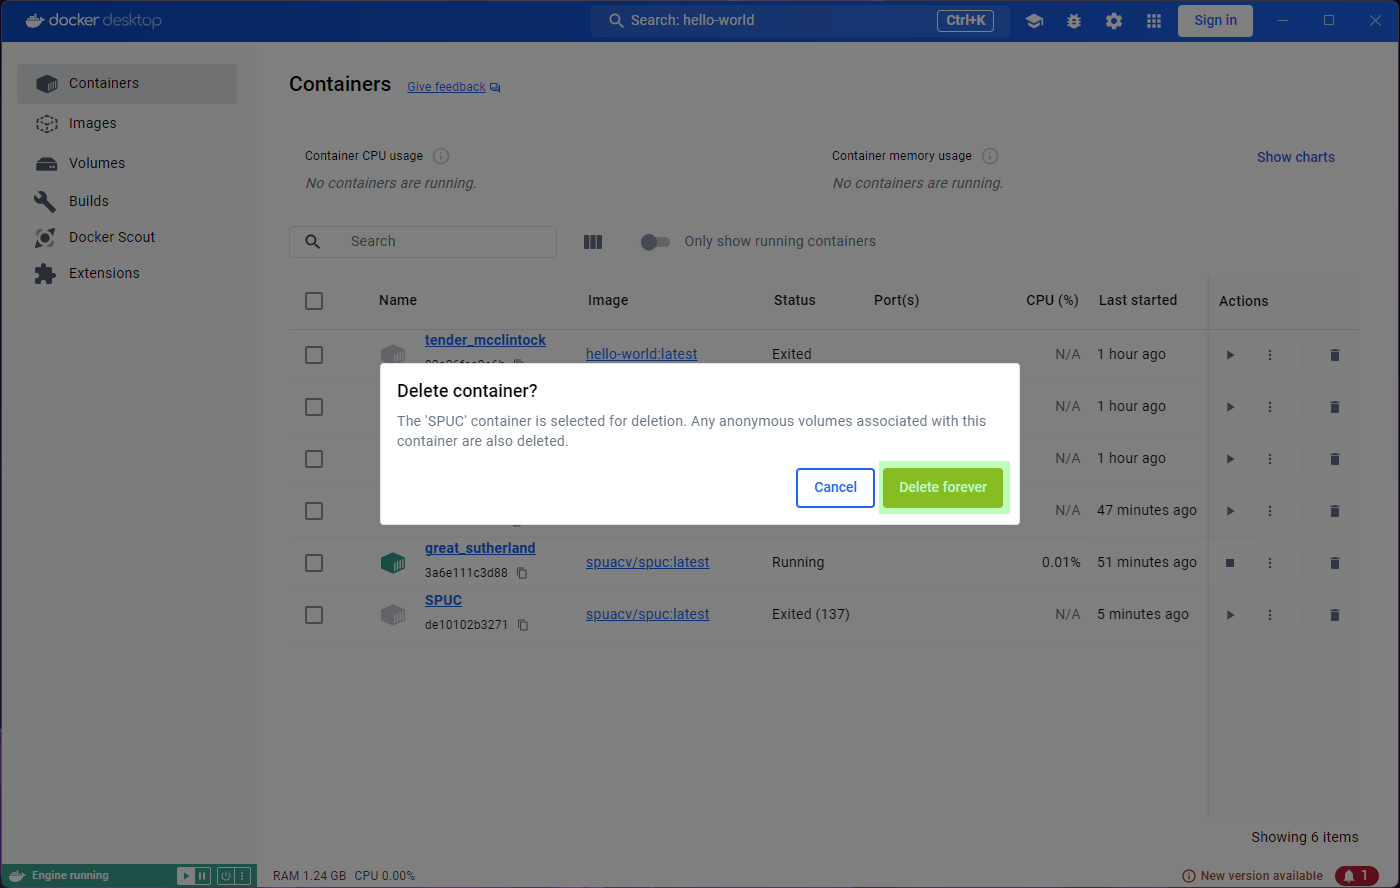
Lets go to the containers list, and delete the SPUC
container. There is a very convenient bin icon on the right, which will
prompt you for confirmation.
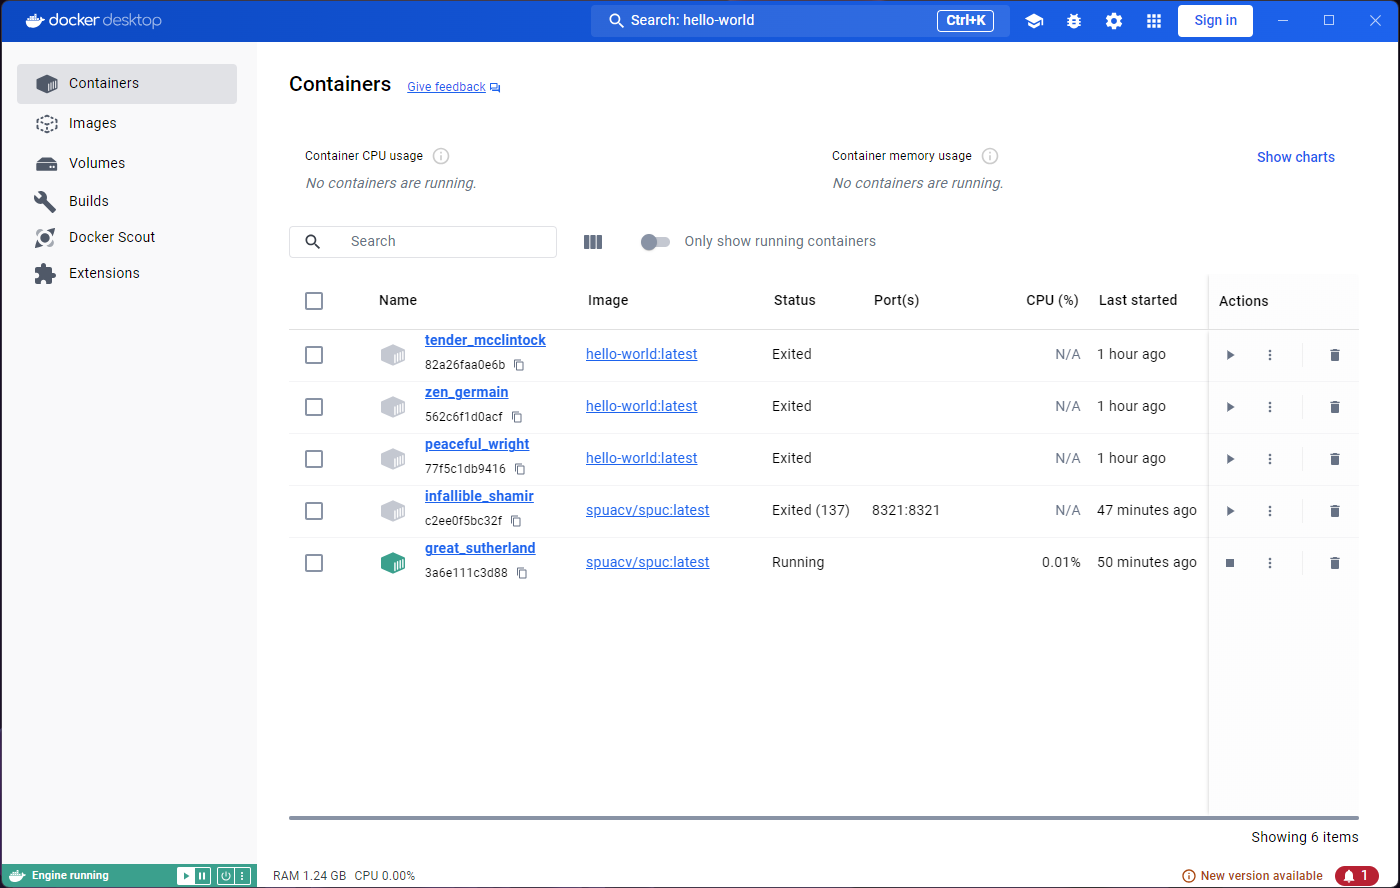
You should now be able to run the spuc image again, and
name the container SPUC. However, if you try to add the
port you’ll find that you still have a conflict. This is because the
port is still in use by the old container, even though it is stopped. If
you delete the randomly named container which had the port map, you
should be able to run the image with the name and port you want.
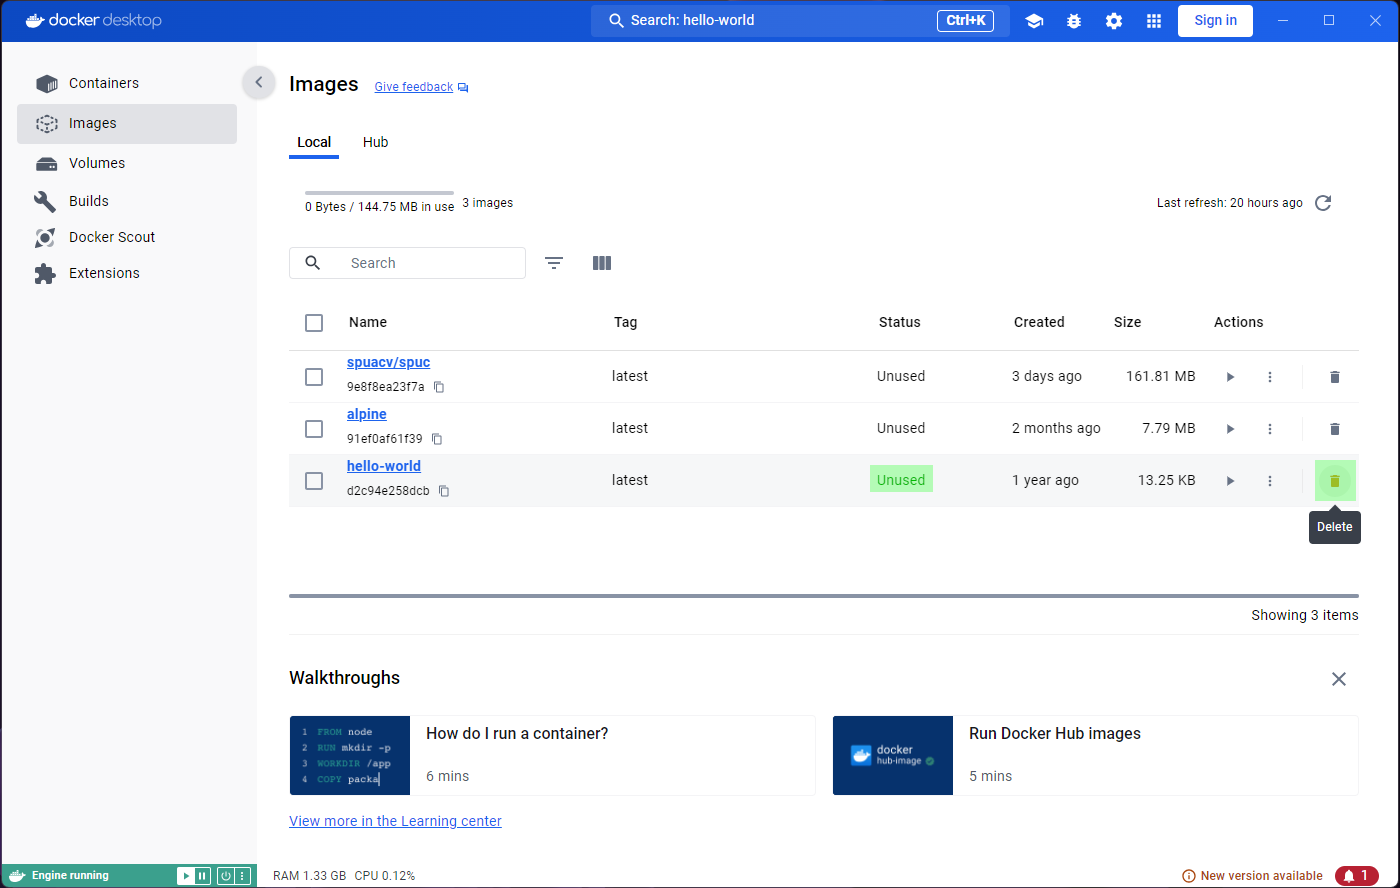
Since we are deleting stuff, the hello-world image was
nice and useful to test docker was working, but it is now rather
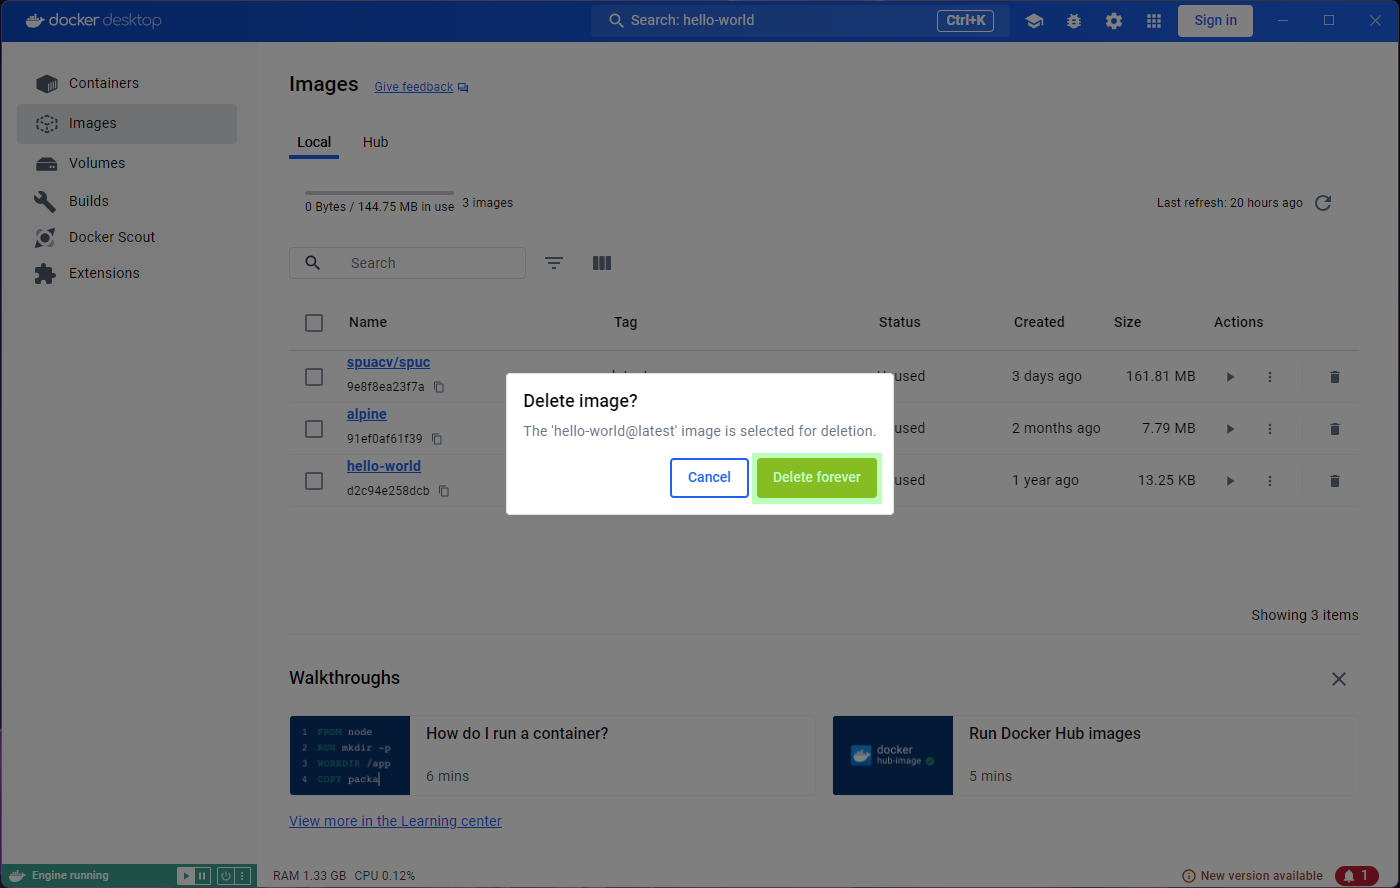
useless. If I want to delete it, the Images tab on the left
has a convenient bin icon to do so. Clicking on it will prompt you for
confirmation, but it will fail.

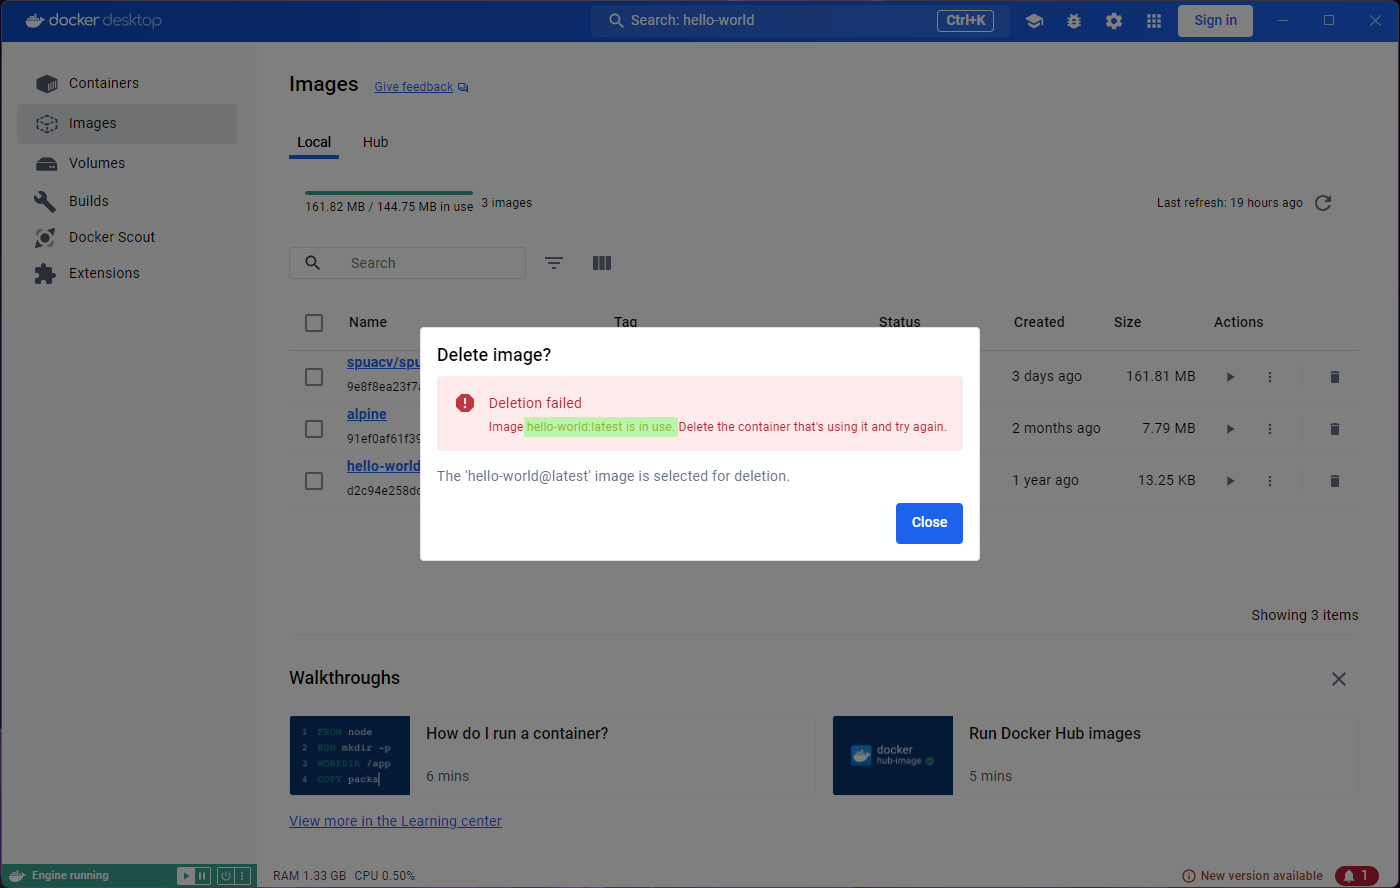
You’ll probably notice that the status of the image is
In use. That seems strange though, given that all the
containers from that image exited immediately.
Lets have a look at the Containers tab. Some of the
containers in the list came from the hello-world image.
They are now stopped, but the fact that they originated from the
hello-world image is enough.
We’ve only been using Docker for very little, and we already have a long list of containers! You may see how this can become a problem; Particularly so because we were a bit sloppy and did not name the containers.
Let’s try and get rid of the containers then. We can conveniently
select them all with the tick-box at the top, and an option to
Delete shows up. Clicking on it will prompt for
confirmation, and we can go ahead and accept.
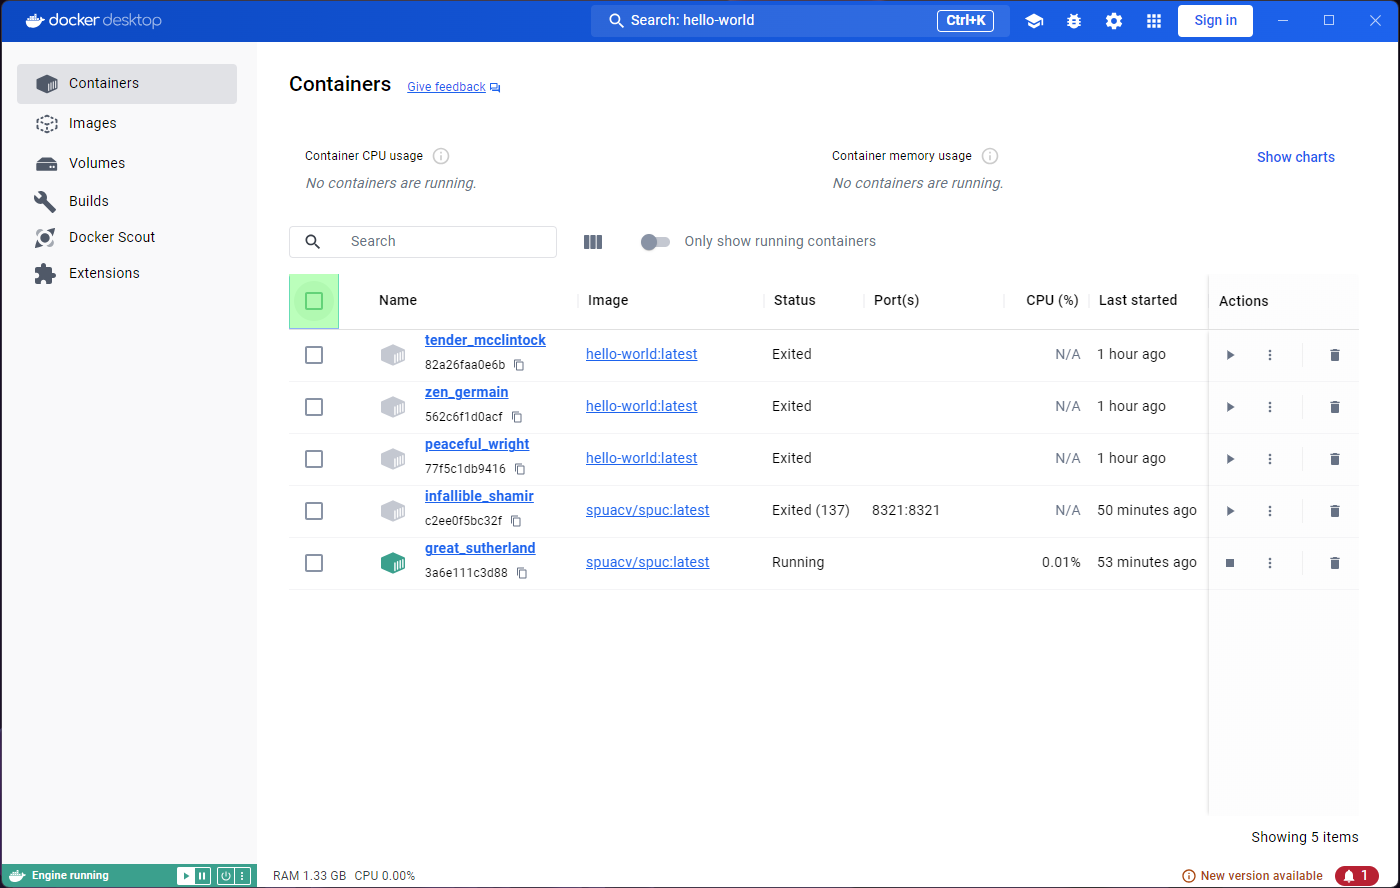
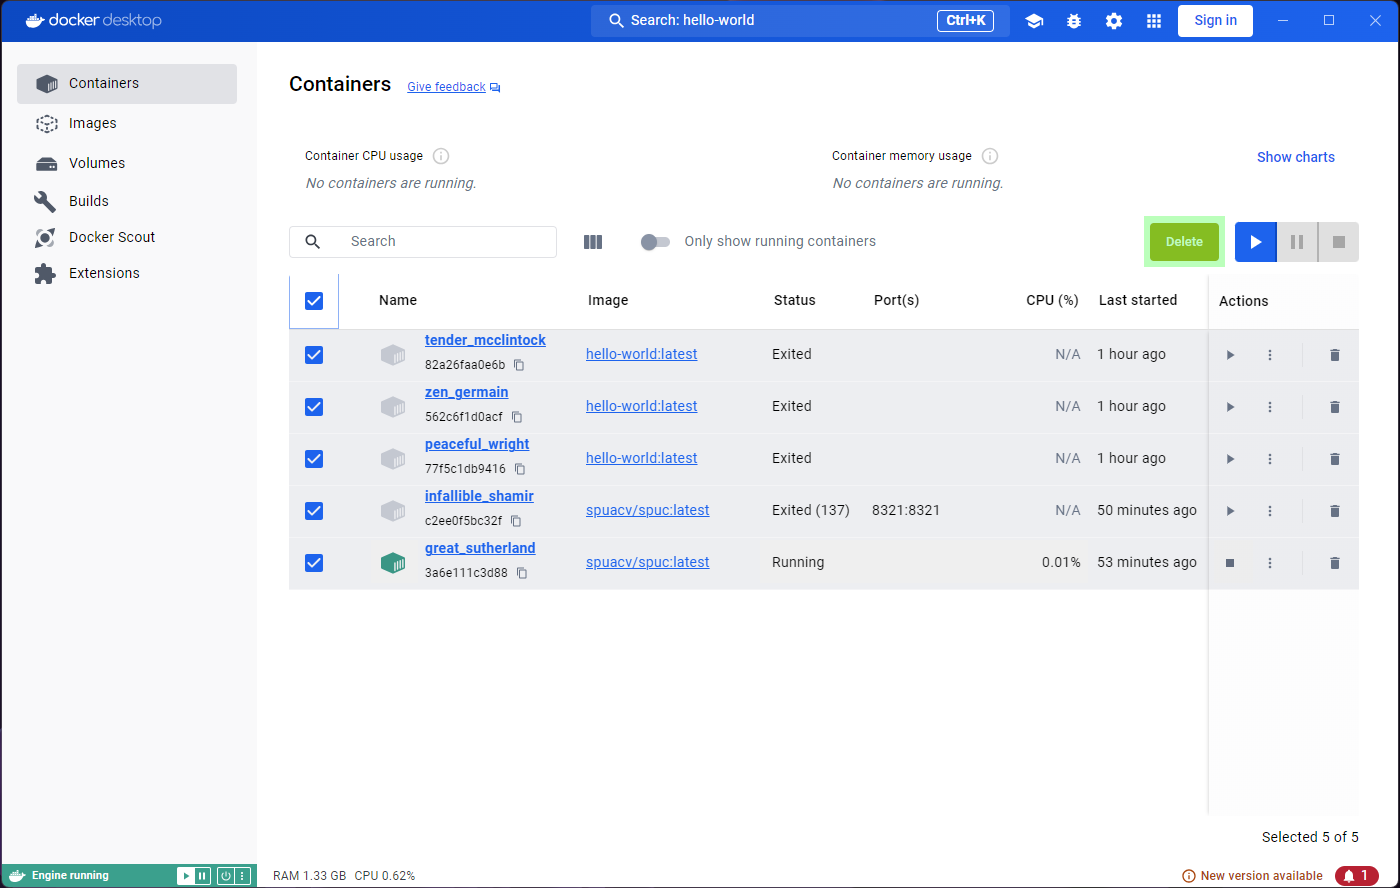
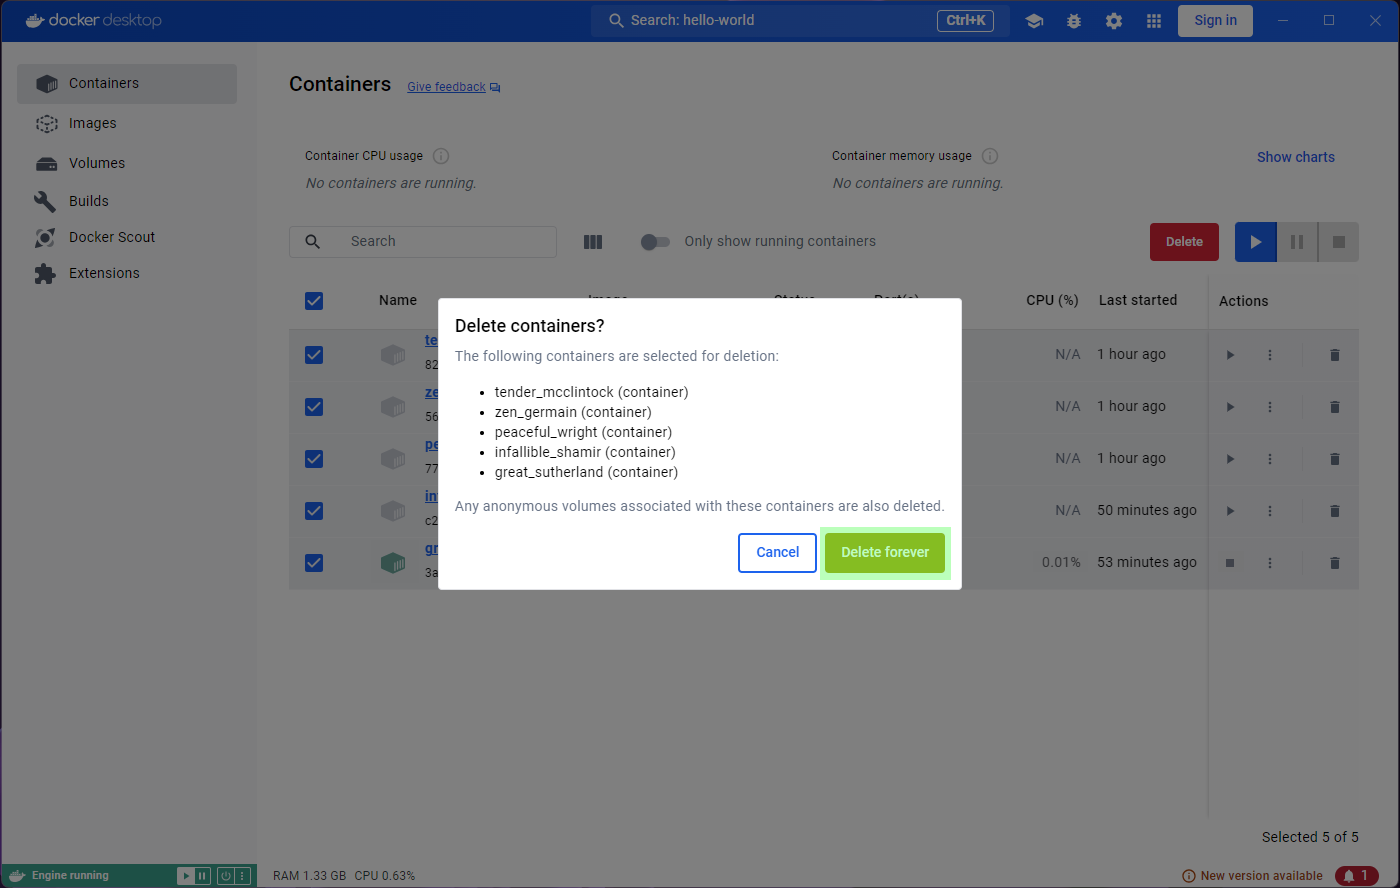
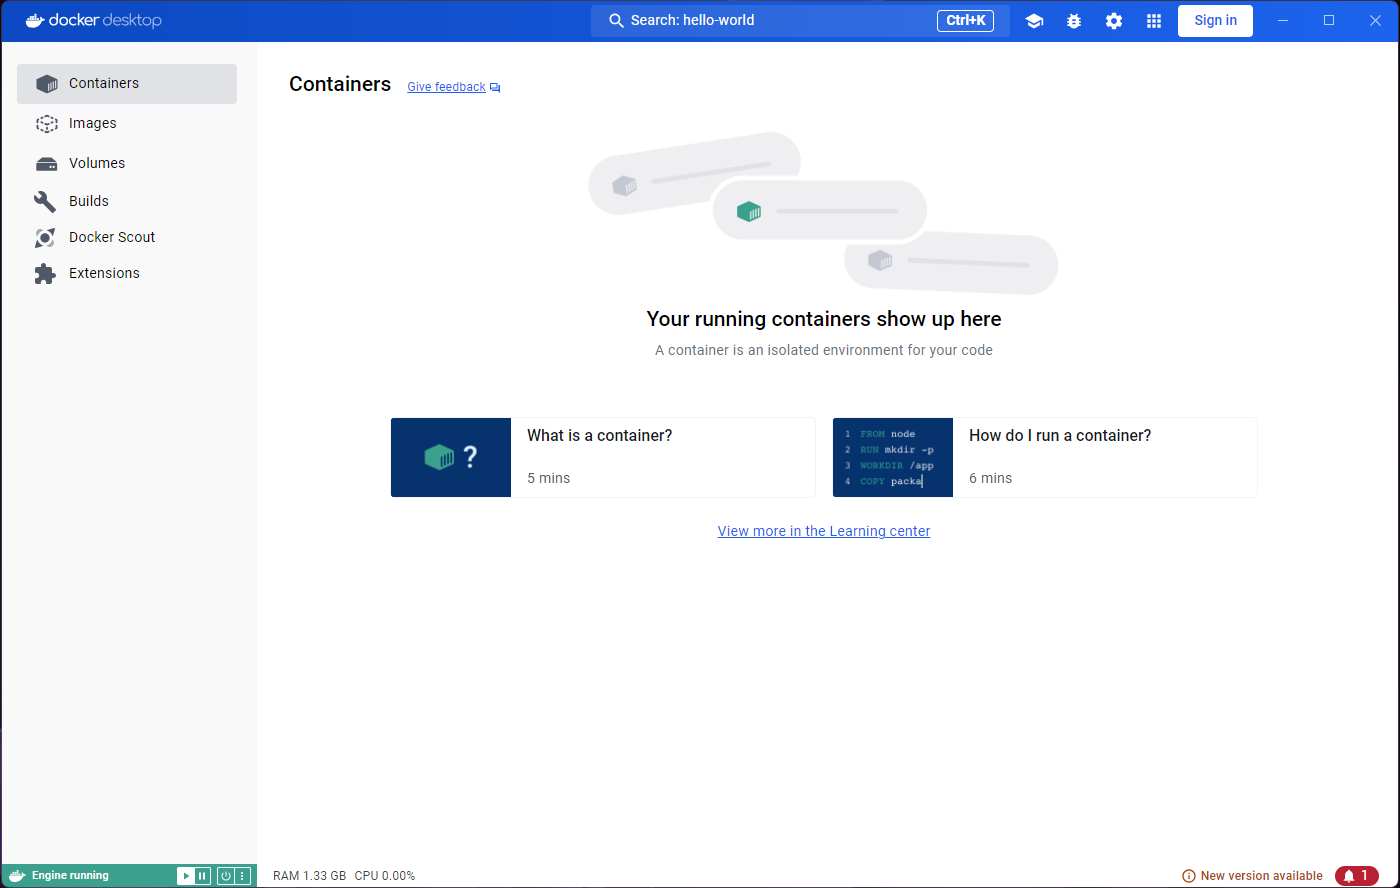
All our containers are now gone. Forever. We can’t get them back. This is fine though - they were meant to be ephemeral.
Warning: You have to be careful here, this action deleted even the containers that were running. You can filter the containers before you select them “all”.
On the up-side, the Images tab shows the
hello-world image as Unused now. For docker,
an image is In use as long as at least one container has
been created from it. Since we have no containers from that image,
Docker now knows the images can be safely deleted.
Limitations - Why not Docker Desktop?
We have seen many of the neat and functional bits of Docker Desktop, and it can be mighty appealing, particularly so if you lean towards the use of graphical interfaces. However, we’ve not touched on its weaknesses.
One thing we have completely lost now is the record of our unicorn
sightings. The containers are gone, and so are the changes we made to
the print.config file. Data in the containers can be made
persistent, but it is not the default behaviour.
Another very important thing is that Docker Desktop is very limited in how you can run the containers. The optional settings let you modify the instruction with which the container is run, but it is very limited.
For example, let’s run the other image we have already pulled,
alpine, which is the image of a very lightweight Linux
distribution. Go to the images list, and click on run.
Nothing seems to have happened at all! Not even a single output to
the Logs, and no way to open a terminal inside Alpine.

Just to be clear though, this Docker image does contain the whole Alpine OS. In Docker Desktop, however, there is no way to interact with it. This is the case for many (if not most) images. To be able to use it (or them), we need to provide some sort of input or command, which we cannot provide from Docker Desktop.
Therefore, Docker Desktop cannot really be used for much more than being a nice dashboard.
In the next episode, we will use docker from the command line, and all of the advantages it brings will become apparent.
- Images are snapshots of an environment, easily distributable and ready to be used as templates for containers.
- Containers are executions of the images, often with configuration added on top, and usually meant for single use.
- Running a container usually implies creating a new copy, so it is important to clean up regularly.
- Docker Desktop is a great dashboard that allows us to understand and visualize the lifecycle of images and containers. It could potentially be all you need to use if you only consume images out of the box. However, it is very limited in most cases (even for consumers), and rarely allows the user to configure and interact with the containers adequately.
Content from Building our Docker CLI toolkit
Last updated on 2026-07-14 | Edit this page
Estimated time: 40 minutes
Before we start to tackle Docker tasks that are only possible in the command line, we need to build up our toolkit of Docker commands that allow us to perform the same tasks we learned to do in Docker Desktop.
Overview
Questions
- How do I use the Docker CLI to perform the same tasks we learned to do in Docker Desktop?
Objectives
- Build our fundamental Docker CLI toolkit
Pulling and Listing Images
To run an image, first we need to download it. You may remember that, in Docker, this is known as pulling an image.
Let’s try pulling the SPUC container that we used before:
If it is the first time you pull this image, you will see something like this:
OUTPUT
latest: Pulling from spuacv/spuc
302e3ee49805: Pull complete
6b08635bc459: Pull complete
18bb7c8edce2: Pull complete
8341816e3d13: Pull complete
174a3dce8e2a: Pull complete
67d0d37078fb: Pull complete
4a705a772a90: Pull complete
bd9732a6317b: Pull complete
44c70b826ff3: Pull complete
cee1b3575f12: Pull complete
Digest: sha256:ad219064aaaad76860c53ec8420730d69dc5f8beb9345b0a15176111c2a976c5
Status: Downloaded newer image for spuacv/spuc:latest
docker.io/spuacv/spuc:latest
If you’d already downloaded it before, you will instead get something like this:
OUTPUT
latest: Pulling from spuacv/spuc
Digest: sha256:ad219064aaaad76860c53ec8420730d69dc5f8beb9345b0a15176111c2a976c5
Status: Image is up to date for spuacv/spuc:latest
docker.io/spuacv/spuc:latest
This just means Docker detected you already had that image, so it didn’t need to download it again.
The structure of the command we just used will be the same for most of the commands we will use in the Docker CLI, so it is worth taking a moment to understand it.
The structure of a Docker command
The Docker CLI can be intimidating, as it is easy to get very long commands that take a bit of work to understand. However, when you understand the structure of the commands it becomes much easier to understand what is happening.
Let’s dive into the structure of the command we looked at. Here is a diagram which breaks things down:

- Every Docker command starts with ‘docker’
- Next, you specify the type of object to act on (e.g. image, container)
- Followed by the action to perform and the name of the object (e.g. run, pull)
- You can also include additional arguments and switches as needed (e.g. the image name)
But wait! We ran docker pull spuacv/spuc:latest, and the
diagram shows the command as ‘image’!
We apologise for the trick but we were actually using a shorthand
built into the Docker CLI. There are a few of these shortcuts; they are
useful, but can be confusing. In this case, docker pull is
actually a shorthand for docker image pull.
In this lesson, we have decided to use the most common versions of commands, which is often the shorthand. It is important to know that these shorthands exist, but it is also important to know the full command structure.
Listing Images
Now that we have pulled our image, let’s check that it is there:
OUTPUT
REPOSITORY                              TAG        IMAGE ID       CREATED         SIZE
spuacv/spuc                             latest    ce72bd42e51c   3 days ago      137MB
This command lists (ls is short for list) all the images that we have downloaded. It is the equivalent of the ‘Images’ tab in Docker Desktop. You should see the SPUC image listed here, along with some other information about it.
Inspecting
You may remember that in Docker Desktop we could explore the image buildup and the image’s metadata. We called this ‘inspecting’ the image. To inspect an image using the Docker CLI, we can use:
OUTPUT
[
    {
        "Id": "sha256:ce72bd42e51c049fe29b4c15dc912e88c4461e94c2e1d403b90e2e53dfb1b420",
        "RepoTags": [
            "spuacv/spuc:latest"
        ],
        "RepoDigests": [
            "spuacv/spuc@sha256:ad219064aaaad76860c53ec8420730d69dc5f8beb9345b0a15176111c2a976c5"
        ],
        "Parent": "",
        "Comment": "buildkit.dockerfile.v0",
        "Created": "2024-10-11T14:05:59.254831281+01:00",
        "DockerVersion": "",
        "Author": "",
        "Config": {
[...]
This tells you a lot of details about the image. This can be useful for understanding what the image does and how it is configured but it is also quite overwhelming!
The most useful information for an image user is what the container
will do when it is run. We highlighted the command and
entrypoint while inspecting images in Docker Desktop. Let’s
work on getting this information only.
To do that we will refine our command using the -f flag
to specify the output format. Lets try running the following
command:
OUTPUT
Command: [--units iuhc]That’s more manageable! How does it work?
The result of the inspect command is a JSON object, so we can access
elements from the output hierarchically. The command is
part of the image’s Config, which is at the base of the
json object. When we use double curly braces, docker understands we want
to access the value of the key Cmd in the
Config object.
We can do a similar thing to extract the entrypoint:
OUTPUT
Entrypoint: [python /spuc/spuc.py]or even get them both at the same time:
BASH
docker inspect spuacv/spuc:latest -f $'Command: {{.Config.Cmd}}\nEntrypoint: {{.Config.Entrypoint}}'OUTPUT
Command: [--units iuhc]
Entrypoint: [python /spuc/spuc.py]
Great! So we know what the command and entrypoint are… but what do they mean?
Default Command
The default command is the command that a container will run when it is started. The default values are specified by the creator of an image, but can be overridden when the container is run.
The default command is formed of two parts, the entrypoint and the command. The two are concatenated to form the full command.
To understand this, let’s take a more detailed look at the lifecycle of a container.

When run, the container enters a startup state in which:
- The image is downloaded if needed.
- The container is created from an image.
- The container is started.
Now the container is running, and the command is executed by concatenating the entrypoint and the command.
- Entrypoint: usually the base command for the container. Not often overwritten.
- Command: usually parameters for the base command. Often overwritten.
Finally the container is stopped and removed.
In our case, the entrypoint is python /spuc/spuc.py and
the command is --units iuhc. This means that when the
container is run, it will execute the commandpython /spuc/spuc.py --units iuhc.
As mentioned, the command is commonly overwritten when the container is run. This means we could pass different parameters to the python script when we run the container.
We will cover this topic in more detail later on.
We will give another couple of examples of how entrypoints and commands are used and affect the container lifecycle in the following image.
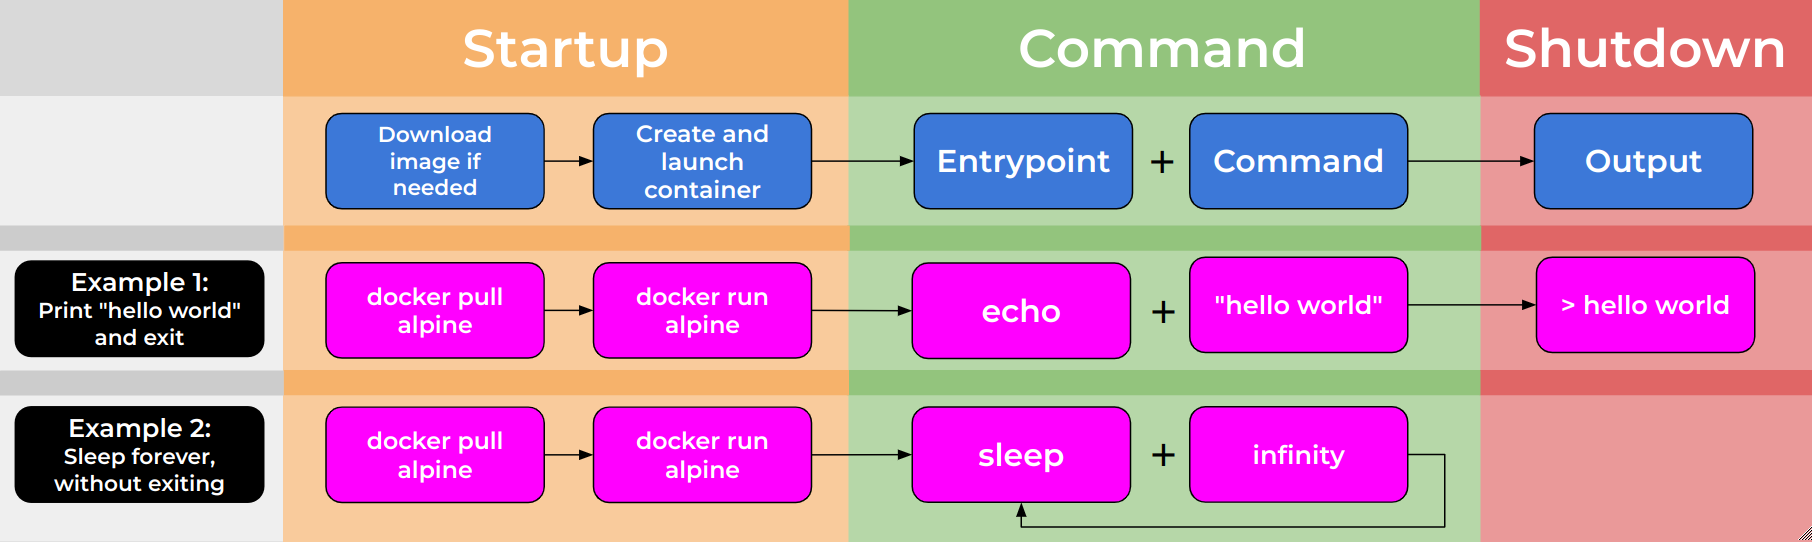
In Example 1 we have an entrypoint of echo and a command
of hello world. When the container is run, the command will
be echo Hello World! and the container will print
Hello World!.
In Example 2 we have an entrypoint of sleep and a
command of infinity. When the container is run, the command
will be sleep infinity and the container will run
indefinitely, similar to how services run!
Running
Now that we have the image, and we know what it will do, let’s run it!
OUTPUT
            \
             \
              \\
               \\\
                >\/7
            _.-(º   \
           (=___._/` \            ____  ____  _    _  ____
                )  \ |\          / ___||  _ \| |  | |/ ___|
               /   / ||\         \___ \| |_) | |  | | |
              /    > /\\\         ___) |  __/| |__| | |___
             j    < _\           |____/|_|    \____/ \____|
         _.-' :      ``.
         \ r=._\        `.       Space Purple Unicorn Counter
        <`\\_  \         .`-.
         \ r-7  `-. ._  ' .  `\
          \`,      `-.`7  7)   )
           \/         \|  \'  / `-._
                      ||    .'
                       \\  (
                        >\  >
                    ,.-' >.'
                   <.'_.''
                     <'


Welcome to the Space Purple Unicorn Counter!

:::: Units set to Imperial Unicorn Hoove Candles [iuhc] ::::

:: Try recording a unicorn sighting with:
    curl -X PUT localhost:8321/unicorn_spotted?location=moon\&brightness=100

:: No plugins detected
And there we have it! The SPUC container is running and ready to count unicorns. What we are seeing now is the equivalent of the ‘Logs’ tab in Docker Desktop.
The only problem we have though, is that it is ‘blocking’ this terminal, so we can’t run any more commands until we stop the container.
Let’s stop the container using [Ctrl+C], and run it
again, but in the background, ‘detached’ from the terminal, using the
-d flag:
OUTPUT
0bb79cbb589652c265552913f6de7992cd996f6da97ecc9ba43672fe34ff5f23Note: The -d flag needs to go in front
of the image name!
But what is happening? We can’t see the output of the container anymore! Is the container running or not?
Listing Containers
To see what is happening, we can use the docker ps
command:
OUTPUT
CONTAINER ID   IMAGE                  COMMAND                  CREATED              STATUS              PORTS        NAMES
0bb79cbb5896   spuacv/spuc:latest     "python /spuc/spuc.p…"   About a minute ago   Up About a minute   8321/tcp     ecstatic_nightingale
This command lists all the containers that are currently running. It
is the equivalent of the ‘Containers’ tab in Docker Desktop, except that
it only shows running containers. You can see that the SPUC container is
running, and that it has been given a random name
ecstatic_nightingale.
If you want to see all containers, including those that are stopped,
you can use the -a flag:
OUTPUT
CONTAINER ID   IMAGE                  COMMAND                  CREATED              STATUS                       PORTS        NAMES
0bb79cbb5896   spuacv/spuc:latest     "python /spuc/spuc.p…"   About a minute ago   Up About a minute            8321/tcp     ecstatic_nightingale
03ef43deee20   spuacv/spuc:latest     "python /spuc/spuc.p…"   10 minutes ago       Exited (0) 10 minutes ago                 suspicious_beaver
Logs
So we know it is running, but we can’t see the output of the container. We can still access them though, we just need to ask Docker for the logs:
OUTPUT
            \
             \
              \\
               \\\
                >\/7
            _.-(º   \
           (=___._/` \            ____  ____  _    _  ____
                )  \ |\          / ___||  _ \| |  | |/ ___|
               /   / ||\         \___ \| |_) | |  | | |
              /    > /\\\         ___) |  __/| |__| | |___
             j    < _\           |____/|_|    \____/ \____|
         _.-' :      ``.
         \ r=._\        `.       Space Purple Unicorn Counter
        <`\\_  \         .`-.
         \ r-7  `-. ._  ' .  `\
          \`,      `-.`7  7)   )
           \/         \|  \'  / `-._
                      ||    .'
                       \\  (
                        >\  >
                    ,.-' >.'
                   <.'_.''
                     <'


Welcome to the Space Purple Unicorn Counter!

:::: Units set to Imperial Unicorn Hoove Candles [iuhc] ::::

:: Try recording a unicorn sighting with:
    curl -X PUT localhost:8321/unicorn_spotted?location=moon\&brightness=100
Notice that we had to use the name of the container,
ecstatic_nightingale, to get the logs. This is because the
docker logs command requires the name of the
container not the image.
Great, now that we have a container in the background, lets try to register a unicorn sighting!
OUTPUT
curl: (7) Failed to connect to localhost port 8321 after 0 ms: Couldn't connect to serverThat is right! We need to expose the port to the host machine, as we did in Docker Desktop.
Exposing ports
The container is running in its own isolated environment. To be able to communicate with it, we need to tell Docker to expose the port to the host machine.
This can be done using the -p flag. We also need to
specify the port to be used on the host machine and the port to expose
on the container, like so:
-p <host_port>:<container_port>In this case we want to expose port 8321 on the host machine to port 8321 on the container:
OUTPUT
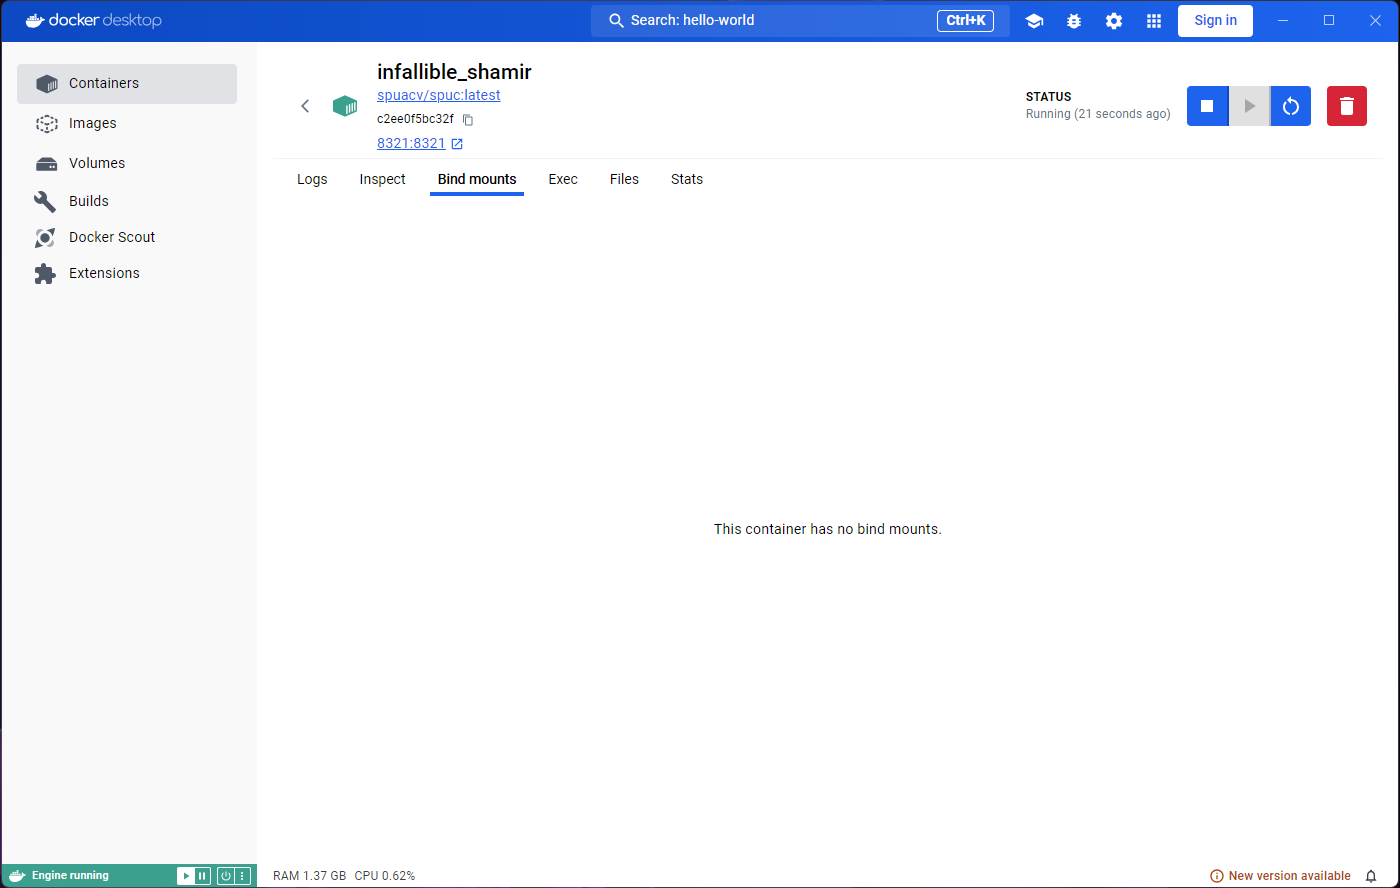
6edf9ebd404625541fdb674d1a696707bad775a0161882ef459c5cbcb151e24bIf you now look at the container that is running, you will see that the port is exposed:
OUTPUT
CONTAINER ID   IMAGE               COMMAND                  CREATED         STATUS         PORTS                                       NAMES
6edf9ebd4046   spuacv/spuc:latest  "python /spuc/spuc.p…"   4 seconds ago   Up 3 seconds   0.0.0.0:8321->8321/tcp, :::8321->8321/tcp   unruffled_noyce
So we can finally try to register a unicorn sighting:
OUTPUT
{"message":"Unicorn sighting recorded!"}And of course we can check the logs if we want to:
OUTPUT
[...]

::::: 2024-10-15 11:19:47.751212 Unicorn spotted at moon!! Brightness: 100 iuhc
It can be quite inconvenient to have to find out the name of the container every time we want to see the logs, and it is not the only time in which we’ll need the name of the container to interact with it. We can make our lives easier by naming the container when we run it.
Setting the name of a container
We can name the container when we run it using the
--name flag:
OUTPUT
4696d5301a792451f9954ba10cc42604a904fa1a811362733050ba04270c02eb
docker: Error response from daemon: driver failed programming external
connectivity on endpoint spuc_container (67e075648d16fafdf086573169d891bee9b33bec0c1cb5535cf82c715241bb32):
 Bind for 0.0.0.0:8321 failed: port is already allocated.
Oops! It looks like we already have a container running on port 8321. Of course, it is the container that we ran earlier, unruffled_noyce, and we can’t have two containers running on the same port!
To fix this, we can stop and remove the container that is running on
port 8321 using the docker stop command:
OUTPUT
unruffled_noyce
unruffled_noyceKilling containers
Using docker kill <container_name>, will
immediately stop a container. This is usually recommended against as a
standard, and should be left as a last resort. However, in practice it
is very often used.
The SPUC container, in particular, responds very slowly to the
stop signal, so we will use kill going
forward. Try it with the other container we left running in the
background:
OUTPUT
ecstatic_nightingaleRight, now we can try running the container again:
OUTPUT
bf9b2abc95a7c7f25dc8c1c4c334fcf4ce9642754ed7f6b5586d82f9e9e45ac7And now we can see the logs using the name of the container, and even
follow the logs in real time using the -f flag:
OUTPUT
            \
             \
              \\
               \\\
                >\/7
            _.-(º   \
           (=___._/` \            ____  ____  _    _  ____
                )  \ |\          / ___||  _ \| |  | |/ ___|
               /   / ||\         \___ \| |_) | |  | | |
              /    > /\\\         ___) |  __/| |__| | |___
             j    < _\           |____/|_|    \____/ \____|
         _.-' :      ``.
         \ r=._\        `.       Space Purple Unicorn Counter
        <`\\_  \         .`-.
         \ r-7  `-. ._  ' .  `\
          \`,      `-.`7  7)   )
           \/         \|  \'  / `-._
                      ||    .'
                       \\  (
                        >\  >
                    ,.-' >.'
                   <.'_.''
                     <'


Welcome to the Space Purple Unicorn Counter!

:::: Units set to Imperial Unicorn Hoove Candles [iuhc] ::::

:: Try recording a unicorn sighting with:
    curl -X PUT localhost:8321/unicorn_spotted?location=moon\&brightness=100
This also blocks the terminal, so you will need to use
[Ctrl+C] to stop following the logs. There is an important
difference though. Because the container is running in the background,
using [Ctrl+C] will not stop the container, only the log
following.
Executing commands in a running container
One of the very useful things we could do in docker compose was to
run commands inside a container. If you remember, we could do this using
the Exec tab. In the Docker CLI, we can do this using the
docker exec command. Lets try for example:
OUTPUT
# This file configures the print output to the terminal.
# Available variables are: count, time, location, brightness, units
# The values of these variables will be replaced if wrapped in curly braces.
# Lines beginning with # are ignored.
::::: {time} Unicorn spotted at {location}!! Brightness: {brightness} {units}
This command runs cat config/print.config inside the
container. This is a step forward, but it is not quite the experience we
had in Docker Desktop. There, we had a live terminal inside the
container, and we could run commands interactively.
To do that, we need to use the -it flag, and specify a
command that will load the terminal, i.e. bash. Let’s try
launching an interactive terminal session inside the container, running
the bash shell:
OUTPUT
root@50159dddde44:/spuc#This is more like it! now we can run commands as if we were inside the container itself, as we did in Docker Desktop.
OUTPUT
[...]

.
├── __pycache__
│   └── strings.cpython-312.pyc
├── config
│   └── print.config
├── output
├── requirements.txt
├── spuc.py
└── strings.py

4 directories, 5 files
To get out from this interactive session, we need to use
[Ctrl+D], or type exit.
Interactive sessions
The -it flag that we just used is very useful. It
actually helps us overcome the problem we had with the
alpine container in the previous episode. If we were to
simply run the alpine container we would have the same
issue we had before. Namely, the container exits immediately and we
can’t exec into it. However, we can use the
-it flag on the run command, and get an
interactive terminal session inside the container:
OUTPUT
Unable to find image 'alpine:latest' locally
latest: Pulling from library/alpine
43c4264eed91: Pull complete
Digest: sha256:beefdbd8a1da6d2915566fde36db9db0b524eb737fc57cd1367effd16dc0d06d
Status: Downloaded newer image for alpine:latest
/ #
We are inside the container, and it stayed alive because we are
running an interactive session. We can play inside as much as we want,
and when we are done, we can simply type exit to leave the
container. As opposed to the spuc container, which was
running a service and we exec’ed into, this container will be terminated
on exit.
Reviving Containers
Another thing Docker Desktop allowed us to do was to wake up a previously stopped container. We can of course do the same thing in the Docker CLI.
To show this, lets first stop the container we have running:
OUTPUT
spuc_containerTo revive the container, we can use the
docker start command:
OUTPUT
spuc_containerWe could now check that the container is running again using the
docker ps command. However, lets try another useful
command:
OUTPUT
CONTAINER ID   NAME              CPU %     MEM USAGE / LIMIT     MEM %     NET I/O           BLOCK I/O        PIDS
bf9b2abc95a7   spuc_container    0.01%     23.61MiB / 15.29GiB   0.15%     23.6kB / 589B     5.1MB / 201kB    5
This command lets us see the live resource usage of containers,
similar to the task manager on Windows or top on Linux. We can exit the
stats with [Ctrl+C].
As we can see, the container is alive and well, and we can now exec into it again if we want to.
Cleaning up
The last thing we need to know is how to clean up after ourselves. We
have already removed a container using the docker rm
command, and we can use the docker image rm command to
remove an image:
OUTPUT
spuc_containerOUTPUT
spuc_containerOUTPUT
Untagged: spuacv/spuc:latest
Untagged: spuacv/spuc@sha256:ad219064aaaad76860c53ec8420730d69dc5f8beb9345b0a15176111c2a976c5
Deleted: sha256:ce72bd42e51c049fe29b4c15dc912e88c4461e94c2e1d403b90e2e53dfb1b420
Deleted: sha256:975e4f6d3de315ced48fa0d0eda7e3af5cd4953c16adfbd443e65d6d2bf0eaa6
Deleted: sha256:f3fc2c0e51d4240d55e40b0305762df66600cdd5073a5c92008cfe8f867f5437
Deleted: sha256:f3e2fffff5c16237e6507a6196eb76fd2eba64e343c3a1b2692b73b95fcd1298
Deleted: sha256:d4d3e0d103c04b9fd2eb428699c46302a3d38d695729ee49068be07ad7e5c442
Deleted: sha256:700c7bb1865e2ca492d821c689f11175c66e9d27f210b3f04521040290c34126
Deleted: sha256:5d5adb77457c9a495a5037ce44a0db461b8d3b605177a2c3bc6dc0d7876a681d
Deleted: sha256:3a77b40519ce3ffa585333bab02f30371b4c8c7ffa10a35fd4c82a0d3423fa91
Deleted: sha256:791eb7562f83ac1fc48aa6f31129bf947d7de7d8c9b85db92131c3beb5650bd6
Deleted: sha256:c59180f9a5f41ea7e3d92ee36d5b4c01dadf5148075c0d01c394f7efc321a3ca
Deleted: sha256:8d853c8add5d1e7b0aafc4b68a3d9fb8e7a0da27970c2acf831fe63be4a0cd2c
An alternative is to do a single-line full clean up. We can also
remove all stopped containers and unused images using the
docker system prune command:
OUTPUT
WARNING! This will remove:
  - all stopped containers
  - all networks not used by at least one container
  - all dangling images
  - unused build cache

Are you sure you want to continue? [y/N] y
Deleted Containers:
90d006980a999176dd82e95119556cdf62431c26147bdbd3513e1733be1a5897

Deleted Images:
untagged: spuacv/spuc@sha256:bc43ebfe7dbdbac5bc0b4d849dd2654206f4e4ed1fb87c827b91be56ce107f2e
deleted: sha256:f03fb04b8bc613f46cc1d1915d2f98dcb6e008ae8e212ae9a3dbfaa68c111476

Total reclaimed space: 13.09MB
Automatic cleanup
There is one more point to make. It is nice not to have to clean up
containers manually all the time. Luckily, the Docker CLI has a flag
that will remove the container when it is stopped: --rm.
This can be very useful, especially when you are naming containers, as
it prevents name conflicts.
Lets try it:
We can verify that the container exists using docker ps.
When the container is stopped, however, the container is automatically
removed. We don’t have to worry about cleaning up afterwards, but it
comes at a price. Since we’ve deleted the container, there is no way to
bring it back.
We will use the command going forward, as it is a good practice to keep your system clean and tidy.
The last command we ran is a relatively standard command in the Docker CLI. If you are thinking “wow, that command is getting pretty long…”, you are right! Things will get even worse before they get better, but we will cover how to manage this later in the course.
We are now equipped with everything we saw we could do in Docker Desktop, but with steroids. There are many more things we can do with the Docker CLI, including data persistance. We will cover these in the next episode.
- All the commands are structured with a main command, a specialising command, an action command, and the name of the object to act on.
- Everything we did in Docker Desktop (and more!) can be done in the Docker CLI with:
| Command | Description |
|---|---|
| Images | |
docker pull <image> |
Pull an image from a registry |
docker image ls |
List all images on the system |
docker inspect <image> |
Show detailed information about an image |
docker run <image> |
Run a container from an image |
docker image rm <image> |
Remove an image |
| Containers | |
docker logs <container> |
Show the logs of a container |
docker exec <container> <cmd> |
Run a command in a running container |
docker stop <container> |
Stop a running container |
docker kill <container> |
Immediately stop a running container |
docker start <container> |
Start a stopped container |
docker rm <container> |
Remove a container |
| System | |
docker ps |
List all running containers |
docker stats |
Show live resource usage of containers |
docker system prune |
Remove all stopped containers and unused images |
| Flag | Used on | Description |
|---|---|---|
-f |
inspect |
Specify the output format |
-f |
logs |
Follow the logs in real time |
-a |
ps |
List all containers, including stopped ones |
-it |
run, exec
|
Interactively run a command in a running container |
-d |
run |
Run a container in the background |
-p |
run |
Expose a port from the container to the host |
--name |
run |
Name a container |
--rm |
run |
Remove the container when it is stopped |
Content from Sharing information with containers
Last updated on 2026-07-14 | Edit this page
Estimated time: 45 minutes
Now that we have learned the basics of the Docker CLI, getting set up with all the tools we came across in Docker Desktop, we can start to explore the full power of Docker!
Overview
Questions
- How can I save my data?
- How do I get information in and out of containers?
Objectives
- Learn how to persist and share data with containers using mounts and volumes
Making our data persist
In the earlier sections we interacted with the SPUC container and
made changes to the print.config file. We also registered
some unicorn sightings using the API, which were recorded in the
unicorn_sightings.txt file. However, we lost all those
changes when we stopped the container.
Docker containers are naturally isolated from the host system, meaning that they have their own filesystem, and cannot access the host filesystem. They are also designed to be temporary, and are destroyed when they are stopped.
This is mostly a good thing, as it means that containers are lightweight and can be easily recreated, but we can’t be throwing our unicorn sightings away like this!
Also, with the file being in the container, we can’t (easily) do much with it. Luckily, Docker has methods for allowing containers to persist data.
Volumes
One way to allow a container to access the host filesystem is by
using a volume. A volume is a specially designated
directory hidden away deep in the host filesystem. This directory is
shared with the container.
Volumes are very tightly controlled by Docker. They are designed to be used for sharing data between containers, or for persisting data between runs of a container.
Let’s have a look at how we can use a volume to persist the
unicorn_sightings.txt file between runs of the container.
We do this by modifying our run command to include a
-v (for volume) flag, a volume name and a path inside the
container.
BASH
docker kill spuc_container
docker run -d --rm --name spuc_container -p 8321:8321 -v spuc-volume:/spuc/output spuacv/spuc:latest
OUTPUT
spuc_container
f1bd2bb9062348b6a1815f5076fcd1b79e603020c2d58436408c6c60da7e73d2
Ok! But what is happening? We can see what containers we have created using:
OUTPUT
local spuc-volumeWe can see more information about the volume using:
OUTPUT
[
    {
        "CreatedAt": "2024-10-11T11:15:09+01:00",
        "Driver": "local",
        "Labels": null,
        "Mountpoint": "/var/lib/docker/volumes/spuc-volume/_data",
        "Name": "spuc-volume",
        "Options": null,
        "Scope": "local"
    }
]
Which shows us that the volume is stored in
/var/lib/docker/volumes/spuc-volume/_data on the host
filesystem. You can visit and edit files there if you have superuser
permissions (sudo).
But what about the container? Has this actually worked?
First… what’s that over there?? A unicorn! No… three unicorns! Let’s record these sightings.
BASH
curl -X PUT localhost:8321/unicorn_spotted?location=moon\&brightness=100
curl -X PUT localhost:8321/unicorn_spotted?location=earth\&brightness=10
curl -X PUT localhost:8321/unicorn_spotted?location=mars\&brightness=400
OUTPUT
{"message":"Unicorn sighting recorded!"}
{"message":"Unicorn sighting recorded!"}
{"message":"Unicorn sighting recorded!"}
Ok, let’s check the sightings file.
OUTPUT
count,time,location,brightness,units
1,2024-10-16 09:14:17.719447,moon,100,iuhc
2,2024-10-16 09:14:17.726706,earth,10,iuhc
3,2024-10-16 09:14:17.732191,mars,400,iuhc
Now, for our test, we will stop the container. Since we used the
-rm flag, the container will also be deleted.
OUTPUT
spuc_container
CONTAINER ID   IMAGE     COMMAND   CREATED   STATUS    PORTS     NAMES
This would have been game over, but we used a volume. Let’s run it again and check the sightings file.
BASH
docker run -d --rm --name spuc_container -p 8321:8321 -v spuc-volume:/spuc/output spuacv/spuc:latest
docker exec spuc_container cat /spuc/output/unicorn_sightings.txt
OUTPUT
536a6d2f73061aa94729df3536ee86b60dcd68f4652bfbdc9e4cfa9c6cfda168
count,time,location,brightness,units
1,2024-10-16 09:14:17.719447,moon,100,iuhc
2,2024-10-16 09:14:17.726706,earth,10,iuhc
3,2024-10-16 09:14:17.732191,mars,400,iuhc
It’s worked! The unicorn sightings are still there! The only problem is that the file is still in the container, and we can’t easily access it from the host filesystem.
Bind mounts
Another way to allow a container to access the host filesystem is by
using a bind mount. A bind mount is a direct mapping of a
specified directory on the host filesystem to a directory in the
container filesystem. This allows you to directly access files on the
host filesystem from the container, but it has its own challenges.
Let’s have a look at how we can use a bind mount to persist the
unicorn_sightings.txt file between runs of the container.
Confusingly, bind mounting is also done using the -v flag.
However, instead of a name for the volume, we have to specify a path on
the host filesystem.
Note: In older versions of Docker the path had to be absolute; relative paths are now supported.
BASH
docker kill spuc_container
docker run -d --rm --name spuc_container -p 8321:8321 -v ./spuc/output:/spuc/output spuacv/spuc:latest
OUTPUT
spuc_container
79620ff93fdd8135dcc7f595223144c075a9df53fc32f2ce799ee8e338b9df41
The directory spuc/output likely did not exist in your
current working directory, so Docker created one. It is currently empty,
as you can see by listing the contents with ls spuc/output.
If we now record a unicorn sighting, we can see the records file in the
directory.
BASH
curl -X PUT localhost:8321/unicorn_spotted?location=mercury\&brightness=400
cat spuc/output/unicorn_sightings.txt
OUTPUT
{message:"Unicorn sighting recorded!"}
count,time,location,brightness,units
1,2024-10-16 10:31:22.222542,mercury,400,iuhc
and the file is still there even after stopping the container
OUTPUT
spuc_container
unicorn_sightings.txt
If we run the container again, we can see the file is still there.
BASH
docker run -d --rm --name spuc_container -p 8321:8321 -v ./spuc/output:/spuc/output spuacv/spuc:latest
cat spuc/output/unicorn_sightings.txt
OUTPUT
3dd079c21845fc36ddc3b20fd525790a1e194c198c4b98337f4ed82bfc7a9755
count,time,location,brightness,units
1,2024-10-16 10:31:22.222542,mars,400,iuhc
So we not only managed to persist the data between runs of the container, but we can also access the file when the container is not running. This is great!… but there are downsides.
To illustrate this, let’s see what the permissions are on the file we just created.
OUTPUT
-rw-r--r-- 1 root root 57 Oct 11 14:14 spuc/output/unicorn_sightings.txtNote: This no longer seems to be the case from Docker version 27.3.1 onwards.
Argh, the file is owned by root! This is because the container runs
as root, and so any files created by the container are owned by root.
This can be a problem, as you will not have permission to access the
file without using sudo.
This is a common problem with bind mounts, and can be a bit of a pain
to deal with. You can change the ownership of the file using
sudo chown, but this can be a bit of a hassle.
Additionally, it is hard for Docker to clean up bind mounts, as they are not managed by Docker. The management of bind mounts is left to the user.
Really, neither volumes nor bind mounts are perfect, but they are both useful tools for persisting data between runs of a container.
Bind mount files
Earlier, we looked at how to change the print.config file in SPUC to format the logs. This was a bit difficult, as we had to do it from inside the container, and it did not persist between runs of the container.
We now have the tools to address this! We can use a bind mount to share the config file with the container.
Docker cp
We can get files in and out of containers using the
docker cp command.
Let’s try this to get the print.config file out of the
container. It works like the cp command, but you have to
specify the container name and path:
OUTPUT
# This file configures the print output to the terminal.
# Available variables are: count, time, location, brightness, units
# The values of these variables will be replaced if wrapped in curly braces.
# Lines beginning with # are ignored.
::::: Unicorn spotted at {location}!! Brightness: {brightness} {units}
Note that this will not keep changes in sync like a bind mount, but it is useful for getting files in and out of containers.
Let’s now modify the print.config file to include the time and the unicorn count:
::::: {time} Unicorn number {count} spotted at {location}! Brightness: {brightness} {units}Now, to share it with the container, we need to put it in the path
/spuc/config/print.config. Again we will use
-v, but we will specify the path to the file, instead of a
directory.
BASH
docker kill spuc_container
docker run -d --rm --name spuc_container -p 8321:8321 -v ./print.config:/spuc/config/print.config -v spuc-volume:/spuc/output spuacv/spuc:latest
Now let’s check if this worked. For that, we need to record another sighting and then check the logs.
BASH
curl -X PUT localhost:8321/unicorn_spotted?location=jupyter\&brightness=210
docker logs spuc_container
OUTPUT
{"message":"Unicorn sighting recorded!"}
[...]
::::: 2024-10-16 10:53:13.449393 Unicorn number 4 spotted at jupyter! Brightness: 210 iuhc
Fantastic! We have now managed to share a file with the container. Not only that, but because we created the file before mounting it to the container, we are the owners, and can modify it. Changes to the file will reflect immediately on the container.
For example, let’s edit the file to get rid of the date:
::::: Unicorn number {count} spotted at {location}! Brightness: {brightness} {units}Now let’s register a sighting, and look at the logs:
BASH
curl -X PUT localhost:8321/unicorn_spotted?location=venus\&brightness=148
docker logs spuc_container
OUTPUT
{"message":"Unicorn sighting recorded!"}
[...]
::::: Unicorn number 5 spotted at venus! Brightness: 148 iuhc
It almost seems too easy!
Warning: We replaced the file in the container with the file from the host filesystem. We could do the same with a whole directory, but be careful not to overwrite important files in the container!
Common mistakes with volumes
You have to be really careful with the syntax for volumes and mounts.
Let’s imagine you are in a path containing a directory
spuc, with an empty sub-directory output and a
print.config file. What do you think will happen when you
run the following commands?
docker run -v spuc-vol spuacv/spuc:latestdocker run -v ./spucs/output:/spuc/output spuacv/spuc:latestdocker run -v ./spuc-vol:/spuc/output spuacv/spuc:latestdocker run -v ./spuc:/spuc spuacv/spuc:latestdocker run -v print.config:/spuc/config/print.config spuacv/spuc:latest
Problem: We provided a volume name, but not a path to mount it to. If the volume already existed, this will mount it on
/spuc-vol. If the volume did not exist, it will create a directory/spuc-volin the container, but it wont persist!
Fix: You only messed up the container, nothing to worry about. Stop it and try again.Problem: You misspelled the path! This will create a new directory called spucs and mount it.
Fix: Usesudo rm -rf ./spucsto remove the directory and try again.Problem: At first, it seems like we will create a volume. However, we have provided a path, not a name for the volume. Therefore, Docker thinks you want a bind mount, and will create a (root owned) directory called
spuc-vol.
Fix: Usesudo rm -rf ./spuc-volumeto remove the directory and try again.Problem: This is valid syntax for a bind mount. It will take the almost empty
spucdirectory in your filesystem and mount it to/spucin the container. However, it replaced everything in there in the process! Your command most likely failed because it could not find/spuc/spuc.py.
Fix: You only messed up the container, nothing to worry about. Try again.Problem: We forgot to use a path for the file! This will try to create a new volume called
print.configand mount it to/spuc/config/print.config. However, it will most likely fail becauseprint.configis not a directory.
Fix: Usedocker volume rm print.configto remove the volume and try again.
We now have a print configuration and unicorn sighting record that persists between runs of the container.
It seems like we have everything we need to run the Space Purple Unicorn Counter! Or is there anything else we should do? Lets have a look at the docs!
- Volumes and bind mounts help us persist and share data with containers.
- The syntax for both is very similar, but they have different use
cases:
-
Volumes are managed by Docker. They are best for
persisting data you do not need to access.
docker run -v <volume_name>:<path_in_container> image -
Bind mounts are managed by the user. They are best
for passing data to the container.
docker run -v <path_on_host>:<path_in_container> image
-
Volumes are managed by Docker. They are best for
persisting data you do not need to access.
- They both overwrite files in the container, and have their own challenges.
Content from The Docker Hub
Last updated on 2026-07-14 | Edit this page
Estimated time: 5 minutes
So we want to look at the docs for a container image, but we don’t want Docker Desktop anymore! Where do the docs live? Actually, they were never part of Docker Desktop, they are part of the Docker Hub!
Overview
Questions
- What is the Docker Hub, and why is it useful?
Objectives
- Explore the Docker Hub webpage.
- Identify the three components of a container image’s identifier.
- Access the readme and other metadata of a container image.
Introducing the Docker Hub
The Docker Hub is an online repository of container images, a vast number of which are publicly available. A large number of the container images are curated by the developers of the software that they package. Also, many commonly used pieces of software that have been containerized into images are officially endorsed, which means that you can trust the container images to have been checked for functionality, stability, and that they don’t contain malware.
Docker can be used without connecting to the Docker Hub
Note that while the Docker Hub is well integrated into Docker functionality, the Docker Hub is certainly not required for all types of use of Docker containers. For example, some organizations may run container infrastructure that is entirely disconnected from the Internet.
Exploring an example Docker Hub page
The reason we are here is to find the documentation for the SPUC container image. Lets go ahead and find the image we need for registering our unicorn sightings.
Open your web browser to https://hub.docker.com
In the search bar type “spuc” and hit enter.
You should see a list of images related to spuc and, amongst them, the one we were directed to. Lets go ahead and select the spuacv/spuc container image.
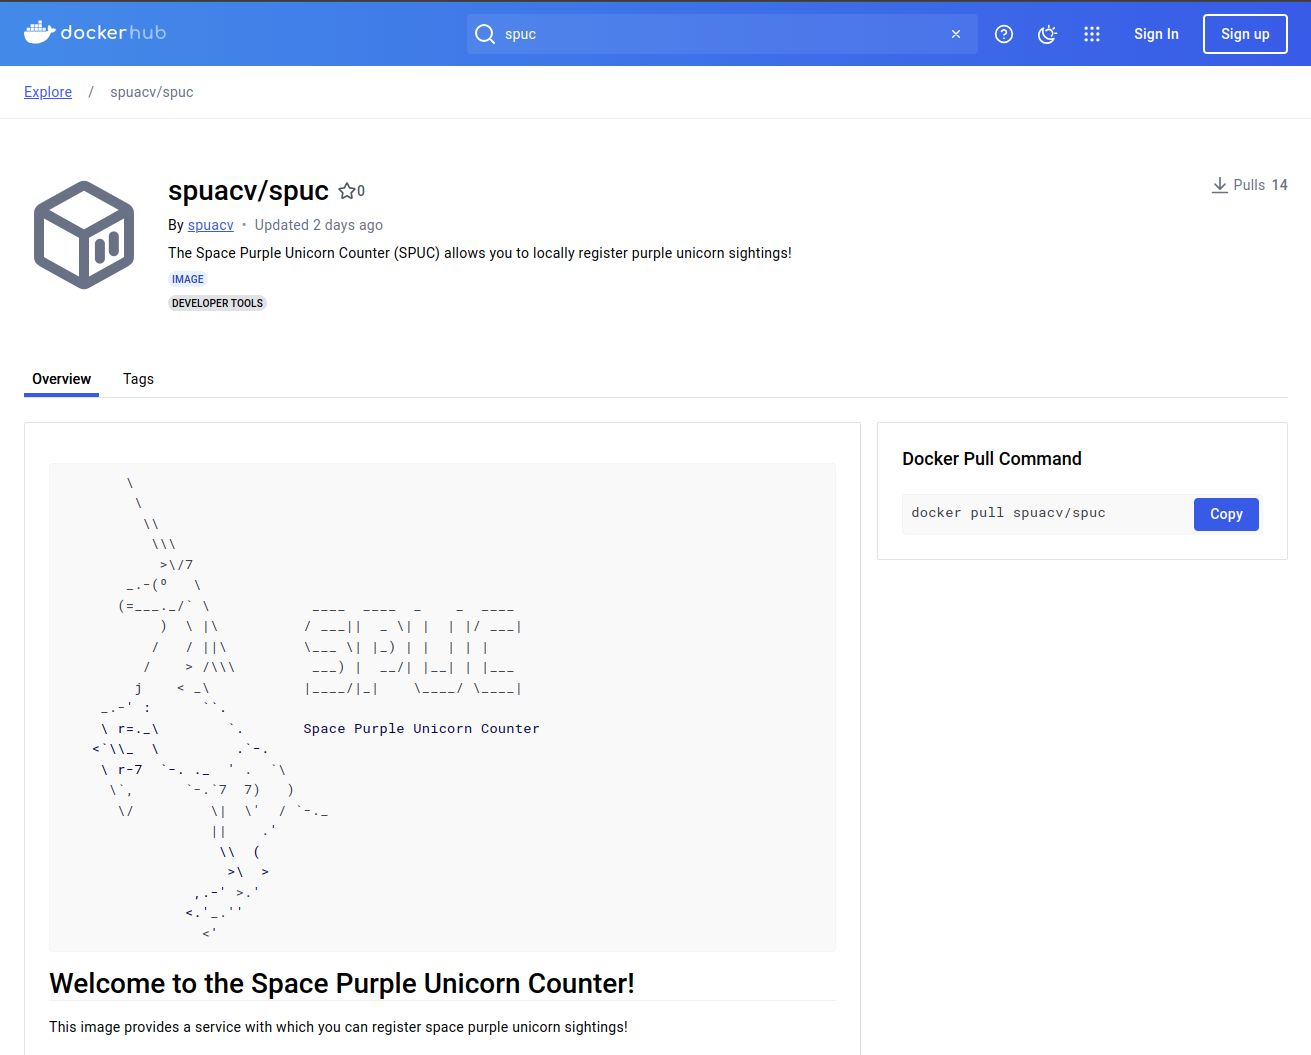
This is a fairly standard docker repository page. The page is divided into several sections:
The top provides information about the name, endorsements, creator, a short description, tags, and popularity (i.e. how many downloads it has).
The top-right provides the command to pull this container image to your computer.
The main body of the page contains two tabs, one with the overview, and another with the tags.
The overview tab contains the documentation of the container image. This is what we wanted!
Since we are here though, lets also look at the tags tab.
The tags tab contains the list of versions of the container image. A single repository can have many different versions of container images. These versions are indicated by “tags”.
If we select the “Tags” tab, we can see the list of tags for this container image.
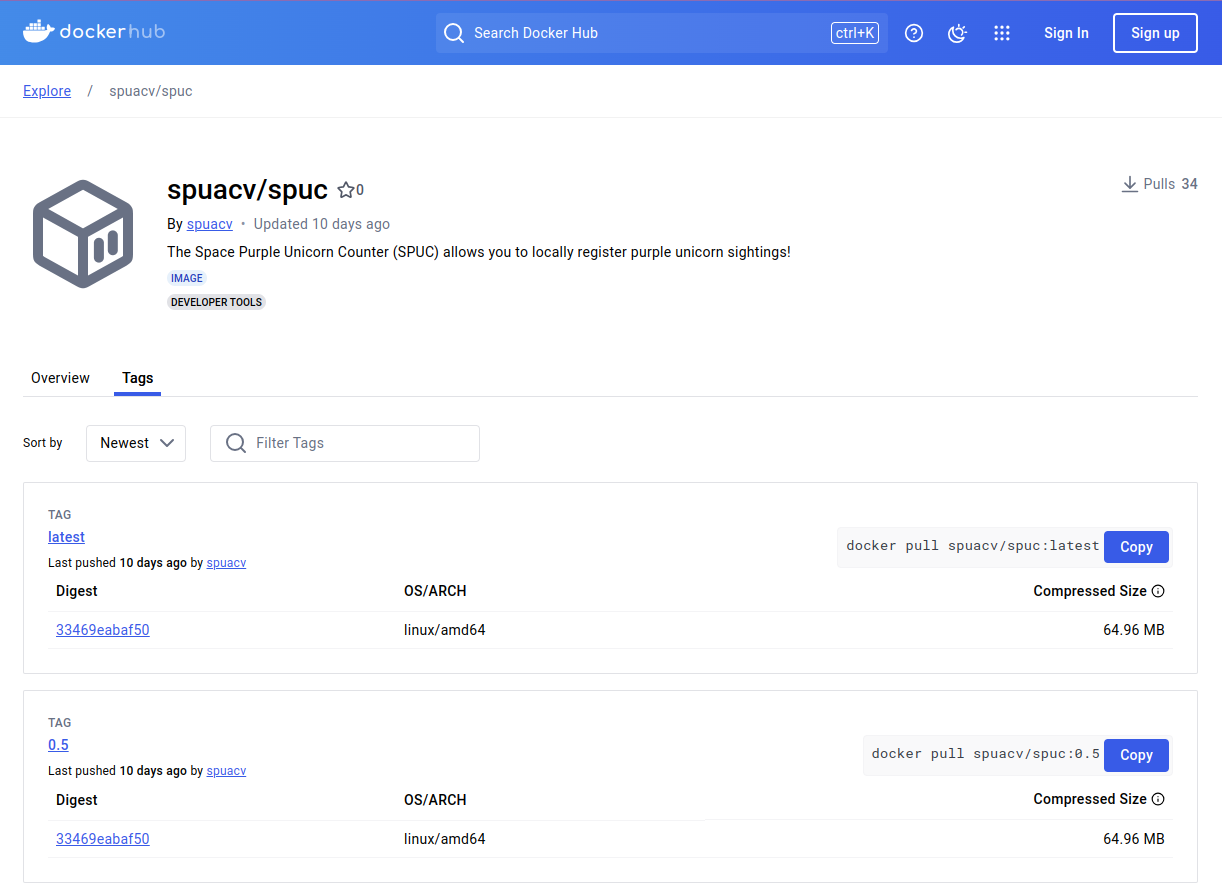
If we click the version tag for latest of this image,
Docker Hub shows it as spuacv/spuc:latest.
This name structure is the full identifier of the container image and consists of three parts:
OWNER/REPOSITORY:TAGThe REPOSITORY is what we would commonly refer to as the
name of the container image.
The latest tag is actually the default, and it is used
if no tag is specified.
Note: The latest tag is not always the
most recent version of the software. Tags are actually just labels, and
the latest tag is just a convention.
You may also have noticed that there are a lot more details about the container image in the page.
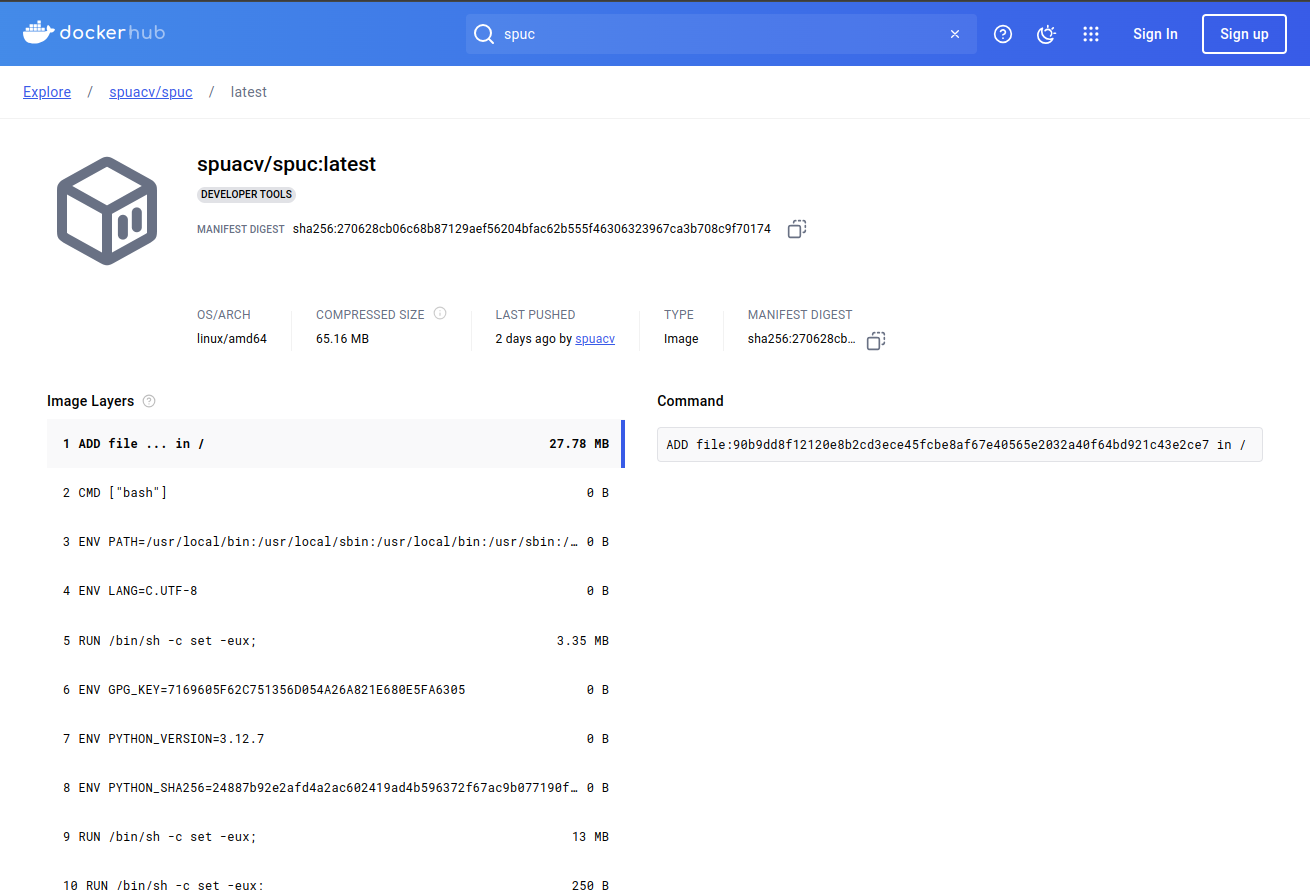
In particular, we can see the image layers, which describe in part how the image was created. This is a very useful feature for understanding what is in the image and evaluating its security.
Some images on Docker Hub are “official images,” which means that they are endorsed by the Docker team.
You can see this, for example, with the Python official image.
In the search box, type “python” and hit enter.
You should see a list of images related to python. We can immediately get a feel of the sheer number of container images hosted here. There is upwards from 10,000 images related to python alone.
Select the top result, which is the endorsed python container image.
The “official” badge is shown on the top right of the repository.

Another thing you may have noticed is that the “owner” of the image
is not shown. This is only true for official images, so instead of
OWNER/CONTAINER_IMAGE_NAME:TAG, the name is just
CONTAINER_IMAGE_NAME:TAG.
Note that anyone can create an account on Docker Hub and share container images there, so it’s important to exercise caution when choosing a container image on Docker Hub. These are some indicators that a container image on Docker Hub is consistently maintained, functional and secure:
- The container image is updated regularly.
- The container image associated with a well established company, community, or other group that is well-known. Docker helps with badges to mark official images, verified publishers and sponsored open source software.
- There is a Dockerfile or other listing of what has been installed to the container image.
- The container image page has documentation on how to use the container image.
- The container image is used by the wider community. The graph on the right at the search page can help with this.
If a container image is never updated, created by a random person, and does not have a lot of metadata, it is probably worth skipping over.
So we found our documentation, lets have a careful read through.
- The Docker Hub is an online repository of container images.
- The repositories include the container image documentation.
- Container images may have multiple versions, indicated by tags.
- The naming convention for Docker container images is:
OWNER/CONTAINER_IMAGE_NAME:TAG
Content from Configuring containers
Last updated on 2026-07-14 | Edit this page
Estimated time: 30 minutes
Well this is interesting! The documentation for the SPUC container tells us that we can set an environment variable to enable an API endpoint for exporting the unicorn sightings. It also mentions that we can pass a parameter to change the units of the brightness of the unicorns. But how can we do this?
Overview
Questions
- How can I set environment variables in a container?
- How can I pass parameters to a container?
- How can I override the default command and entrypoint of a container?
Objectives
- Learn how to configure environment variables and parameters in containers
- Learn how to override the default command and entrypoint of a container
Setting the environment
We know we have to modify the environment variable
EXPORT and set it to True. This should enable
an API endpoint for exporting the unicorn sightings.
This sounds like a useful feature, but how can we set an environment
variable in a container? Thankfully this is quite straightforward, we
can use the -e flag to set an environment variable in a
container.
Lets modifying our run command again:
BASH
docker kill spuc_container
docker run -d --rm --name spuc_container -p 8321:8321 -v ./print.config:/spuc/config/print.config -v spuc-volume:/spuc/output -e EXPORT=true spuacv/spuc:latest
docker logs spuc_container
OUTPUT
[...]
Welcome to the Space Purple Unicorn Counter!

:::: Units set to Imperial Unicorn Hoove Candles [iuhc] ::::

:: Try recording a unicorn sighting with:
    curl -X PUT localhost:8321/unicorn_spotted?location=moon\&brightness=100

:: No plugins detected

:::: Unicorn sightings export activated! ::::
:: Try downloading the unicorn sightings record with:
    curl localhost:8321/export
And now we can see that the export endpoint is available! Lets try it out!
OUTPUT
count,time,location,brightness,units
1,2024-10-16 09:14:17.719447,moon,100,iuhc
2,2024-10-16 09:14:17.726706,earth,10,iuhc
3,2024-10-16 09:14:17.732191,mars,400,iuhc
4,2024-10-16 10:53:13.449393,jupyter,210,iuhc
5,2024-10-16 12:53:51.726902,venus,148,iuhc
This is great! No need to bind mount or exec to get the data out of the container, we can just use the API endpoint.
Defaulting to network style connections is very common in Docker containers and saves a lot of hassle.
Environment variables are a very common tool for configuring containers. They are used to set things like API keys, database connection strings, and other configuration options.
Passing parameters (overriding the command)
In some other cases, parameters are passed to the container to configure its behaviour. This is the case for the brightness units in the SPUC container.
It is actually probably the first change you’d want to do to this particular container. It is recording the brightness of the unicorns in Imperial Unicorn Hoove Candles (iuhc)! This is a very outdated unit and we must change it to the much more standard Intergalactic Unicorn Luminosity Units (iulu).
Fortunately the SPUC documentations tells us that we can pass a
parameter to the container to set these units right. If we look
carefully at the entrypoint and command of the container, we can see
that the default units are set to iuhc there:
BASH
docker inspect spuacv/spuc:latest -f "Entrypoint: {{.Config.Entrypoint}}\nCommand: {{.Config.Cmd}}"OUTPUT
Entrypoint: [python /spuc/spuc.py]
Command: [--units iuhc]
What we have to do, then, is to override the Command part of
the default command. This is actually a very common thing to do when
running containers. It is done by passing a parameter at the end of our
run command, after the image name:
BASH
docker kill spuc_container
docker run -d --rm --name spuc_container -p 8321:8321 -v ./print.config:/spuc/config/print.config -v spuc-volume:/spuc/output -e EXPORT=true spuacv/spuc:latest --units iulu
if we now register some unicorn sightings, we should see the brightness in iulu units.
BASH
curl -X PUT localhost:8321/unicorn_spotted?location=pluto\&brightness=66
curl localhost:8321/export
OUTPUT
count,time,location,brightness,units
1,2024-10-16 09:14:17.719447,moon,100,iuhc
2,2024-10-16 09:14:17.726706,earth,10,iuhc
3,2024-10-16 09:14:17.732191,mars,400,iuhc
4,2024-10-16 10:53:13.449393,jupyter,210,iuhc
5,2024-10-16 12:53:51.726902,venus,148,iuhc
6,2024-10-16 13:14:17.719447,pluto,66,iulu
We can already feel the weight lifting off our shoulders already! But we cannot mix iuhcs with iulus, so lets remove the volume and re-register our sightings with the correct units
BASH
docker kill spuc_container
docker volume rm spuc-volume
docker run -d --rm --name spuc_container -p 8321:8321 -v ./print.config:/spuc/config/print.config -v spuc-volume:/spuc/output -e EXPORT=true spuacv/spuc:latest --units iulu
curl -X PUT localhost:8321/unicorn_spotted?location=moon\&brightness=177
curl -X PUT localhost:8321/unicorn_spotted?location=earth\&brightness=18
curl -X PUT localhost:8321/unicorn_spotted?location=mars\&brightness=709
curl -X PUT localhost:8321/unicorn_spotted?location=jupyter\&brightness=372
curl -X PUT localhost:8321/unicorn_spotted?location=venus\&brightness=262
curl -X PUT localhost:8321/unicorn_spotted?location=pluto\&brightness=66
curl localhost:8321/export
OUTPUT
count,time,location,brightness,units
1,2024-10-16 13:15:03.719371,moon,177,iulu
2,2024-10-16 13:15:03.719398,earth,18,iulu
3,2024-10-16 13:15:03.719410,mars,709,iulu
6,2024-10-16 13:15:03.719425,jupyter,372,iulu
5,2024-10-16 13:15:03.719437,venus,262,iulu
6,2024-10-16 13:15:03.719447,pluto,66,iulu
Finally, we have the correct units for the brightness of the unicorns!
Overriding the entrypoint
We can also override the entrypoint of a container using the
--entrypoint flag. This is useful if you want to run a
different command in the container, or if you want to run the container
interactively.
SPUC has an entrypoint of python /spuc/spuc.py making it
hard to interact with. We can override this using the
--entrypoint flag.
Challenge
Which of these are valid entrypoint and command combinations for the SPUC container? What are the advantages and disadvantages of each?
| Entrypoint | Command | |
|---|---|---|
| A | python /spuc/spuc.py --units iuhc |
|
| B | python /spuc/spuc.py |
--units iuhc |
| C | python |
/spuc/spuc.py --units iuhc |
| D | python /spuc/spuc.py --units iuhc |
These are all valid combinations! The best choice depends on the use case.
This combination bakes the command and the parameters into the image. This is useful if the command is always the same and the specified parameters are unlikely to change (although more may be appended).
This combination allows the command’s arguments to be changed easily, while baking-in which Python script to run.
This combination allows the Python script to be changed easily, which is more likely to be bad than good!
This combination allows maximum flexibility, but it requires the user to write the whole command to modify even the parameters.
Thanks to the SPUC documentation, our service is now running with the best units, and we can export the unicorn sightings using the API endpoint!
What else could we do with this container? Lets look at the docs again!
- Environment variables and overriding the command and entrypoint of containers are the main ways to configure the behaviour of a container. A well structured container will have sensible defaults, but will also allow for configuration to be changed easily.
- Environment variables can be configured using the flag
-e - The command can be used to pass parameters to the container, like
so:
docker run <image> <parameters>
This actually overrides the default command of the container. - The entrypoint can also be overridden using the
--entrypointflag.
Content from Creating Your Own Container Images
Last updated on 2026-07-14 | Edit this page
Estimated time: 60 minutes
Overview
Questions
- How can I create my own container images?
- What is a
Dockerfile?
Objectives
- Learn how to create your own container images using a
Dockerfile. - Introduce the core instructions used in a
Dockerfile. - Learn how to build a container image from a
Dockerfile. - Learn how to run a container from a local container image.
The SPUC documentation just keeps on giving, let’s keep the streak going!
There is another cool feature on there that we haven’t used yet - the ability to add new unicorn analysis features using plugins! Let’s try that out.
The docs says that we need to add a Python file at
/spuc/plugins/ that defines an endpoint for the new
feature.
It would be very handy to be able to get some basic statistics about our Unicorns. Let’s add a new plugin that will return a statistical analysis of the brightness of the unicorns in the database.
First lets make a file stats.py with the following
content:
PYTHON
# stats.py
from __main__ import app
from __main__ import file_path

import pandas as pd
import os

@app.route("/stats", methods=["GET"])
def stats():
    if not os.path.exists(file_path):
        return {"message": "No unicorn sightings yet!"}

    with open(file_path) as f:
        df = pd.read_csv(f)
        df = df.iloc[:, 1:]
        stats = df.describe()
        return stats.to_json()
Don’t worry if you’re not familiar with Python or Pandas.
Understanding this snippet of code is not our aim. The code will return
some statistics about the data in file_path.
We already know how to load this file. Let’s use a bind mount to
share the file with the container. Since we are debugging, we’ll leave
out the -d flag so we can see the output easily.
BASH
docker kill spuc_container
docker run --rm --name spuc_container -p 8321:8321 -v ./print.config:/spuc/config/print.config -v spuc-volume:/spuc/output -v ./stats.py:/spuc/plugins/stats.py -e EXPORT=true spuacv/spuc:latest --units iulu
OUTPUT
[...]
Traceback (most recent call last):
  File "/spuc/spuc.py", line 31, in <module>
    __import__(f"{plugin_dir}.{plugin[:-3]}")
  File "/spuc/plugins/stats.py", line 4, in <module>
    import pandas as pd
ModuleNotFoundError: No module named 'pandas'
Oh… well what can we do about this? Clearly we need to install the
pandas package in the container but how do we do that? We
could do this interactively, but we know that won’t survive a
restart!
Really what we need to do is change the image
itself, so that it has pandas installed by default. This
takes us to one of the most fundamental features of Docker - the ability
to create your own container images.
Creating Docker Images
So how are images made? With a recipe!
Images are created from a text file that contains a list of
instructions, called a Dockerfile. The instructions are
terminal commands, and build the container image up layer by layer.
All Dockerfiles start with a FROM instruction.
This sets the base image for the container. The base image is
the starting point for the container, and all subsequent instructions
are run on top of this base image.
You can use any image as a base image. There are
several official images available on Docker Hub which are very
commonly used. For example, ubuntu for general purpose
Linux, python for Python development, alpine
for a lightweight Linux distribution, and many more.
But of course, the most natural fit for us right now is to use the SPUC image as a base image. This way we can be sure that our new image will have all the dependencies we need.
Let’s create a new file called Dockerfile and add the
following content:
This is the simplest possible Dockerfile - it just says that our new image will be based on the SPUC image.
But what do we do with it? We need to build the image!
To do this we use the docker build command (short for
docker image build). This command takes a Dockerfile and
builds a new image from it. Just as when saving a file, we also need to
name the image we are building. We give the image a name with the
-t (tag) flag:
OUTPUT
[+] Building 0.0s (5/5) FINISHED docker:default
=> [internal] load build definition from Dockerfile 0.0s
=> => transferring dockerfile: 61B 0.0s
=> [internal] load metadata for docker.io/spuacv/spuc:latest 0.0s
=> [internal] load .dockerignore 0.0s
=> => transferring context: 2B 0.0s
=> [1/1] FROM docker.io/spuacv/spuc:latest 0.1s
=> exporting to image 0.0s
=> => exporting layers 0.0s
=> => writing image sha256:ccde35b1f9e872bde522e9fe91466ef983f9b579cffc2f457bff97f74206e839 0.0s
=> => naming to docker.io/library/spuc-stats 0.0sCongratulations, you have now built an image! The command built a new
image called spuc-stats from the Dockerfile in
the current directory.
By default, the docker build command looks for a file
called Dockerfile in the path specified by the last
argument.
This last argument is called the build context, and it must be the path to a directory.
It is very common to see . or ./ used as
the build context, both of which refer to the current directory.
All of the instructions in the Dockerfile are run as if
we were in the build context directory.
If you now list the images on your system you should see the new
image spuc-stats listed:
OUTPUT
spuacv/spuc latest ccde35b1f9e8 25 hours ago 137MB
spuc-stats latest 21210c129ca9 5 minutes ago 137MBWe can now run this image in the same way we would run any other image:
OUTPUT
\
\
\\
\\\
>\/7
_.-(º \
(=___._/` \ ____ ____ _ _ ____
) \ |\ / ___|| _ \| | | |/ ___|
/ / ||\ \___ \| |_) | | | | |
/ > /\\\ ___) | __/| |__| | |___
j < _\ |____/|_| \____/ \____|
_.-' : ``.
\ r=._\ `. Space Purple Unicorn Counter
<`\\_ \ .`-.
\ r-7 `-. ._ ' . `\
\`, `-.`7 7) )
\/ \| \' / `-._
|| .'
\\ (
>\ >
,.-' >.'
<.'_.''
<'
Welcome to the Space Purple Unicorn Counter!
:::: Units set to Imperial Unicorn Hoove Candles [iuhc] ::::
:: Try recording a unicorn sighting with:
curl -X PUT localhost:8321/unicorn_spotted?location=moon\&brightness=100
:: No plugins detectedSo we have a copy of the SPUC image with a new name, but nothing has
changed! In fact, we can pass all the same arguments to the
docker run command as we did before:
BASH
docker run --rm --name spuc-stats_container -p 8321:8321 -v ./print.config:/spuc/config/print.config -v spuc-volume:/spuc/output -v ./stats.py:/spuc/plugins/stats.py -e EXPORT=true spuc-stats --units iuluOUTPUT
Traceback (most recent call last):
File "/spuc/spuc.py", line 31, in <module>
__import__(f"{plugin_dir}.{plugin[:-3]}")
File "/spuc/plugins/stats.py", line 4, in <module>
import pandas as pd
ModuleNotFoundError: No module named 'pandas'We are back where we were, but we can now start to make this container image our own!
Let’s first fix that dependency problem. We do this by adding a
RUN instruction to the Dockerfile. This
instruction runs a command in the container and then saves the result as
a new layer in the image. In this case we want to install the
pandas package so we add the following lines to the
Dockerfile:
This will install the pandas package in the container
using Python’s package manager pip. Now we can build the
image again:
OUTPUT
[+] Building 11.1s (6/6) FINISHED docker:default
[...]
=> CACHED [1/2] FROM docker.io/spuacv/spuc:latest 0.0s
=> [2/2] RUN pip install pandas 10.5s
=> exporting to image 0.4s
=> => exporting layers 0.4s
=> => writing image sha256:e548b862a5c4dd91551668e068d4ad46e6a25d3a3dbed335e780a01f954a2c26 0.0s
=> => naming to docker.io/library/spuc-stats 0.0sYou might have noticed a warning about running pip as
the root user. We are building a container image, not installing
software on our host machine, so we can ignore this warning.
Let’s run the image again:
BASH
docker run --rm --name spuc-stats_container -p 8321:8321 -v ./print.config:/spuc/config/print.config -v spuc-volume:/spuc/output -v ./stats.py:/spuc/plugins/stats.py -e EXPORT=true spuc-stats --units iuluOUTPUT
[...]
Welcome to the Space Purple Unicorn Counter!
[...]
:::: Plugins loaded! ::::
:: Available plugins
stats.py
[...]It worked! We no longer get the error about the missing
pandas package, and the plugin is loaded!
Let’s try out the new endpoint (you may want to do this from another
terminal, or exit with Ctrl+C and re-run with
-d first):
OUTPUT
{"brightness":{"count":6.0,"mean":267.3333333333,"std":251.7599385658,"min":18.0,"25%":93.75,"50%":219.5,"75%":344.5,"max":709.0}}And there we have it! We have created our own container image with a new feature!
But why stop here? We could keep modifying the image to make it more how we would like by default.
COPY
It is a bit annoying having to bind mount the stats.py
file every time we run the container. This makes sense for development,
because we can potentially modify the script while the container runs,
but we would like to distribute the image with the plugin already
installed.
We can add this file to the image itself using the COPY
instruction. This copies files from the host machine into the container
image. It takes two arguments: the source file on the host machine and
the destination in the container image.
Let’s add it to the Dockerfile:
DOCKERFILE
# Dockerfile
FROM spuacv/spuc:latest
RUN pip install pandas
COPY stats.py /spuc/plugins/stats.pyNow we can build the image again:
OUTPUT
[...]
=> [1/3] FROM docker.io/spuacv/spuc:latest 0.0s
=> [internal] load build context 0.0s
=> => transferring context: 287B 0.0s
=> CACHED [2/3] RUN pip install pandas 0.0s
=> [3/3] COPY stats.py /spuc/plugins/stats.py 0.0s
=> exporting to image 0.0s
[...]You might have now noticed that on every build we are getting
messages like CACHED [2/3]... above.
Every instruction* in a Dockerfile creates a new layer
in the image.
Each layer is saved with a specific hash. If the set of instructions up to that layer remain unchanged, Docker will use the cached layer, instead of rebuilding it. This results in a lot of time and space being saved!
In the case above, we had already run the FROM and
RUN instructions in a previous build. Docker was able to
use the cached layers for those 2 instructions, and only had to do some
work for the COPY layer.
And run the image again, but this time without the bind mount for the
stats.py file:
BASH
docker run --rm --name spuc-stats_container -p 8321:8321 -v ./print.config:/spuc/config/print.config -v spuc-volume:/spuc/output -e EXPORT=true spuc-stats --units iuluOUTPUT
[...]
Welcome to the Space Purple Unicorn Counter!
[...]
:::: Plugins loaded! ::::
:: Available plugins
stats.py
[...]The plugin is still loaded!
And again… why stop there? We’ve already configured the print how we like it, so lets add it to the image as well!
DOCKERFILE
# Dockerfile
FROM spuacv/spuc:latest

RUN pip install pandas
COPY stats.py /spuc/plugins/stats.py
COPY print.config /spuc/config/print.configNow we rebuild and re-run (without the bind mount for
print.config):
BASH
docker build -t spuc-stats ./
docker run --rm --name spuc_container -p 8321:8321 -v spuc-volume:/spuc/output -e EXPORT=True spuc-stats --units iuluOUTPUT
[...]
=> [1/4] FROM docker.io/spuacv/spuc:latest 0.0s
=> [internal] load build context 0.0s
=> => transferring context: 152B 0.0s
=> CACHED [2/4] RUN pip install pandas 0.0s
=> CACHED [3/4] COPY stats.py /spuc/plugins/stats.py 0.0s
=> [4/4] COPY print.config /spuc/config/print.config 0.0s
=> exporting to image 0.0s
[...]
Welcome to the Space Purple Unicorn Counter!
[...]OOh! a unicorn! lets record it!
OUTPUT
{"message":"Unicorn sighting recorded!"}and the logs confirm copying the print config worked:
OUTPUT
[...]
::::: Unicorn number 7 spotted at saturn! Brightness: 87 iuluThe run command is definitely improving! Is there
anything else we can do to make it even better?
ENV
We can also set environment variables in the Dockerfile
using the ENV instruction. These can always be overridden
when running the container, as we have done ourselves, but it is useful
to set defaults. We like the EXPORT variable set to
True, so let’s add that to the Dockerfile:
DOCKERFILE
# Dockerfile
FROM spuacv/spuc:latest

RUN pip install pandas

COPY stats.py /spuc/plugins/stats.py
COPY print.config /spuc/config/print.config
ENV EXPORT=TrueRebuilding and running (without the -e EXPORT=True flag)
results in:
BASH
docker build -t spuc-stats ./
docker run --rm --name spuc-stats_container -p 8321:8321 -v spuc-volume:/spuc/output spuc-stats --units iulu
OUTPUT
[...]
 => [1/4] FROM docker.io/spuacv/spuc:latest                                                         0.0s
 => [internal] load build context                                                                   0.0s
 => => transferring context: 61B                                                                    0.0s
 => CACHED [2/4] RUN pip install pandas                                                             0.0s
 => CACHED [3/4] COPY stats.py /spuc/plugins/stats.py                                               0.0s
 => CACHED [4/4] COPY print.config /spuc/config/print.config                                        0.0s
 => exporting to image                                                                              0.0s
[...]
Welcome to the Space Purple Unicorn Counter!
[...]
:::: Unicorn sightings export activated! ::::
:: Try downloading the unicorn sightings record with:
    curl localhost:8321/export
The EXPORT variable is now set to True by
default!
ARG
There is another instruction called ARG that is used to
set variables in the Dockerfile. These variables are only
available during the build process, and are not saved in the image.
You might have noticed that the ENV instruction did not
create a new layer in the image.
This instruction is a bit special, as it only modifies the configuration of the image. The environment is set on every instruction of the dockerfile, so it is not saved as a separate layer.
However, environment variables can have an effect on
instructions bellow it. Because of this, moving the ENV
instruction will change the layers, and the cache is no longer
valid.
We can see this by moving the ENV instruction in our
Dockerfile before the RUN command:
DOCKERFILE
# Dockerfile
FROM spuacv/spuc:latest

ENV EXPORT=True

RUN pip install pandas

COPY stats.py /spuc/plugins/stats.py
COPY print.config /spuc/config/print.config
If we now try to build again, we will get this output:
OUTPUT
[+] Building 10.4s (9/9) FINISHED                                                         docker:default
 => [internal] load build definition from Dockerfile                                                0.0s
 => => transferring dockerfile: 187B                                                                0.0s
 => [internal] load metadata for docker.io/spuacv/spuc:latest                                       0.0s
 => [internal] load .dockerignore                                                                   0.0s
 => => transferring context: 2B                                                                     0.0s
 => CACHED [1/4] FROM docker.io/spuacv/spuc:latest                                                  0.0s
 => [internal] load build context                                                                   0.0s
 => => transferring context: 61B                                                                    0.0s
 => [2/4] RUN pip install pandas                                                                    9.8s
 => [3/4] COPY stats.py /spuc/plugins/stats.py                                                      0.0s
 => [4/4] COPY print.config /spuc/config/print.config                                               0.0s
 => exporting to image                                                                              0.5s
 => => exporting layers                                                                             0.5s
 => => writing image sha256:5a64cc132a7cbbc532b9e97dd17e5fb83239dfe42dae9e6df4d150c503d73691        0.0s
 => => naming to docker.io/library/spuc-stats                                                       0.0s
As you can see, the first layer is cached, but everything after the
ENV instruction is rebuilt. Our environment variable has
absolutely no effect on the RUN instruction, but Docker
does not know that. The only thing that matters is that it
could have had an effect.
It is therefore recommended that you put the ENV
instructions only when they are needed.
A similar thing happens with the ENTRYPOINT and
CMD instructions, which we will cover next. Since these are
not needed at all during the build, they are best placed at the end of
the Dockerfile.
ENTRYPOINT and CMD
We’re on a bit of a roll here! Let’s add one more modification to the image. Let’s change away from those imperial units by default.
We can do this by changing the default command in the
Dockerfile. As you may remember, the default command is
composed of an entrypoint and a command. We can modify
either of them in the Dockerfile. Just to make clear wheat the full
command is directly from our dockerfile, lets write down both:
DOCKERFILE
# Dockerfile
FROM spuacv/spuc:latest

ENV EXPORT=True

RUN pip install pandas

COPY stats.py /spuc/plugins/stats.py
COPY print.config /spuc/config/print.config

ENTRYPOINT ["python", "/spuc/spuc.py"]
CMD ["--units", "iulu"]
Notice that we used an array syntax. Both the ENTRYPOINT
and CMD instructions can take a list of arguments, and the
array syntax ensures that the arguments are passed correctly.
Let’s give this a try, dropping the now unnecessary
--units iulu from the docker run command:
BASH
docker build -t spuc-stats ./
docker run --rm --name spuc-stats_container -p 8321:8321 -v spuc-volume:/spuc/output spuc-stats
OUTPUT
[...]
 => [1/4] FROM docker.io/spuacv/spuc:latest                                                         0.0s
 => CACHED [2/4] RUN pip install pandas                                                             0.0s
 => CACHED [3/4] COPY stats.py /spuc/plugins/stats.py                                               0.0s
 => CACHED [4/4] COPY print.config /spuc/config/print.config                                        0.0s
 => exporting to image                                                                              0.0s
[...]
:::: Units set to Intergalactic Unicorn Luminosity Units [iulu] ::::
[...]
Much better! A far cleaner command, much more customised for our use case!
Building containers from the ground up
In this lesson we adjusted the SPUC image, which already contains a service. This is a perfectly valid way of using Dockerfiles! But it is not the most common.
While you can base your images on any other public image, it is most common for developers to be creating containers ‘from the ground up’.
The most common practice is creating images from images like
ubuntu or alpine and adding your own software
and configuration files. An example of this is how the developers of the
SPUC service created their image. The Dockerfile is reproduced
below:
DOCKERFILE
FROM python:3.12-slim

RUN apt update
RUN apt install -y curl

WORKDIR /spuc

COPY ./requirements.txt /spuc/requirements.txt

RUN pip install --no-cache-dir --upgrade -r /spuc/requirements.txt

COPY ./*.py /spuc/
COPY ./config/*.config /spuc/config/
RUN mkdir /spuc/output

EXPOSE 8321

ENTRYPOINT ["python", "/spuc/spuc.py"]
CMD ["--units", "iuhc"]
From this we can see the developers:
- Started
FROMapython:3.12-slimimage - Use
RUNto install the required packages -
COPYthe source code and configuration files - Set the default
ENTRYPOINTandCMD.
There are also two other instructions in this Dockerfile that we haven’t covered yet.
-
WORKDIRsets the working directory for the container. It is used to create a directory and then change into it. You may have noticed before that when we exec into the SPUC container we start in the/spucdirectory. All of the commands after aWORKDIRinstruction are run from the directory it sets. -
EXPOSEis used to expose a port from the container to the host machine. This is not strictly necessary, but it is a good practice to document which ports the service uses.
- You can create your own container images using a
Dockerfile. - A
Dockerfileis a text file that contains a list of instructions to produce a container image. - Each instruction in a
Dockerfilecreates a newlayerin the image. -
FROM,WORKDIR,RUN,COPY,ENV,ENTRYPOINTandCMDare some of the most important instructions used in aDockerfile. - To build a container image from a
Dockerfileyou use the command:docker build -t <image_name> <context_path> - You can run a container from a local image just like any other image, with docker run.
Content from Using Docker Compose
Last updated on 2026-07-14 | Edit this page
Estimated time: 60 minutes
Overview
Questions
- What is Docker Compose?
- Why and when would I use it?
- How can I translate my
docker runcommands into acompose.ymlfile? - How can I make containers communicate with each other?
Objectives
- Learn how to run multiple containers together.
- Clean up our run command for once and for all.
We’ve manage to come a long way in making the SPUC container work better for us, but it still lacks a little something. If we want to open this service to our local community, we can hardly expect them to hit the API with a curl command!
Luckily, the SPUA released the SPUC Super Visualiser (SPUCSVi)! The SPUCSVi is a web-based tool that allows you to register unicorn sightings, and also see the record of unicorn sightings. Handily, the SPUA also made it available as a Docker container.
Now that you have seen several docker run commands, you
can well imagine how cumbersome running multiple containers can get.
Even more so if we want the different containers to play well with each
other.
Enter: Docker Compose!
Docker Compose is a tool for defining and running multi-container applications. With Compose, you use a YAML file to configure your application’s services. Then, with a single command, you create and start all the services from your configuration.
Let’s take a look at Docker Compose and see how it can help us run SPUC and SPUCSVi.
Running a container
As an initial step, we will learn how to run a container using Docker Compose.
The first thing we need to do is create a compose.yml
file. All compose.yml files start with
services:. This is the root element under which we define
the services we want to run.
Next, let’s add the service for the SPUC container. We’ll call it
spuc and we will tell it what image to
use.
YML
# compose.yml
services:
spuc: # The name of the service
image: spuacv/spuc:latest # The image to useThis is actually enough for us to run the container! But we won’t use
docker run any more.
Instead, we will use the base command docker compose. To
run the services, we add the command up, signalling that we
want to bring services up (i.e. start them).
OUTPUT
[+] Running 2/0
 ✔ Network docker_intro_default   Created                           0.1s
 ✔ Container docker_intro-spuc-1  Created                           0.0s
Attaching to spuc-1
spuc-1  |
spuc-1  |             \
spuc-1  |              \
spuc-1  |               \\
spuc-1  |                \\\
spuc-1  |                 >\/7
spuc-1  |             _.-(º   \
spuc-1  |            (=___._/` \            ____  ____  _    _  ____
spuc-1  |                 )  \ |\          / ___||  _ \| |  | |/ ___|
spuc-1  |                /   / ||\         \___ \| |_) | |  | | |
spuc-1  |               /    > /\\\         ___) |  __/| |__| | |___
spuc-1  |              j    < _\           |____/|_|    \____/ \____|
spuc-1  |          _.-' :      ``.
spuc-1  |          \ r=._\        `.       Space Purple Unicorn Counter
spuc-1  |         <`\\_  \         .`-.
spuc-1  |          \ r-7  `-. ._  ' .  `\
spuc-1  |           \`,      `-.`7  7)   )
spuc-1  |            \/         \|  \'  / `-._
spuc-1  |                       ||    .'
spuc-1  |                        \\  (
spuc-1  |                         >\  >
spuc-1  |                     ,.-' >.'
spuc-1  |                    <.'_.''
spuc-1  |                      <'
spuc-1  |
spuc-1  |
spuc-1  | Welcome to the Space Purple Unicorn Counter!
spuc-1  |
spuc-1  | :::: Units set to Imperial Unicorn Hoove Candles [iuhc] ::::
spuc-1  |
spuc-1  | :: Try recording a unicorn sighting with:
spuc-1  |     curl -X PUT localhost:8321/unicorn_spotted?location=moon\&brightness=100
spuc-1  |
spuc-1  | :: No plugins detected
spuc-1  |
So we have our container running! With a couple of interesting bits of output to note:
- A container was created named
docker-intro-spuc-1. (The directory name is prepended to the container name) - A
networkwas created for the container - we will dig into what this means later! - The tool is running in the foreground, so we can see the output of the tool
We can stop the container by pressing [Ctrl+C] in the
terminal.
Configuring the container
We have managed to run our container, but we are still a way off from
reproducing our last run command. It’s ok, we need to add
more configuration to our Docker Compose file.
Let’s recall our docker run command for the regular SPUC
container (rather than the one we made ourselves - we’ll get to that in
a bit):
BASH
docker run -d --rm --name spuc_container -p 8321:8321 -v ./print.config:/spuc/config/print.config -v spuc-volume:/spuc/output -v stats.py:/spuc/plugins/stats.py -e EXPORT=true spuacv/spuc:latest --units iuluThere are a lot of flags here! Each of these flags has a
corresponding key in Docker Compose. Lets order all the elements we want
in a table, so we can see what we need to add to our
compose.yml file.
| Flag | Description |
|---|---|
-d |
Run the container in the background |
--rm |
Remove the container when it stops |
--name spuc_container |
Name the container spuc_container
|
-p 8321:8321 |
Map port 8321 on the host to port 8321 in the container |
-v ./print.config:/spuc/config/print.config |
Bind mount the ./print.config file into the
container |
-v spuc-volume:/spuc/output |
Persist the /spuc/output directory in a volume |
-v ./stats.py:/spuc/plugins/stats.py |
Bind mount the ./stats.py plugin into the
container |
-e EXPORT=true |
Set the environment variable EXPORT to
true
|
--units iulu |
Set the units to Imperial Unicorn Length Units |
We can now start translate this into a Docker Compose file bit by bit!
Running in the background
To run a docker compose stack in the background, we can use the
-d (for detach) flag when calling
docker compose up.
OUTPUT
[+] Running 1/1
 ✔ Container docker-intro-spuc-1  Started                                   0.2s
Of course, this means we can no longer see the logs! But we can still
access them using the logs command.
OUTPUT
spuc-1  |
spuc-1  |             \
spuc-1  |              \
spuc-1  |               \\
spuc-1  |                \\\
spuc-1  |                 >\/7
spuc-1  |             _.-(º   \
spuc-1  |            (=___._/` \            ____  ____  _    _  ____
spuc-1  |                 )  \ |\          / ___||  _ \| |  | |/ ___|
spuc-1  |                /   / ||\         \___ \| |_) | |  | | |
spuc-1  |               /    > /\\\         ___) |  __/| |__| | |___
spuc-1  |              j    < _\           |____/|_|    \____/ \____|
spuc-1  |          _.-' :      ``.
spuc-1  |          \ r=._\        `.       Space Purple Unicorn Counter
spuc-1  |         <`\\_  \         .`-.
spuc-1  |          \ r-7  `-. ._  ' .  `\
spuc-1  |           \`,      `-.`7  7)   )
spuc-1  |            \/         \|  \'  / `-._
spuc-1  |                       ||    .'
spuc-1  |                        \\  (
spuc-1  |                         >\  >
spuc-1  |                     ,.-' >.'
spuc-1  |                    <.'_.''
spuc-1  |                      <'
spuc-1  |
spuc-1  |
spuc-1  | Welcome to the Space Purple Unicorn Counter!
spuc-1  |
spuc-1  | :::: Units set to Imperial Unicorn Hoove Candles [iuhc] ::::
spuc-1  |
spuc-1  | :: Try recording a unicorn sighting with:
spuc-1  |     curl -X PUT localhost:8321/unicorn_spotted?location=moon\&brightness=100
spuc-1  |
spuc-1  | :: No plugins detected
spuc-1  |
spuc-1  |
spuc-1  |             \
spuc-1  |              \
spuc-1  |               \\
spuc-1  |                \\\
spuc-1  |                 >\/7
spuc-1  |             _.-(º   \
spuc-1  |            (=___._/` \            ____  ____  _    _  ____
spuc-1  |                 )  \ |\          / ___||  _ \| |  | |/ ___|
spuc-1  |                /   / ||\         \___ \| |_) | |  | | |
spuc-1  |               /    > /\\\         ___) |  __/| |__| | |___
spuc-1  |              j    < _\           |____/|_|    \____/ \____|
spuc-1  |          _.-' :      ``.
spuc-1  |          \ r=._\        `.       Space Purple Unicorn Counter
spuc-1  |         <`\\_  \         .`-.
spuc-1  |          \ r-7  `-. ._  ' .  `\
spuc-1  |           \`,      `-.`7  7)   )
spuc-1  |            \/         \|  \'  / `-._
spuc-1  |                       ||    .'
spuc-1  |                        \\  (
spuc-1  |                         >\  >
spuc-1  |                     ,.-' >.'
spuc-1  |                    <.'_.''
spuc-1  |                      <'
spuc-1  |
spuc-1  |
spuc-1  | Welcome to the Space Purple Unicorn Counter!
spuc-1  |
spuc-1  | :::: Units set to Imperial Unicorn Hoove Candles [iuhc] ::::
spuc-1  |
spuc-1  | :: Try recording a unicorn sighting with:
spuc-1  |     curl -X PUT localhost:8321/unicorn_spotted?location=moon\&brightness=100
spuc-1  |
spuc-1  | :: No plugins detected
spuc-1  |
Now… something a bit funny is happening here… why are we seeing the output twice?
We’ve actually started the same container twice! We only
stopped the container when we pressed
[Ctrl+C], and didn’t remove it.
Removing the container when it stops
We can stop and remove the container with the down
command.
OUTPUT
[+] Running 2/2
 ✔ Container docker_intro-spuc-1  Removed                                  0.1s
 ✔ Network docker_intro_default   Removed                                  0.2s
In practice, you only need to use down if you
need to remove the container. If you just want to stop it, you
can use [Ctrl+C] like we did before.
Naming the container
The next item in our list is the name of the container. We can name
the container using the container_name key.
YML
# compose.yml
services:
  spuc:
    image: spuacv/spuc:latest
container_name: spuc_container # The name of the containerOUTPUT
[+] Running 2/0
 ✔ Network docker-intro_default          Created                           0.0s
✔ Container spuc_container Started 0.0sYou do not necessarily need to down your containers to
update the configuration, Docker Compose can be smart like
that.
You can update the compose.yml file in your text editor
and then run docker compose up -d to see the changes take
effect.
Warning: This is not always foolproof! Some changes
will require a rebuild of the container. It is also worth noting that
Docker Compose does not save the status with which you started
your services. When you do a down, it will look at the
current file, and stop the services as described in that
file.
Exporting a port
Currently, if we attempt to record a sighting of a unicorn, we will get a connection refused error.
OUTPUT
curl: (7) Failed to connect to localhost port 8321 after 0 ms: Could not connect to serverThis is because we haven’t mapped the port from the container to the
host. We can do this using the ports key using the notation
host_port:container_port.
It’s worth noting the ports key is a list, so we can map
multiple ports if we need to, and that the host and container ports
don’t have to be the same!
YML
# compose.yml
services:
  spuc:
    image: spuacv/spuc:latest
    container_name: spuc_container
    ports:                          # Starts the list of ports to map
- 8321:8321 # Maps port 8321 on the host to port 8321 in the containerOUTPUT
[+] Running 2/0
 ✔ Network docker-intro_default          Created                           0.0s
 ✔ Container spuc_container              Created                           0.0s
Now we can record a unicorn sighting!
OUTPUT
{"message":"Unicorn sighting recorded!"}Bind mounts
As before, we want to make sure that our print configuration is being used by SPUC. We will use a bind mount for this - mapping a file from the host to the container.
As with the CLI, this is (confusingly) done using the
volumes key.
YML
# compose.yml
services:
  spuc:
    image: spuacv/spuc:latest
    container_name: spuc_container
    ports:
      - 8321:8321
    volumes:                                        # Starts the list of volumes/bind mounts
- ./print.config:/spuc/config/print.config # Bind mounts the print.config fileOUTPUT
[+] Running 2/2
 ✔ Network docker_intro_default  Created                           0.1s
 ✔ Container spuc_container      Started                           0.2s
Now, if you record some sightings, you should see them formatted
according to the configuration in print.config.
As before, whether a bind mount or volume is performed is based on
whether the argument on the left of the colon is a name or a
path. If it is a path (i.e. starts with /
or ./), it generates a bind mount. Otherwise, it generates
a volume.
Volumes
Let’s add a volume to persist the unicorn sightings between runs of the container.
YML
# compose.yml
services:
  spuc:
    image: spuacv/spuc:latest
    container_name: spuc_container
    ports:
      - 8321:8321
    volumes:
      - ./print.config:/spuc/config/print.config
- spuc-volume:/spuc/output # Mounts the volume named spuc-volumeOUTPUT
service "spuc" refers to undefined volume spuc-volume: invalid compose projectOops! We forgot to declare the volume! Although we added the instruction to use the volume, we didn’t tell Docker Compose that we needed that volume.
We can do this by adding a volumes key to the file. The
volumes are separate from services, so they are declared at the
same level. To declare a named volume, we specify its name and end with
a :. We will do this at the end of the file.
YML
# compose.yml
services:
  spuc:
    image: spuacv/spuc:latest
    container_name: spuc_container
    ports:
      - 8321:8321
    volumes:
      - ./print.config:/spuc/config/print.config
      - spuc-volume:/spuc/output              # Mounts the volume named spuc-volume

volumes:                                      # Starts section for declaring volumes
spuc-volume: # Declares a volume named spuc-volumeOUTPUT
[+] Running 2/2
 ✔ Volume "docker_intro_spuc-volume"  Created                            0.0s
 ✔ Container spuc_container           Started                           10.3s
Now, if you record some sightings and then stop and start the container, you should see that the sightings are still there!
However, we can now use a cool feature of Docker Compose - the ability to remove volumes when the container is removed.
We can do this using the -v flag with the
down command. Which tells Docker to remove any volumes
named in the volumes key.
You can confirm this by running docker volume ls before
and after running down.
OUTPUT
DRIVER        VOLUME NAME
local         docker_intro_spuc-volume
local         spuc-volume

[+] Running 3/3
 ✔ Container spuc_container         Removed                   10.2s
 ✔ Volume docker_intro_spuc-volume  Removed                    0.0s
 ✔ Network docker_intro_default     Removed                    0.2s

DRIVER        VOLUME NAME
local         spuc-volume
Setting an environment variable
Next, we need to set the EXPORT environment variable to
true. This is done using the environment
key.
YML
# compose.yml
services:
  spuc:
    image: spuacv/spuc:latest
    container_name: spuc_container
    ports:
      - 8321:8321
    volumes:
      - ./print.config:/spuc/config/print.config
      - spuc-volume:/spuc/output
    environment:                      # Starts list of environment variables to set
      - EXPORT=true                   # Sets the EXPORT environment variable to true

volumes:
spuc-volume:OUTPUT
[...]
spuc_container  |
spuc_container  | :::: Unicorn sightings export activated! ::::
spuc_container  | :: Try downloading the unicorn sightings record with:
spuc_container  |     curl localhost:8321/export
spuc_container  |
We can see that the environment variable has been set by the output of the tool and the export functionality is now available.
Overriding the default command
Finally, lets set the units by overriding the command, as we did
before. For this, we use the command key.
YML
# compose.yml
services:
  spuc:
    image: spuacv/spuc:latest
    container_name: spuc_container
    ports:
      - 8321:8321
    volumes:
      - ./print.config:/spuc/config/print.config
      - spuc-volume:/spuc/output
    environment:
      - EXPORT=true
    command: ["--units", "iulu"]          # Overrides the default command

volumes:
spuc-volume:OUTPUT
[...]
spuc_container  |
spuc_container  | :::: Units set to Intergalactic Unicorn Luminosity Units [iulu] ::::
spuc_container  |
[...]
Enabling the plugin
We’re nearly back to where we were with our docker run
command! The only thing we are missing is enabling the plugin.
We used a bind mount before to put the plugin file in the container, so lets try again:
YML
# compose.yml
services:
  spuc:
    image: spuacv/spuc:latest
    container_name: spuc_container
    ports:
      - 8321:8321
    volumes:
      - ./print.config:/spuc/config/print.config
      - spuc-volume:/spuc/output
      - ./stats.py:/spuc/plugins/stats.py        # Mounts the stats.py plugin
    environment:
      - EXPORT=true
    command: ["--units", "iulu"]

volumes:
spuc-volume:OUTPUT
[+] Running 1/1
 ✔ Container spuc_container  Started                            10.3s
Seems to have worked, lets look at the logs to see if the plugin was loaded.
OUTPUT
spuc_container  | Traceback (most recent call last):
spuc_container  |   File "/spuc/spuc.py", line 31, in <module>
spuc_container  |     __import__(f"{plugin_dir}.{plugin[:-3]}")
spuc_container  |   File "/spuc/plugins/stats.py", line 4, in <module>
spuc_container  |     import pandas as pd
spuc_container  | ModuleNotFoundError: No module named 'pandas'
Oh no! We’ve hit an error! The pandas library isn’t
installed in the container - which was the whole reason that we made our
own container in the first place!
Let’s go back to that.
Building containers in Docker Compose
We could use the tag we used when we built the container to use that image:
YML
# compose.yml
services:
  spuc:
    image: spuc-stats   # Use the image we built earlier
    container_name: spuc_container
    ports:
      - 8321:8321
    volumes:
      - ./print.config:/spuc/config/print.config
      - spuc-volume:/spuc/output
      - ./stats.py:/spuc/plugins/stats.py        # Mounts the stats.py plugin
    environment:
      - EXPORT=true
    command: ["--units", "iulu"]

volumes:
  spuc-volume:
However, this would mean that if we want to adjust our locally built container, we would have to rebuild it separately.
Instead, we can use the build key to tell Docker Compose
to build the container if needed.
To do that, we use the build key instead of the
image key:
YML
# compose.yml
services:
  spuc:
  # image: spuc-stats
    build:                        # Instead of using the 'image' key, we use the 'build' key
      context: .                  # Sets the build context (the directory in which the Dockerfile is located)
      dockerfile: Dockerfile      # Sets the name of the Dockerfile
    container_name: spuc_container
    ports:
      - 8321:8321
    volumes:
      - ./print.config:/spuc/config/print.config
      - spuc-volume:/spuc/output
      - ./stats.py:/spuc/plugins/stats.py
    environment:
      - EXPORT=true
    command: ["--units", "iulu"]

volumes:
  spuc-volume:
This tells docker compose to look for the Dockerfile in the current directory. If needed, it will then build the container and tag it with the current directory and service names.
Now, we have to be a little careful with our up command! If we run
up, Docker Compose will default to checking if the image
exists and if it does, it will use that image. This is ok… unless we
have made changes to the Dockerfile!
To ensure that the image is built, we can run
docker compose build. This will build (all) the image(s)
specified inside our compose.yml. After building, we use
the usual up command.
Alternatively, we can add the --build flag to the
up command, which results in Docker building the image
right before starting the container. This will rebuild the image every
time you run it, but use cached layers if they exist.
Let’s start our services using that flag, and verify that the plugin is loaded.
OUTPUT
[+] Building 9.2s (10/10) FINISHED                                                        docker:default
 => [spuc internal] load build definition from Dockerfile                                           0.0s
 => => transferring dockerfile: 250B                                                                0.0s
 => [spuc internal] load metadata for docker.io/spuacv/spuc:latest                                  0.0s
 => [spuc internal] load .dockerignore                                                              0.0s
 => => transferring context: 2B                                                                     0.0s
 => [spuc 1/4] FROM docker.io/spuacv/spuc:latest                                                    0.1s
 => [spuc internal] load build context                                                              0.0s
 => => transferring context: 546B                                                                   0.0s
 => [spuc 2/4] RUN pip install pandas                                                               8.5s
 => [spuc 3/4] COPY stats.py /spuc/plugins/stats.py                                                 0.0s
 => [spuc 4/4] COPY print.config /spuc/config/print.config                                          0.0s
 => [spuc] exporting to image                                                                       0.5s
 => => exporting layers                                                                             0.5s
 => => writing image sha256:b17d7f75ac398b083476cc3fda502875b1d1355b59ad2bdc9d0526f202be9c05        0.0s
 => => naming to docker.io/library/docker_intro-spuc                                                0.0s
 => [spuc] resolving provenance for metadata file                                                   0.0s
[+] Running 1/1
 ✔ Container spuc_container  Started                                                                0.3s
[...]
spuc_container  |
spuc_container  | :::: Plugins loaded! ::::
spuc_container  | :: Available plugins
spuc_container  |     stats.py
spuc_container  |
[...]
You should now have a container running with the stats plugin enabled!
You may have noticed that we ended up duplicating most of
the configuration from the Dockerfile within the
compose.yml file.
In reality, if we are using Docker Compose we do not need to bake in
all of the configuration inside the Dockerfile. The only thing that was
different was the pip install pandas command. Therefore,
our dockerfile could be as simple as this:
Alternatively, we could simplify our compose.yml file by
removing the duplicated configuration. However, this would make the
compose.yml file less self-contained and more dependent on
the Dockerfile. It is usually a better idea to keep the configuration in
the compose.yml file, as it makes it easier to understand
and maintain.
Connecting multiple services
We have now managed to replicate our docker run command
in a more readable and maintainable way.
There is an argument to be made that, even for running a single
service, Docker Compose is a useful tool. It brings an ephemeral run
command, that would need careful documentation to replicate, into a
single file that can be version controlled and shared. It is also much
easier on the eye than a long docker run command!
Where Docker Compose really shines, though, is when you have multiple services that need to be run together. And we happen to have another service that we need to run - SPUCSVi!
Adding SPUCSVi to our Docker Compose file
We can add SPUCSVi to our Docker Compose file in the same way that we
added SPUC, by adding another service to the services
key.
The SPUCSVi documentation helpfully provides a table of configuration options what we can use to configure the service, reproduced here:
| Item | Description | Default |
|---|---|---|
| Image Name | The name of the image to use | spuacv/spucsvi:latest |
| Port | The container port the service runs on | 8322 |
| SPUC_URL | An environment variable to set the URL of the SPUC service | http://spuc:8321 |
We can use this to add SPUCSVi to our Docker Compose file!
But how do we know the correct URL for the SPUC service? This touches on a couple of clever tricks that Docker Compose uses to make running multiple services easier.
First, Docker Compose creates a network for each stack that it starts. This means that, unless overridden, all services in the stack can communicate with each other.
Second, Docker Compose uses the service name as the hostname for the
service. This means that we can use the service name as the hostname in
the URL! For our service named spuc, the hostname would be
spuc with the protocol http prepended and
port appended i.e. http://spuc:8321.
Knowing this, we are able to add SPUCSVi to our Docker Compose file!
YML
# compose.yml
services:
  spuc:
    build:
      context: .
      dockerfile: Dockerfile
    container_name: spuc_container
    ports:
      - 8321:8321
    volumes:
      - ./print.config:/spuc/config/print.config
      - spuc-volume:/spuc/output
      - ./stats.py:/spuc/plugins/stats.py
    environment:
      - EXPORT=true
    command: ["--units", "iulu"]

  spucsvi:                            # Declare a new service named spucsvi
    image: spuacv/spucsvi:latest      # Specify the image to use
    container_name: spucsvi_container # Name the container spucsvi
    ports:                            #
      - "8322:8322"                   # Map port 8322 on the host to port 8322 in the container
    environment:                      #
      - SPUC_URL=http://spuc:8321     # Specify the SPUC_URL environment variable

volumes:
  spuc-volume:
Now both services will be started at the same time!
OUTPUT
[+] Running 3/3
 ✔ Network docker_intro_default  Created                                                           0.1s
 ✔ Container spuc_container      Created                                                           0.0s
 ✔ Container spucsvi_container   Created                                                           0.0s
Attaching to spuc_container, spucsvi_container
spuc_container     |
spuc_container     |             \
spuc_container     |              \
spuc_container     |               \\
spuc_container     |                \\\
spuc_container     |                 >\/7
spuc_container     |             _.-(º   \
spuc_container     |            (=___._/` \            ____  ____  _    _  ____
spuc_container     |                 )  \ |\          / ___||  _ \| |  | |/ ___|
spuc_container     |                /   / ||\         \___ \| |_) | |  | | |
spuc_container     |               /    > /\\\         ___) |  __/| |__| | |___
spuc_container     |              j    < _\           |____/|_|    \____/ \____|
spuc_container     |          _.-' :      ``.
spuc_container     |          \ r=._\        `.       Space Purple Unicorn Counter
spuc_container     |         <`\\_  \         .`-.
spuc_container     |          \ r-7  `-. ._  ' .  `\
spuc_container     |           \`,      `-.`7  7)   )
spuc_container     |            \/         \|  \'  / `-._
spuc_container     |                       ||    .'
spuc_container     |                        \\  (
spuc_container     |                         >\  >
spuc_container     |                     ,.-' >.'
spuc_container     |                    <.'_.''
spuc_container     |                      <'
spuc_container     |
spuc_container     |
spuc_container     | Welcome to the Space Purple Unicorn Counter!
spuc_container     |
spuc_container     | :::: Units set to Imperial Unicorn Hoove Candles [iuhc] ::::
spuc_container     |
spuc_container     | :: Try recording a unicorn sighting with:
spuc_container     |     curl -X PUT localhost:8321/unicorn_spotted?location=moon\&brightness=100
spuc_container     |
spuc_container     | :::: Plugins loaded! ::::
spuc_container     | :: Available plugins
spuc_container     |     stats.py
spuc_container     |
spuc_container     | :::: Unicorn sightings export activated! ::::
spuc_container     | :: Try downloading the unicorn sightings record with:
spuc_container     |     curl localhost:8321/export
spuc_container     |
spucsvi_container  |
spucsvi_container  |      .-'''-. .-------.   ___    _     _______      .-'''-. ,---.  ,---..-./`)
spucsvi_container  |     / _     \\  _(`)_ \.'   |  | |   /   __  \    / _     \|   /  |   |\ .-.')
spucsvi_container  |    (`' )/`--'| (_ o._)||   .'  | |  | ,_/  \__)  (`' )/`--'|  |   |  .'/ `-' \
spucsvi_container  |   (_ o _).   |  (_,_) /.'  '_  | |,-./  )       (_ o _).   |  | _ |  |  `-'`"`
spucsvi_container  |    (_,_). '. |   '-.-' '   ( \.-.|\  '_ '`)      (_,_). '. |  _( )_  |  .---.
spucsvi_container  |   .---.  \  :|   |     ' (`. _` /| > (_)  )  __ .---.  \  :\ (_ o._) /  |   |
spucsvi_container  |   \    `-'  ||   |     | (_ (_) _)(  .  .-'_/  )\    `-'  | \ (_,_) /   |   |
spucsvi_container  |    \       / /   )      \ /  . \ / `-'`-'     /  \       /   \     /    |   |
spucsvi_container  |     `-...-'  `---'       ``-'`-''    `._____.'    `-...-'     `---`     '---'
spucsvi_container  |
spucsvi_container  |     :::: SPUC Super Visualizer serving on localhost:8322 ::::
spucsvi_container  |
As the logs suggest, we can now view the SPUCSVi interface by
visiting localhost:8322 in our browser.
A visual treat awaits, and an easier way to record and view our unicorn sightings!
Networks
We briefly mentioned networks earlier, noting that, by default, Docker Compose creates a network for each stack.
However, by overriding the default network, we can perform some interesting tricks.
Now that we can record Unicorns using the SPUCSVi interface, we don’t need to be able to access the SPUC service directly.
This means we can isolate the SPUC service from the host network. This is a good security practice and helps keep things tidy.
To do this we need to stop exposing the ports for SPUC, by removing
the ports key from the SPUC service:
YML
# compose.yml
services:
  spuc:
    build:
      context: .
      dockerfile: Dockerfile
    container_name: spuc_container
    # ports:                            # We can remove these two lines
    #   - 8321:8321
    volumes:
      - ./print.config:/spuc/config/print.config
      - spuc-volume:/spuc/output
      - ./stats.py:/spuc/plugins/stats.py
    environment:
      - EXPORT=true
    command: ["--units", "iulu"]

  spucsvi:
    image: spuacv/spucsvi:latest
    container_name: spucsvi
    ports:
      - "8322:8322"
    environment:
      - SPUC_URL=http://spuc:8321

volumes:
spuc-volume:Now, the SPUC service is only accessible from within the Docker network! Try doing a curl to register a sighting and you wont be able to. However, you can still register sightings through the SPUCSVi interface.
This can be taken further to create networks with very limited purposes. For example in a typical web app you may make it so that the frontend can connect only to backend, but not to the database.
You may have noticed that the network that Docker Compose created for
our stack is named docker_intro_default. This is because
Docker Compose uses the name of the directory that the
compose.yml file is in as the name of the network.
If you want to specify the name of the network, you can use the
networks key in the compose.yml file. You also
need to specify the network name for each service that you want to
connect to the network.
For example, to specify the network name as
spuc_network, you would add the following to the file:
YML
# compose.yml
services:
  spuc:
    build:
      context: .
      dockerfile: Dockerfile
    container_name: spuc_container
    volumes:
      - ./print.config:/spuc/config/print.config
      - spuc-volume:/spuc/output
      - ./stats.py:/spuc/plugins/stats.py
    environment:
      - EXPORT=true
    command: ["--units", "iulu"]
    networks:                         # Starts list of networks to connect this service to
      - spuc_network                  # Connects to the spuc_network network

  spucsvi:
    image: spuacv/spucsvi:latest
    container_name: spucsvi
    ports:
      - "8322:8322"
    environment:
      - SPUC_URL=http://spuc:8321
    networks:                         # Starts list of networks to connect this service to
      - spuc_network                  # Connects to the spuc_network network

volumes:
  spuc-volume:

networks:                             # Starts section for declaring networks
  spuc_network:                       # Declares a network for spuc
    name: spuc_network                # Specifies the name of the network
Depends on
There is an important problem that we haven’t addressed yet - what happens if the SPUCSVi service starts before the SPUC service?
This is a common problem when running multiple services together - services that depend on each other need to start in a specific order.
Docker Compose has a solution to this - the depends_on
key.
We can use this key to tell Docker Compose that the SPUCSVi service depends on the SPUC service.
YML
# compose.yml
services:
  spuc:
    build:
      context: .
      dockerfile: Dockerfile
    container_name: spuc_container
    volumes:
      - ./print.config:/spuc/config/print.config
      - spuc-volume:/spuc/output
      - ./stats.py:/spuc/plugins/stats.py
    environment:
      - EXPORT=true
    command: ["--units", "iulu"]

  spucsvi:
    image: spuacv/spucsvi:latest
    container_name: spucsvi
    ports:
      - "8322:8322"
    environment:
      - SPUC_URL=http://spuc:8321
    depends_on:                     # Starts section for declaring dependencies
      - spuc                        # Declares that the spucsvi service depends on the spuc service

volumes:
  spuc-volume:
Now, when we run docker compose up, the SPUCSVi service
will wait until SPUC has started before it starts.
But there is a catch! The depends_on key only ensures
that the service is started in the correct order. It doesn’t check if
the service is ready!
This can be a problem if a service is fast to start but slow to be ready. For example, a database service may start quickly, but take a while to be ready to accept connections.
To address this, Docker Compose allows you to define a
healthcheck for a service. This is a command that is run
periodically (from inside the container) to check if the service is
ready. The command failing (returning a non-zero exit code)
means that the service is not ready.
We can try this out by adding a healthcheck to the SPUC
service. Since we don’t want SPUCSVi to start until the record of
unicorn sightings is ready, we can use the curl command to
check if the /export endpoint is available. We need to add
the --fail flag to curl to ensure that it
returns a non-zero exit code if the endpoint is not available.
The other change we need to make is to add a condition
to the depends_on key in the SPUCSVi service. This tells
Docker Compose to only start the service if the service it depends on is
healthy, rather than just started.
YML
# compose.yml
services:
  spuc:
    build:
      context: .
      dockerfile: Dockerfile
    container_name: spuc_container
    volumes:
      - ./print.config:/spuc/config/print.config
      - spuc-volume:/spuc/output
      - ./stats.py:/spuc/plugins/stats.py
    environment:
      - EXPORT=true
    command: ["--units", "iulu"]
    healthcheck:                                                  # Starts section for declaring healthchecks
      test: ["CMD", "curl", "--fail", "http://spuc:8321/export"]  # Specifies the healthcheck command (ran from inside the container)
      interval: 3s                                                # Specifies the interval between healthchecks
      timeout: 2s                                                 # Specifies the timeout for the healthcheck
      retries: 5                                                  # Specifies the number of retries before failing completely

  spucsvi:
    image: spuacv/spucsvi:latest
    container_name: spucsvi
    ports:
      - "8322:8322"
    environment:
      - SPUC_URL=http://spuc:8321
    depends_on:
      spuc:                                                       # This changed from a list (- spuc) to a mapping (spuc:)
        condition: service_healthy                                # Specifies further conditions for starting the service

volumes:
  spuc-volume:
Now, when we run docker compose up, the SPUCSVi service
will only start when the SPUC service is ready.
This is a little hard to see in action as the SPUC service starts so
quickly. To be able to see it, let’s add a sleep command to
the entrypoint of the SPUC service to simulate a slow
start.
YML
# compose.yml
services:
  spuc:
    build:
      context: .
      dockerfile: Dockerfile
    container_name: spuc_container
    volumes:
      - ./print.config:/spuc/config/print.config
      - spuc-volume:/spuc/output
      - ./stats.py:/spuc/plugins/stats.py
    environment:
      - EXPORT=true
    command: ["--units", "iulu"]
    entrypoint: ["sh", "-c", "sleep 5 && python /spuc/spuc.py"]   # Adds a sleep command to the entrypoint to simulate a slow start
    healthcheck:
      test: ["CMD", "curl", "--fail", "http://spuc:8321/export"]
      interval: 3s
      timeout: 2s
      retries: 5

  spucsvi:
    image: spuacv/spucsvi:latest
    container_name: spucsvi
    ports:
      - "8322:8322"
    environment:
      - SPUC_URL=http://spuc:8321
    depends_on:
      spuc:
       condition: service_healthy

volumes:
spuc-volume:OUTPUT
[+] Running 3/3
 ✔ Network docker_intro_default  Created                                   0.1s
 ✔ Container spuc_container      Healthy                                   6.7s
 ✔ Container spucsvi_container   Started                                   6.8s
As yoy can see, the SPUCSVi service only started after the SPUC service was healthy.
To simulate a service that does not pass the healthcheck, we can set
the EXPORT environment variable to false in
the SPUC service. This will mean that the export endpoint is not
available, so the healthcheck will fail.
YML
# compose.yml
services:
  spuc:
    build:
      context: .
      dockerfile: Dockerfile
    container_name: spuc_container
    volumes:
      - ./print.config:/spuc/config/print.config
      - spuc-volume:/spuc/output
      - ./stats.py:/spuc/plugins/stats.py
    environment:
      - EXPORT=false                                # Sets the EXPORT environment variable to false
    command: ["--units", "iulu"]
    healthcheck:
      test: ["CMD", "curl", "--fail", "http://spuc:8321/export"]
      interval: 3s
      timeout: 2s
      retries: 5

  spucsvi:
    image: spuacv/spucsvi:latest
    container_name: spucsvi
    ports:
      - "8322:8322"
    environment:
      - SPUC_URL=http://spuc:8321
    depends_on:
      spuc:
       condition: service_healthy

volumes:
spuc-volume:OUTPUT
[+] Running 3/3
 ✔ Network docker_intro_default  Created                                                            0.1s
 ✘ Container spuc_container      Error                                                             15.7s
 ✔ Container spucsvi_container   Created                                                            0.0s
dependency failed to start: container spuc_container is unhealthy
The SPUC service shows an error, because it failed all 5 retries, and the SPUCSVi service was not started.
Warning: Even though unhealthy, the
spuc_container is running. You can check this by running
docker ps.
- Docker Compose is a tool for defining and running multi-container
stacks in a YAML file. They can also serve as a way of structuring and
documenting
docker runcommands for single containers. - Instructions are saved in a
compose.ymlfile, where services, networks, and volumes are defined. - Each
serviceis a separate container, and it can be fully configured from within the file. - Bind mounts and
volumescan be declared for each service, and they can be shared between containers too. - You can define
networks, which can be used to connect or isolate containers from each other. - All the services, volumes and networks are started together using
the
docker compose upcommand. - They can be stopped using the
docker compose downcommand. - Container images can be built as the services are spun up by using
the
--buildflag. - The order in which services start can be controlled using the
depends_onkey. - A
healthcheckcan be defined to verify the status of a service. These are commands run from within the container to make sure it is ready.
Content from And they lived happily ever after
Last updated on 2026-07-14 | Edit this page
Estimated time: 10 minutes
Overview
Questions
- How do I get the most out of Docker Compose?
- What is a microservices architecture?
Objectives
- Learn how combinations of microservices can achieve complex tasks with no or low code.
- Dissect a real world example of a microservices architecture.
So far, in our exploration of Docker Compose, we have focused on making our run commands more robust and on the orchestration of a stack. Much of the power of Docker, however, is not just the ability to package your own tools, but to use off the shelf tools to create powerful solutions.
Microservices
To be able to use Docker in this way, we need to use Docker Compose to create a microservices architecture.
The philosophy of microservices is to break down applications into small, manageable services. This is in contrast to the traditional monolithic approach, where all parts of an application are contained in a single codebase.
For example, an application might have a database, a web server, front and back ends, an API, a file store, a message queue etc. A monolithic approach would be to package all of these in the same codebase. This is conceptually simple, but can rapidly become unwieldy and difficult to maintain.
Using a tool like Docker Compose we can take a different approach. We can divide the application into smaller services, each of which is responsible for a single task. By breaking down the application into smaller services, we can take advantage of the best tools available for each part of the application.
In a microservices architecture, each tool runs as its own service, and communicates with other services over a network. The database, web server, front and back ends, and all the other services can be genuinely separate. This can enhance the security in the application, as each service can be isolated from the others.
Furthermore, since each of the tools can be best in their class, and maintained by an enthusiastic and expert community, there can be gains in performance. Docker Desktop helps in orchestrating these services, making it easy to start, stop, and manage them, which ends up being at least as simple as in a monolithic application (if not more).
For individual developers, it means less time writing code which has already been written, and more time focusing on the unique, and fun, parts of your application.
Microservices in Docker Compose
Docker Compose is the perfect tool for managing a microservices architecture.
To demonstrate the power of Docker Compose and microservices, let’s take a look at a more applied example.
The Apperture project is a stack of microservices. They combine to provide a log-in secure web portal with built in user-management. It is maintained by the University of Manchester’s Research IT team, and can easily be combined with other stacks to provide them with a login portal.
Apperture is comprised primarily of a compose file. Just
like we have been looking at!
The full compose.yml file is available on
github. It is quite long, so we will reproduce a slimmed down
version here.
YML
services:
  proxy:
    image: 'jc21/nginx-proxy-manager:latest'
    ports:
      - '80:80'
      - '443:443'
    depends_on:
      - authelia
    healthcheck:
      test: ["CMD", "/bin/check-health"]

  whoami:
    image: docker.io/traefik/whoami

  authelia:
    image: authelia/authelia
    depends_on:
      lldap:
        condition: service_healthy
    volumes:
      - ${PWD}/config/authelia/config:/config
    environment:
      AUTHELIA_DEFAULT_REDIRECTION_URL: https://whoami.${URL}
      AUTHELIA_STORAGE_POSTGRES_HOST: authelia-postgres
      AUTHELIA_AUTHENTICATION_BACKEND_LDAP_URL: ldap://apperture-ldap:3890

  lldap:
    image: nitnelave/lldap:stable
    depends_on:
      lldap-postgres:
        condition: service_healthy
    environment:
      LLDAP_LDAP_BASE_DN: dc=example,dc=com
      LLDAP_DATABASE_URL: postgres://user:pass@lldap-postgres/dbname
    volumes:
      - lldap-data:/data

  lldap-postgres:
    image: postgres
    volumes:
      - lldap-postgres-data:/var/lib/postgresql/data
    healthcheck:
      test: ["CMD-SHELL", "pg_isready -U lldap"]

volumes:
  lldap-data:
  lldap-postgres-data:
This compose.yml file is a little more complex than the
ones we have been looking at so far, but it is still just a list of
services and their configurations.
You’ll see some familiar things, like image,
ports, depends_on (and
healthchecks), volumes, and
environment.
Notice the image field in the services
section of the compose.yml file. Every service is using a
pre-built Docker image from Docker Hub, straight off the shelf! This is
the power of Docker Compose and microservices!
To get an idea of what is going on, let’s draw a diagram of the
services in the compose.yml file.
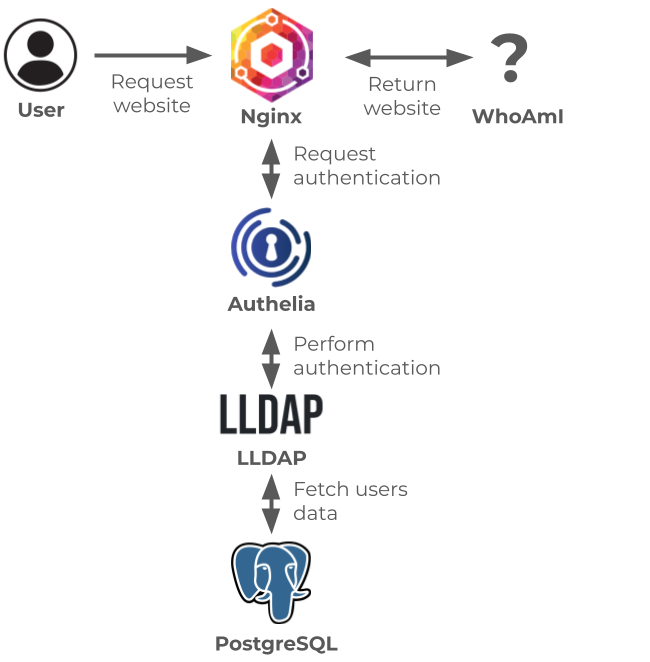
In short: Without writing a single line of code, we have a fully functioning, secure web portal!
Combining Stacks
One of the most powerful features of Docker Compose is the ability to combine stacks. There is no reason we cannot combine the Apperture stack with the SPUC stack we have been working with in previous lessons!
This would allow us to protect our SPUC interface with the Apperture portal. An important addition! We need to ensure poachers cannot falsely record sightings of the rare yet valuable unicorns!
This can be achieved by making a couple of changes to the SPUC
compose.yml file.
In our previous lesson, we learned about networks, which allow services to communicate with each other. Now we want join the networks of the SPUC and Apperture stacks so that they can communicate with each other.
Couple this change with appropriate configuration of the proxy service, and you have a secure SPUC portal!
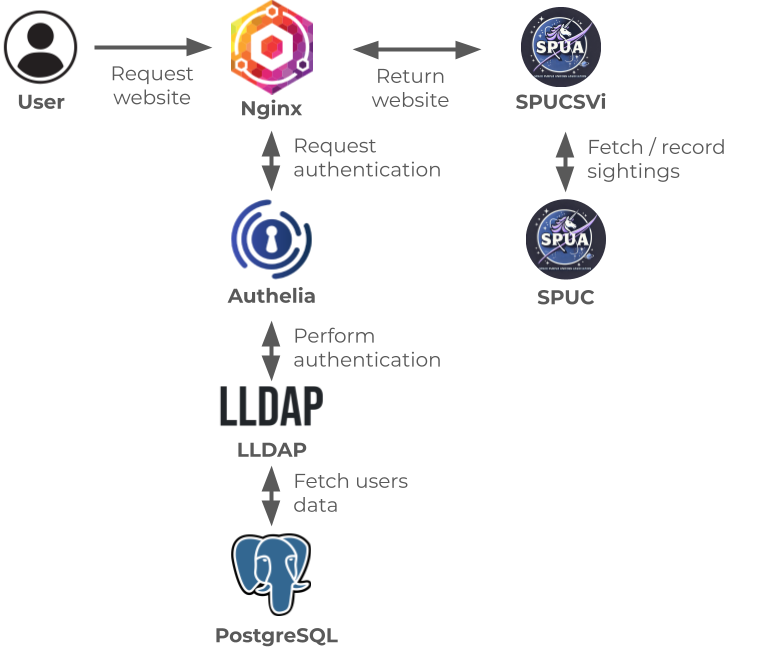
By combining the SPUC and Apperture stacks, we have created a powerful, secure web portal with no added code! But why stop there?
Rapid extension
There are some improvements we can make very quickly!
We can:
- Add a proper database to SPUC using
Postgres - Add support for unicorn-detecting sensors using
RabbitMQandTelegraf - Allow users to upload images of unicorns using
MinIO
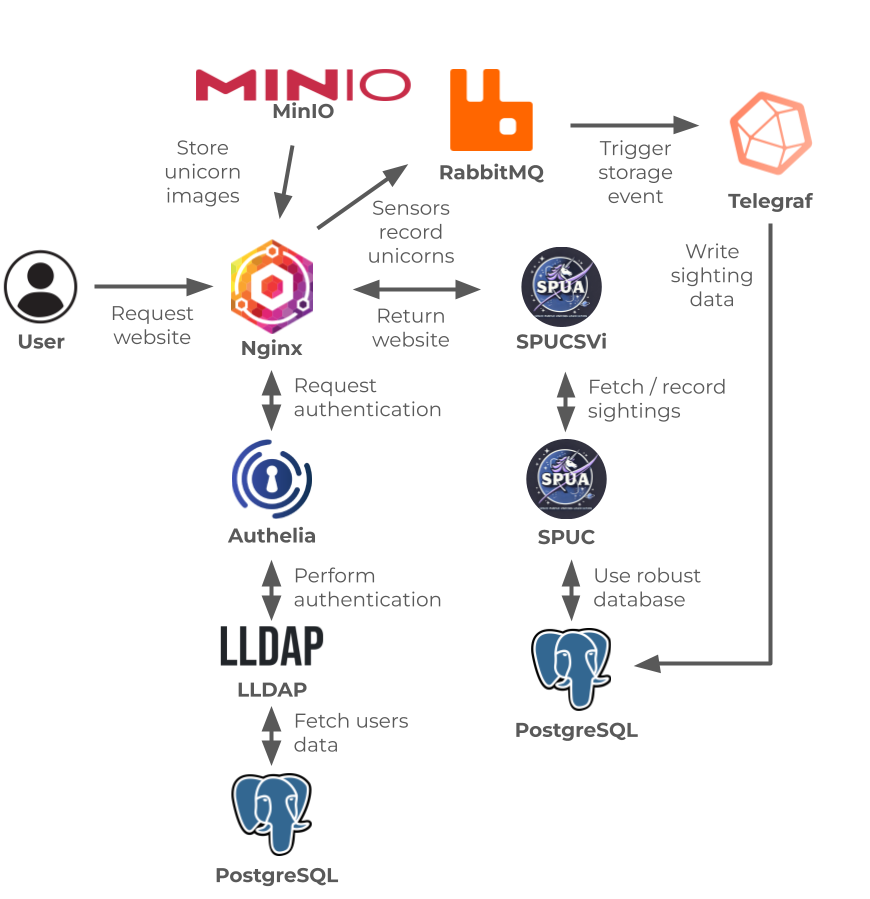
This is the true strength of Docker Compose and microservices. By combining off the shelf tools, we can create powerful solutions with no or low code, and in a fraction of the time it would take to write everything from scratch.
They Lived Happily Ever After
We hope you now feel prepared to start your mission detecting unicorns, and that you use Docker for the good of our intergalactic community.
In behalf of the SPUA, we thank you for your commitment and support for the cause!
