
Setting Up Your GitHub Repo and Project
Last updated on 2026-06-08 | Edit this page
Outline
- For this activity to be more about the development process and not the product, the participants (hopefully) do not have to worry about learning a new or unfamiliar language or framework throughout the course as this would detract from achieving the learning outcomes.
- Hence, we will use a repository provided by your facilitator that will help us understand the agile process.
- There is also a GitHub Projects template that we will use, the link to which is also provided below when you need to set up your project board for this training.
If any screenshots are difficult to read in dark mode, you can switch the course notes to light mode using the sun/moon icon in the top-right corner (next to “Learner View”).
2.1. Screen Sharing Setup for Scrum Master Activities (Facilitator Guidance)
In some exercises, the Scrum Master is also required to share their screen. To manage this efficiently for in-person teams, we recommend that the facilitator sets up a Microsoft Teams call with their group so all participants can join.
Throughout most of the course, the facilitator will share their screen. When a Scrum Master needs to present, they can share their screen via the Teams call, and the facilitator can display it on the main room screen.
This approach should not create any difficulty for online sessions.
2.2. Template Repo
There is a repository template that has been specifically created for this course. It has been prepared by the course authors and includes some pre-populated epics and user stories that you will use throughout the course.
This template will be shared with each group during the course by their facilitator.
2.3. Template GitHub Project
New projects should be created from the training
project template provided by the course authors. Please ensure the
project name follows this format: “[EXTERNAL] Agile Training
<year> Group A” (make sure that
<year> is replaced with the current
year).
Have a Go
In the challenge below, you will use the repository and project templates to get your micro-project set up.
Challenge 1 (15 minutes)
Scrum Masters:
While completing this challenge, you should screen share and talk your Development Team through each step. Point out where to find key elements in the GitHub interface and explain what you’re doing as you go. This will help ensure your team understands the process and can follow it in future.
- Access your repository in GitHub
- Open the repository that has been provided to you by the facilitator.
- Create your GitHub Project
- Open the training project template
- Click on the green ‘Use this template’ button
- Name your project, using our project naming guidelines (see Template GitHub Project section)
- Click the green ‘Use template’ button
You will want to ensure that you have configured and enabled the “Auto-Add to Project” workflow to ensure that Issues added to the repositories feeding the project are added automatically to the Backlog.
Example GitHub Project
Your team’s new project won’t contain any Issues yet, but here is an example of one that is well populated. The top screenshot is the Backlog view and the bottom one is a Kanban view.
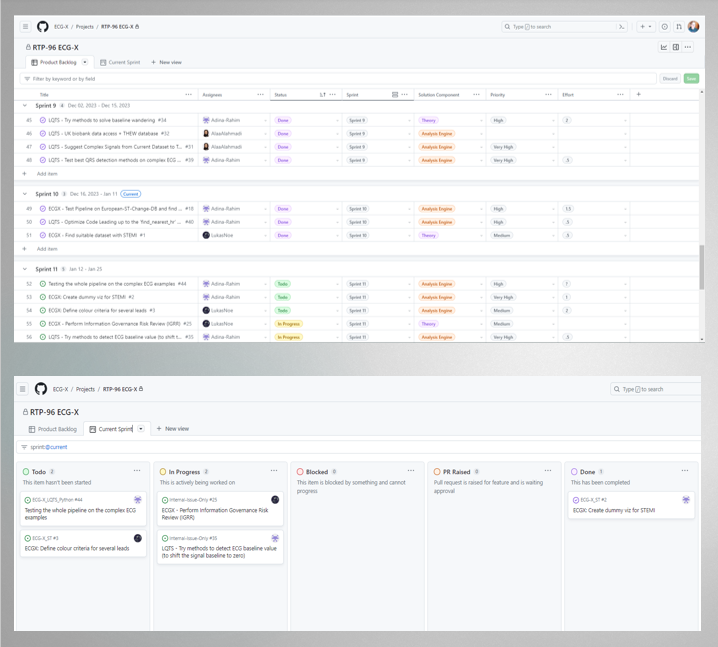
In the challenge below, you can link your new GitHub Project and template repo, and get your local repositories set up.
Challenge 2 (20 minutes)
Scrum Masters:
While completing this challenge, you should talk your Development Team through each step (screen share if you are online). Point out where to find key elements in the GitHub interface and explain what you’re doing as you go. This will help ensure your team understands the process and can follow it in future.
- Link the repo to the Project
- Open the Template Repo
- Go to the ‘Projects’ tab
- Click on ‘Link Project’
- Find the new project by typing its name into the edit box and and then select it.
- Add your developers to the Project
- Facilitators should already have added them to the linked repo
- In the project, go to Settings (in the
...menu), choose “Manage access” on the left and then Invite collaborators by searching via username in the search box - Reference: Managing access to GitHub Projects
Everyone:
- Open the new GitHub Project (you may need to accept an invite first, which may have come via email or )
If you have any problems, remember that you can ask your team mates or the facilitators at any time. Don’t struggle alone!
- A repository should be provided by your facilitator for you to work on during this course.
- There is a project template which should be used as the basis of all GitHub Projects.
- Some additional setup is required to new repos and projects, specifically the importing of rulesets and the addition of workflows respectively.
- Your newly created project can be linked to your repos via their “Projects” tab.