
All in One View
Content from Learning Objectives
Last updated on 2026-06-24 | Edit this page
Learning Objectives
1. Setting Up Your GitHub Repository and Project
- GitHub repositories can be created from templates
- Create GitHub Projects from templates
- Link repositories to projects
- Use GitHub Issues and Kanban boards
- Track Epics, User Stories, and Tasks on the GitHub Project board
2. Product Backlog Creation on GitHub
- Capture requirements using GitHub Issues
- Break requirements into Epics, User Stories, and Tasks (Issues)
- Link related Issues to their corresponding Epics
- Add clear titles, descriptions, and acceptance criteria to each Issue
- Use priorities and labels to categorize Issues
- Prepare a refined backlog for Sprint Planning
3. Sprint Planning in GitHub
- Create Sprint iterations with defined start and end dates
- Define a Sprint Goal collaboratively and link it to Issues
- Select backlog items and tag them with appropriate labels
- Estimate Issues using story points and populate effort fields
- Assign Issues to the Sprint using the Sprint field
4. Sprint Development Work on GitHub
- Select Issues from the Sprint backlog
- Assign Issues and update their status (e.g., In Progress, Blocked)
- Use comments to track progress, assumptions, dependencies, and assign reviewers
5. Sprint Review and Retrospective Using GitHub
- Prepare and tag a Product Increment release for stakeholder demos
- Conduct Sprint Reviews to demonstrate progress and capture feedback
- Log bugs and new requirements as Issues
- Track team performance and Sprint velocity using Project insights
- Convert retrospective outcomes into actionable Issues for future Sprints
6. Backlog Refinement & Mid-Sprint Updates
- Review and update Product Backlog Issues regularly
- Add new Issues and reprioritize existing ones (e.g., using MoSCoW)
- Manage mid-sprint changes while maintaining workload balance
- Ensure all new Issues are estimated and tracked
- Keep the backlog ready for the next Sprint Planning session
Content from Outline and Agenda
Last updated on 2026-06-08 | Edit this page
This workshop focuses on GitHub as an Agile Project Management tool
NOT as a software engineering platform.
During the workshop you will practice:
- Planning and tracking work using a Scrum-style Kanban board (GitHub Project Board)
- Creating and managing Product Backlog Items (Issues) on GitHub
- Defining Epics and User Stories on GitHub
- Organising work using labels, statuses, and workflow columns on GitHub
- Collaborating through issue comments and @mentions on GitHub
- Applying the Definition of Done (DoD) on GitHub
How you will use GitHub repositories:
You will use GitHub repositories to store recipe Markdown (.md) files, working directly in the GitHub browser interface.
We will NOT be teaching:
- Repository cloning
- Branching strategies
- Pull Requests (PRs)
- Merge conflict resolution
- Git command line tools
Why?
The focus is on Agile project management within a one-day course.
- Participants come from different backgrounds
- We want to minimise technical overhead
- The focus is Agile delivery and collaboration using GitHub — NOT software engineering workflows
1.1. Outline
You’ll be working as part of a Scrum Team for the duration of the course, completing a short micro-project together. The way roles are assigned is intentionally flexible so that you can reflect on how Scrum might be introduced and adapted in your own teams.
Roles will be guided as follows:
Scrum Master (rotation-based): If you have a background in project management or coordination, you are encouraged to take on the Scrum Master role. If more than one person fits this description, you can rotate this responsibility between sprints so everyone gets a chance to experience it.
Developers (default role): All participants will primarily work as Developer, focusing on delivering tasks, collaborating within the team, and contributing to the sprint goals.
Facilitator / Product Owner: In this course we include participants acting as a Facilitator. This is not a formal Scrum role, but for the purposes of the course, the facilitator will take on a Product Owner like responsibility, representing a research team (i.e., Stakeholders), who are only “lightly engaged” with the process, and will help you clarify requirements as needed. There will also be an opportunity for you to step into a Product Owner role during selected challenges, reflecting situations where you may need to interpret or represent stakeholder needs in practice.
1.2. Agenda
| Time | Item |
|---|---|
| 9:30-10:15 | GitHub Setup and Familiarisation |
| 10:15-10:25 | Coffee & Questions |
| 10:25-11:15 | Requirement Gathering/Product Discovery |
| 11:15-11:40 | Sprint 1: Planning |
| 11:40-12:05 | Sprint 1: Development Work |
| 12:05-12:15 | Sprint 1: Review |
| 12:15-12:25 | Sprint 1: Retrospective |
| 12:25-13:05 | Lunch |
| 13:05-13:15 | Backlog Refinement |
| 13:15-13:40 | Sprint 2: Planning |
| 13:40-14:00 | Sprint 2: Development Work |
| 13:00-14:10 | Sprint 2: Review |
| 14:10-14:20 | Sprint 2: Retrospective |
| 14:20-14:30 | Coffee & Questions |
| 14:30-14:40 | Backlog Refinement |
| 14:40-15:00 | Sprint 3: Planning |
| 15:00-15:35 | Sprint 3: Development Work & Introduce Mid Sprint Requirement Changes |
| 15:35-15:45 | Sprint 3: Review |
| 15:45-15:55 | Short break |
| 15:55-16:05 | Sprint 3: Retrospective |
| 16:05-16:20 | End to End Demo Facilitator (Branch → PR → Review → Merge) |
| 16:20-16:30 | Day Recap & Close |
1.3. Scrum Development Cycle Overview
As we explained in the Agile Fundamentals Course, Scrum encourages the mindset where change is the norm and enables teams to embrace and respond to change effectively in their work. The Scrum methodology fulfils this philosophy by using Sprint Cycles. Each Iteration (sprint) lasts 2-4 weeks, and gives the Stakeholders and Product Owner a chance to update priorities for the following sprint.
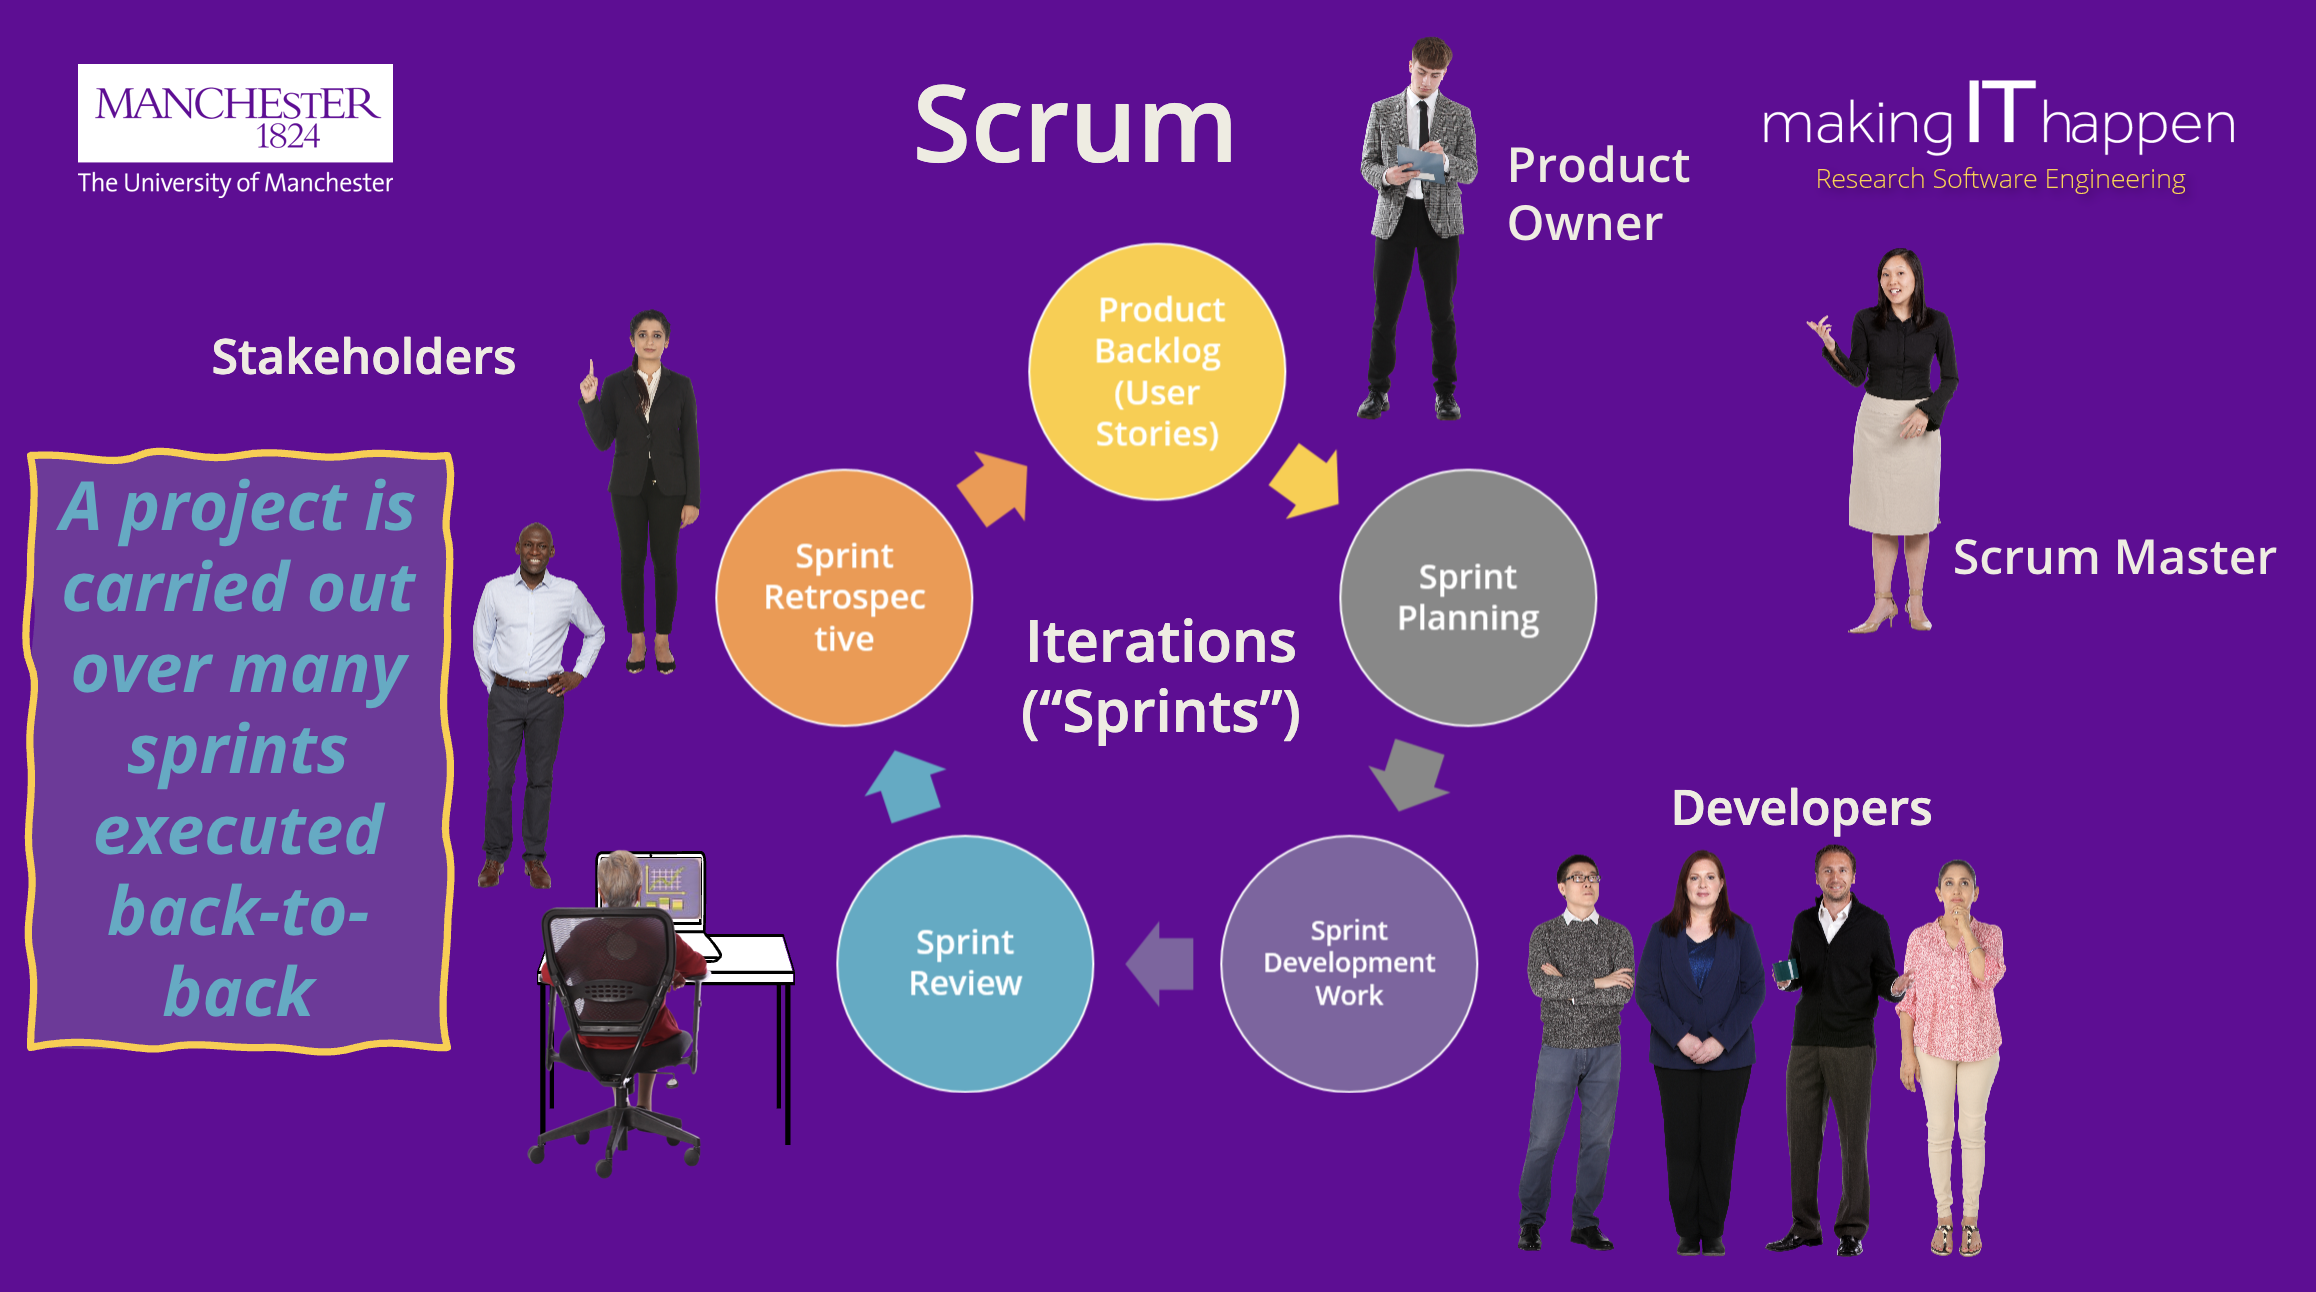
1.4. Scrum Roles
The following slide from Agile Fundamentals – Introductions Part 1 highlights the key Scrum Roles, but in practice we often adapt Scrum roles to reflect how research projects actually operate.
For example, in our RSE Department at the University of Manchester, we loosen the definition of Scrum Roles in our RSE version of Scrum. For example, our Grade 7 Scrum Masters would assume a level of responsibility for delivery that would normally be held by the Product Owner. Also, the Product Owner role might be done by the Scrum Master, Developer(s) and/or members of the academic team, depending upon the project size and level of engagement by the academics.
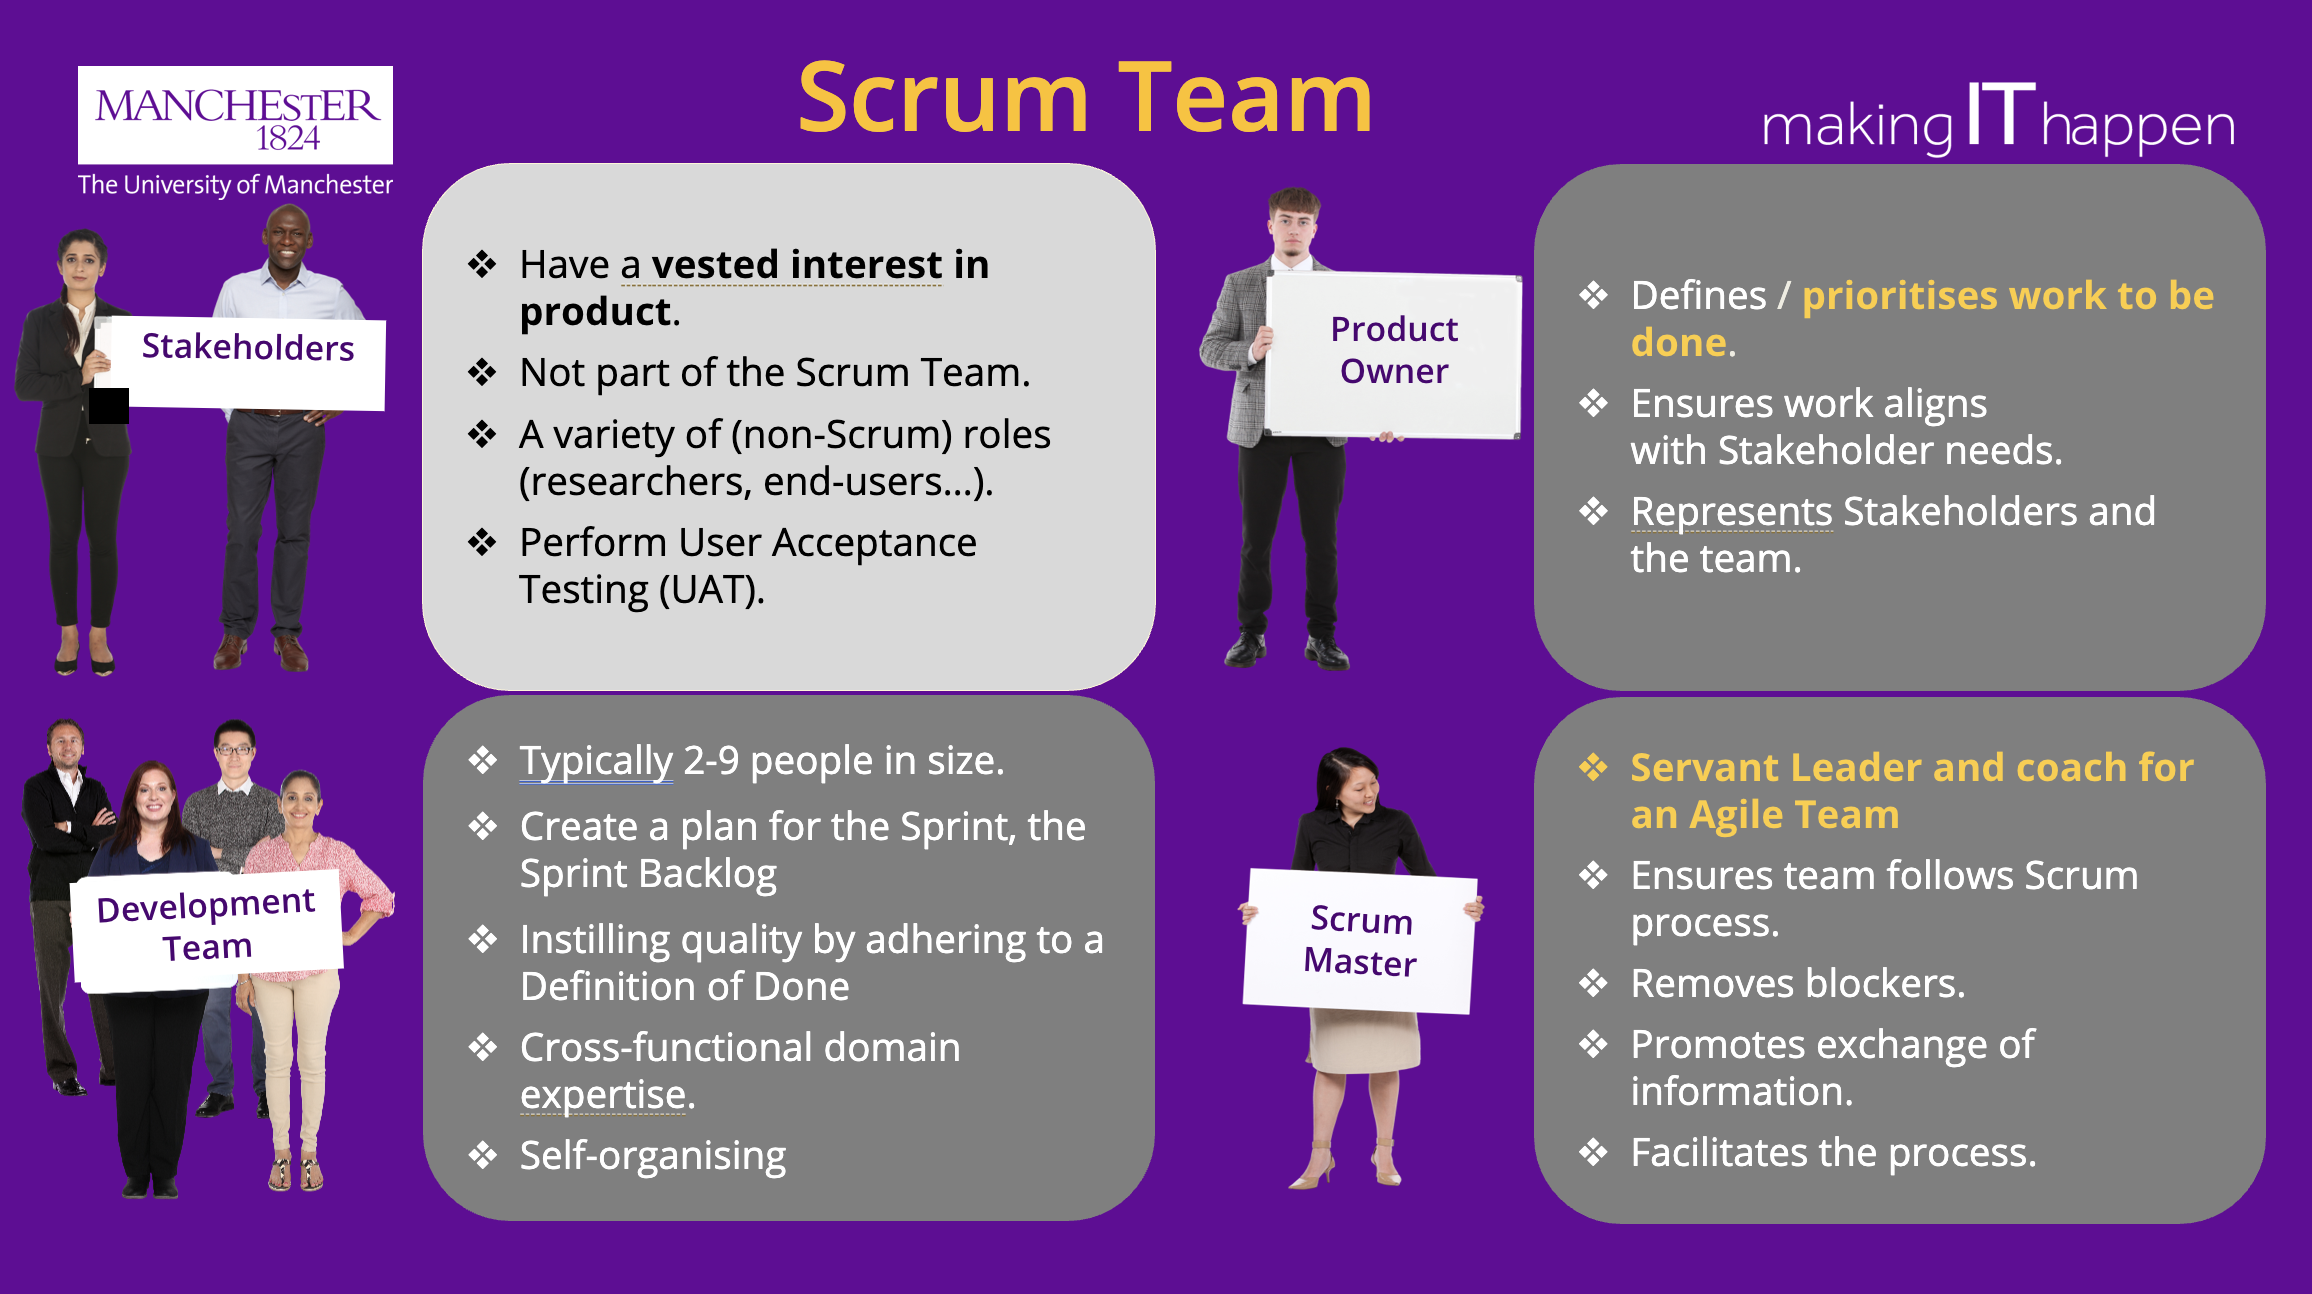
- You will be working on a Scrum Team of Developers.
- All participants will fulfil the Developer role at some point.
- Participants with project management responsibilities will also take on the Scrum Master role during the course.
- The Facilitator is a role specific to the training course and will assume the Product Owner role throughout the workshop, although you will have the opportunity to temporarily act as a PO through specific challenges.
Content from Setting Up Your GitHub Repo and Project
Last updated on 2026-06-08 | Edit this page
Outline
- For this activity to be more about the development process and not the product, the participants (hopefully) do not have to worry about learning a new or unfamiliar language or framework throughout the course as this would detract from achieving the learning outcomes.
- Hence, we will use a repository provided by your facilitator that will help us understand the agile process.
- There is also a GitHub Projects template that we will use, the link to which is also provided below when you need to set up your project board for this training.
If any screenshots are difficult to read in dark mode, you can switch the course notes to light mode using the sun/moon icon in the top-right corner (next to “Learner View”).
2.1. Screen Sharing Setup for Scrum Master Activities (Facilitator Guidance)
In some exercises, the Scrum Master is also required to share their screen. To manage this efficiently for in-person teams, we recommend that the facilitator sets up a Microsoft Teams call with their group so all participants can join.
Throughout most of the course, the facilitator will share their screen. When a Scrum Master needs to present, they can share their screen via the Teams call, and the facilitator can display it on the main room screen.
This approach should not create any difficulty for online sessions.
2.2. Template Repo
There is a repository template that has been specifically created for this course. It has been prepared by the course authors and includes some pre-populated epics and user stories that you will use throughout the course.
This template will be shared with each group during the course by their facilitator.
2.3. Template GitHub Project
New projects should be created from the training
project template provided by the course authors. Please ensure the
project name follows this format: “[EXTERNAL] Agile Training
<year> Group A” (make sure that
<year> is replaced with the current
year).
Have a Go
In the challenge below, you will use the repository and project templates to get your micro-project set up.
Challenge 1 (15 minutes)
Scrum Masters:
While completing this challenge, you should screen share and talk your Development Team through each step. Point out where to find key elements in the GitHub interface and explain what you’re doing as you go. This will help ensure your team understands the process and can follow it in future.
- Access your repository in GitHub
- Open the repository that has been provided to you by the facilitator.
- Create your GitHub Project
- Open the training project template
- Click on the green ‘Use this template’ button
- Name your project, using our project naming guidelines (see Template GitHub Project section)
- Click the green ‘Use template’ button
You will want to ensure that you have configured and enabled the “Auto-Add to Project” workflow to ensure that Issues added to the repositories feeding the project are added automatically to the Backlog.
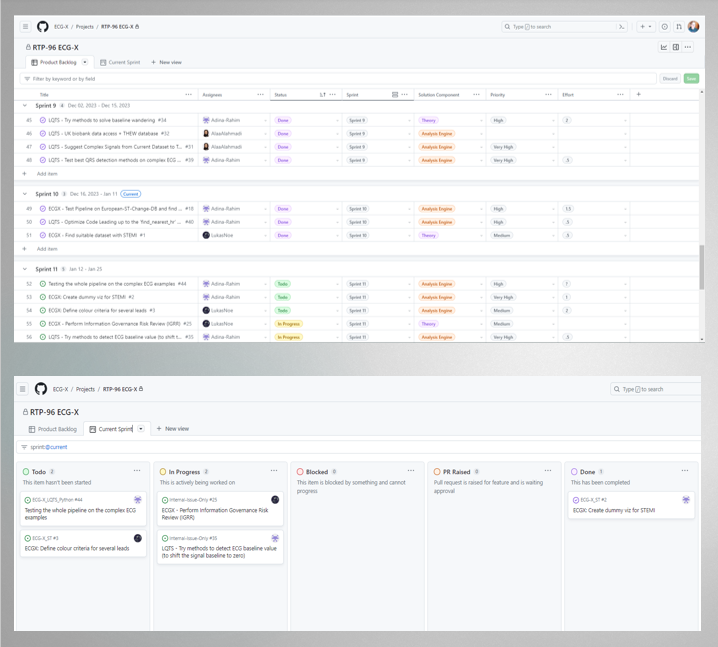
Example GitHub Project
Your team’s new project won’t contain any Issues yet, but here is an example of one that is well populated. The top screenshot is the Backlog view and the bottom one is a Kanban view.
In the challenge below, you can link your new GitHub Project and template repo, and get your local repositories set up.
Challenge 2 (20 minutes)
Scrum Masters:
While completing this challenge, you should talk your Development Team through each step (screen share if you are online). Point out where to find key elements in the GitHub interface and explain what you’re doing as you go. This will help ensure your team understands the process and can follow it in future.
- Link the repo to the Project
- Open the Template Repo
- Go to the ‘Projects’ tab
- Click on ‘Link Project’
- Find the new project by typing its name into the edit box and and then select it.
- Add your developers to the Project
- Facilitators should already have added them to the linked repo
- In the project, go to Settings (in the
...menu), choose “Manage access” on the left and then Invite collaborators by searching via username in the search box - Reference: Managing access to GitHub Projects
Everyone:
- Open the new GitHub Project (you may need to accept an invite first, which may have come via email or )
If you have any problems, remember that you can ask your team mates or the facilitators at any time. Don’t struggle alone!
- A repository should be provided by your facilitator for you to work on during this course.
- There is a project template which should be used as the basis of all GitHub Projects.
- Some additional setup is required to new repos and projects, specifically the importing of rulesets and the addition of workflows respectively.
- Your newly created project can be linked to your repos via their “Projects” tab.
Content from Requirements Gathering
Last updated on 2026-06-25 | Edit this page
Overview
Questions
- How do we capture requirements?
- How do we prioritise requirements?
Objectives
- Get hands-on experience of breaking down a Request document into requirements.
- Learn how to state requirements as Stories and Tasks and add these to a GitHub Project.
- Know how to prioritise a list of requirements using GitHub Project labels and fields.
- Learn about how we use Epics to represent larger bodies of work.
3.1. Introduction
As covered in the Agile Fundamentals course in the Product Discovery chapter,
“In Agile, projects don’t start with long requirement documents. Instead, they begin with a Product Vision. The Product Vision explains the purpose of the product, the value it should deliver, and the people it is intended to serve.”
Building on that knowledge from basic Agile, in our research environments where Agile is not yet an established practice in research teams and academia, requests from our customers/academics may arrive in various forms. For example, in our RSE department at the University of Manchester, the initial scope of a project, along with high-level stakeholder needs, is captured in an RSE Request Document completed at the beginning of the demand process. This document is used by us to communicate a likely scope for the project to researchers and includes the initial costing for the service. After a project kicks off, this scoping document forms the basis of the initial population of the backlog with more granular Issues.
You may follow different strategies for gathering requirements from your customers depending on your department’s existing workflows and organisational context.
For this course, we have created a request document that mimics the less formally structured requirements often seen in research environments where Agile practices are not yet well established. Rather than providing a formal Agile Product Vision, customers may instead supply requirements in a simple document format. During this course, you will use this document to extract and interpret the customer requirements.
Also, as we learned in the Agile Fundamentals course, the Product Owner (P.O.) represents the needs of stakeholders and is responsible for defining and owning end-user requirements. The P.O. then breaks these requirements down into a set of high-level, prioritised User Stories and Tasks, which we will see in this chapter how to enter as new items in the GitHub Project.
These items (known as Issues in GitHub terminology) can also be linked to larger bodies of work called Epics. The GitHub Project template that you will be using during this course provides custom fields for assigning Issues to Epics.
As part of Sprint Planning, the Development Team will use the Issues developed by the Product Owner to generate more granular tasks for them to complete during a Sprint.
3.2. Requirements Prioritisation using MoSCoW
As we learned in the Agile Fundamentals course, requirements need to be prioritised by the Product Owner (P.O.) to prepare the product backlog for the sprint planning meeting. There are many prioritisation frameworks [you can see list here], but the one we learned and used in the Agile Fundamentals course is MoSCoW, which we will also use in this course. Please see the Prioritise Stories using MoSCoW section in the Agile Fundamentals Course for more details or for recap.
As a quick recap, MoSCoW stands for:
- Must have
- Should have
- Could have
- Won’t have
As the purpose of this course is to help you become proficient in using GitHub as a tool for Agile project management, when the time comes to translate requirements into GitHub Issues, the template project you have been provided includes a custom field for categorising Issues using the MoSCoW prioritisation method.
Challenge 1: Understanding the Product (15 minutes)
Your facilitator will act in the Product Owner (PO) role.
-
They will provide you with the Request Document, which contains the product details. Your tasks are to:
- Read and understand the project.
- Identify and note down the key requirements and any assumptions you make on paper.
- Ask the Product Owner clarifying questions if any requirements are unclear.
Scrum Masters: Ensure that all team members are actively involved in the discussion and have an opportunity to contribute.
3.3. Epics
As we learned in the Agile Fundamentals course under the Identify Epics (Steps) from User Activities section, Epics are large bodies of work that take multiple sprints to complete. They could be considered “meta-issues” but should not be represented as Issues at all as they can span multiple sprints. The GitHub project template created by course authors that you will be using during this course provides custom fields for assigning Issues to Epics.
3.4. Breaking Requirements Down into User Stories and Tasks
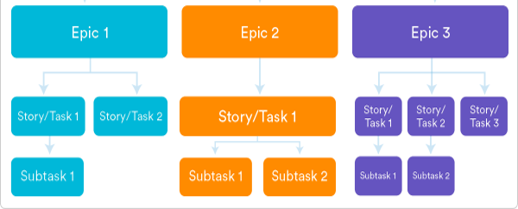
Figure source: https://www.atlassian.com/agile/project-management/epics-stories-themes
Next we can begin to consider how these high-level requirements can be translated into Issues residing in our GitHub Project. In Scrum, Functional Requirements are expressed as User Stories, requirements written from the perspective of an end-user.
A User Story Template and Some Examples
What defines a User Story is the way it is expressed. As a recap from the Agile Fundamentals course under the Identify Epics (Steps) from User Activities section, User Stories should use a consistent structure:
As a <user role>,
I want <activity>
so that <business value>- As a postgrad, I want to collaborate with fellow students on the system to run analyses on the data.
- As a researcher, I want to calibrate our model by uploading existing data sets as text files.
- As a manager, I want to be able to view my colleagues progress graphically, so I can better report our success and failures.
Where possible, requirements must be written as user stories and recorded in the Issue tracker of the relevant repository. These should be marked as a user story using the label provided in the repository provided to you by your course facilitator. As well as user stories, all tasks (things that need to be done that cannot be expressed as a user story) must be recorded on Backlog on the GitHub Issue tracker associated with the project. Issues must have clear titles and enough detail in their descriptions to make it clear.
3.5. Definition of Done
Since you have already completed the ‘Team Definition of Done’ exercise in the Agile Fundamentals course and are aware of what the team’s “Definition of Done” is, we won’t repeat that excercise here.
NOTE: For the purposes of this course, your Definition of Done is that each task must be peer reviewed before its status is changed to Done on the GitHub project board.
3.6. Adding Stories, Tasks and Epics to our GitHub Project
The new GitHub Project that you created during the Set-Up does not yet contain any Issues. The next step is to add the high-level User Stories and Tasks that the Product Owner has created, to the Product Backlog. In practice, they are added as Issues to the new GitHub Project. These can also be assigned to larger Epics if required using the custom field.
An Issue in GitHub Projects is a generic term for User Stories and Tasks in the Product Backlog. In other words, a Tasks and a User Story are types of Issues.
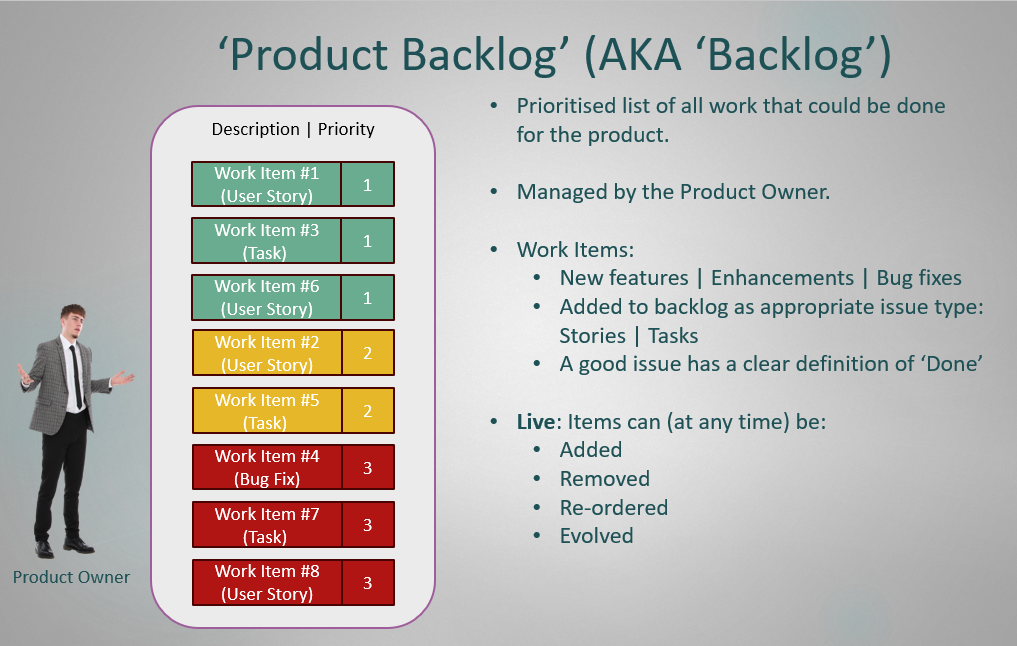
To add a new Issue, go to your GitHub Project, find the Product Backlog view and then click on the ‘+’ symbol next to “Add Item” text and click on “Create a New Issue”. If adding an Issue directly in the project view like this you will see that it is created as a “draft” or note to begin with. You must convert these drafts into Issues as soon as possible. In the side panel displayed when the Issue is clicked you can select “Convert to Issue” to assign the Issue to a repository and enabled all the options.
Examples of User Stories for the Micro Project
Below is an example of some User Stories that have been generated from the request document. These are written in the User Story style and map directly onto one of the stakeholder needs in the request document. They may all be considered to be part of an Epic called “Project Setup & Content Standards”.
| Req. # (from request doc) | Task Detail |
|---|---|
| 1 | As a contributor, I want a standard Markdown recipe template, so that all recipes are consistent and easy to edit and publish |
| 1 | As a project editor, I want a defined folder and filename structure, so that recipes are easy to organise and locate by cuisine. |
| 1 | As a contributor, I want clear submission guidelines, so that I know how to format and submit my recipe correctly. |
It is important to write clear titles and descriptions for all Issues being added. If you need to add an Issue quickly, you can begin with just a title, but other details should be added as early as possible. For example, a good description that makes it clear what the Issue is about and what its Definition of Done is.
Challenge 2: Building and Prioritising the Product Backlog on GitHub (20 minutes)
The facilitator, acting as the Product Owner (PO), has already created several requirements as GitHub Issues in the repository provided to you. Your task is to add these Issues to your GitHub Project for the Collaborative Multicultural Recipe Book project.
-
Add Stories and Tasks to GitHub Project:
Open your GitHub Project for the Collaborative Multicultural Recipe Book.
Use the “ + Add Item” button to add Stories and Tasks to the Product Backlog.
-
As in this instance, the P.O. has already created some issues, you can add these directly to your project
- After clicking on the +, select Add item from repository
- This will open a window giving you the pre-populated user stories which you can now add
- You are free to edit any of these issues if your conversation with the P.O. leads to a change in requirements
-
These Stories and Tasks include:
- Clear titles
- Descriptions with sufficient detail
- A clear Definition of Done for each story/task
-
Assign MuSCoW Priorities:
- Each Issue has a MuSCoW field: “Must have”, “Should have”, “Could have”, “Won’t have”.
- Assign the appropriate MuSCoW value to each Issue.
- Feel free to ask the Stakeholders (represented by the Facilitators) their thoughts about the level of priority for each Issue if you are unsure.
Adding or Updating Requirements:
- You may add new requirements that emerge during discussions with stakeholders (represented by the facilitators), alongside reviewing and re-prioritising the existing requirements using the MoSCoW method.
- Any requirements identified during Challenge 1 that are not already included in the pre-populated GitHub Issues can be created as new issues and added to the GitHub repository.
Further Instructions:
- Scrum Masters: Ensure that all members of the team are involved.
The steps in this course may feel different to you from the Agile Fundamentals course, but remember that the purpose of this course is not to repeat the Agile Fundamentals course. You have already learned core Agile principles there. Since this is a one-day course, our focus is instead on how we can use GitHub as a tool for Agile project management, allowing more time to practice GitHub features while still applying Agile concepts at a higher level.
3.7. Further Prioritisation and Categorisation of Issues on GitHub Project
It is up to the Scrum Team how items in the Product Backlog are prioritised and what system is used, and the Product Owner has the final say. Each Issue could be assigned a “priority”, which shows its level of urgency and which can be a number, or text categories. The template project already has a “Priority” field with “High”, “Medium” and “Low” values included. To further categorise Issues, descriptors could also be added as new labels, to the “Labels” field.
To add further labels to the labels field: Visit the repository connected to your GitHub Project, and select either “Pull Requests” or “Issues”. In the top right-hand corner, select “Labels” to see a list of all existing labels, and then select “New Label”. Note that labels live in a repository and are not syncrhonised across repositories in a project.
To view a list of all available fields: Click on the “+” symbol at the right-hand end of the column headers, (in the “Product Backlog” view). This will show a drop-down menu of all “Visible fields” and “Hidden fields” and these can be toggled to change visibility.
To add a new field: The option to add a new field (“+ New Field”) is also included in the drop-down menu of available fields, described above.
To edit or delete fields: Click on the ellipse (“…”) symbol next to the field’s title, in the column header.
How can we add Epics into our GitHub Project?
An Epic field already exists in the template project, but each Scrum Team must replace the placeholder values with the relevant titles and descriptions for that project. When editing the Epic field’s options in the GitHub Project settings, each individual option should be given a short title but the description of the option can be used to express the Epic (using a user story sentence structure if necessary) or simply to add detail to what the Epic is about e.g. Title: “Implement UI”; Description: “As a user, I would like to interact with a graphic user interface, so non-technical people can use the software”
1. Create additional labels
Add new labels to help organise your Issues.
For example:
- Italian Cuisine
- Recipe Formatting
- Translation
Use labels to group related work items.
2. Update Epics
- Review the existing Epics in your project
- Replace placeholder names with meaningful Epic titles for your project
- Ensure Epics reflect major areas of work (e.g. cuisine types, recipe themes, or project structure)
Our Product Backlog is now up to date with the latest set of requirements from the users broken down into “User Stories” and “Tasks” (and represented as Issues in GitHub). The first sprint is almost ready to begin, but first we need a Sprint Planning Meeting, to select a subset of these Issues to go into the Sprint Backlog, the set of items that will be worked on during this sprint.
- In this course Request document forms the basis for gathering requirements.
- We can use the MuSCoW strategy to help Stakeholders to prioritise the list of requirements.
- Requirements are broken down into User Stories and Tasks which are added to the GitHub Project as Issues.
- The new Issues added to the Product Backlog must to be prioritised, led by the Product Owner.
- Issues can be categorised further by using a variety of fields, for example the “Labels” field.
- Epics are larger bodies of work, spanning multiple sprints (possibly multiple projects). A custom “Epic” field exists to allow Issues to be assigned to an owning Epic.
Content from Sprint Planning
Last updated on 2026-09-17 | Edit this page
Overview
Questions
- How do we conduct Sprint Planning meetings?
- How is the Sprint Backlog created?
Objectives
- Learn how a new Sprint is created, using GitHub Projects
- Use Planning Poker to estimate the size of tasks
- Learn to estimate how much work can be done in a sprint, as a team
IMPORTANT NOTE:
You are already familiar with Agile and Scrum concepts. In this course, the focus is on applying that knowledge using the GitHub Project Board, not revisiting the theory.
Pay attention to how Sprint Goals, estimation, and backlog management are implemented using GitHub features.
4.1. Introduction
A recap from the Agile Fundamentals course: At the beginning of each sprint cycle, the Development Team, Scrum Master(This could be a Project Manager in your team, depending on how your team operates) and Product Owner will attend a Sprint Planning meeting, to agree the scope of the upcoming Sprint.
- The Scrum Master (Project Manager) chairs the meeting, ensures the procedure is followed and gets everyone to agree the sprint’s start and end dates.
- The Product Owner will share the highest priority Issues (Stories and Tasks) and possibly Epics too.
- Collectively, the Scrum Team decide on a Sprint Goal that represents what is to be achieved during the sprint.
- The Development Team selects candidate backlog items that align with the Sprint Goal.
- The Development Team collectively assign story points (amount of effort required to complete) to each task.
- Using the combination of priority scores and story points, Development Team evaluates
whether the Sprint Goal matches the team’s capacity:
- If the Sprint Goal is too large or too small, the Development Team negotiates adjustments with the Product Owner. Once updated, the tasks relevant to the new Sprint Goal are finalised for inclusion in the upcoming sprint.
- If the Sprint Goal matches the team’s capacity, no update is needed, and the selected tasks are simply added to the upcoming sprint.
In short, the main steps involved in the sprint planning meeting, which you learned in detail in the Agile Fundamentals course under Sprint Planning chapter, are as follows:
- Define the Sprint Goal
- Identify candidate backlog items
- Estimate Effort / Story Points
- Create the Sprint Backlog & Commit for the Next Sprint
4.2. Creating new Sprint Iterations in GitHub
Each new sprint Iteration needs to be added to the GitHub Project manually, with the sprint’s start and end dates added. To do this, in your GitHub Project‘s web-page, click on the ellipse (“…”) on the top right-hand side. Select ’Settings’ and then select ‘Sprints’ on the left-hand column of the ‘Settings’ page. On the ‘Sprint Field Settings’ page, select ‘Add Iteration’ and set the start and end dates of the new sprint.
It’s easy to edit the dates of a sprint by clicking directly on the start and end dates, in the ‘Sprint Field Settings’ page.
Challenge 1: Create a Sprint in your GitHub Project (5 minutes)
Scrum Master: In your GitHub Project, create a new Sprint/Iteration.
Although the workshop takes place in one day, we are using consecutive calendar dates to simulate separate sprints in GitHub. Because GitHub does not allow overlapping iteration dates, we will simulate three sprints across three consecutive calendar days:
Create the iterations as follows:
- Sprint 1 (Morning): Start date: Yesterday ; End date: Yesterday
- Sprint 2 (Midday): Start date: Today; End date: Today
- Sprint 3 (Afternoon): Start date: Tomorrow ; End date: Tomorrow
Normally the sprint start and end dates would be 2 or 4 weeks apart starting on the day of the Sprint Planning - this will be dependent on the project team.
Challenge 2: Define the Sprint Goal & Identify Candidate Backlog Items (8 minutes)
- As a team, work with your P.O. to define a clear Sprint Goal.
- Review the product backlog and identify the candidate backlog items that will contribute to achieving the Sprint Goal.
- Label the identified candidate backlog items in your GitHub Project by creating a new label called “sprint goal candidate”.
- If your project in this workshop is software-related, include a task in the first sprint to update or develop the architectural design using C4 so you know what you are building before you start. For non-software projects, this step can be skipped.
- Scrum Masters: Be sure to check that everyone on the Development Team is involved in this process.
REMINDER:
Since you have already learned Planning Poker in Agile Fundamentals Course, the focus of this exercise is not on producing perfect estimates. Instead, concentrate on using the activity to practice GitHub features and collaboration within your team.
Challenge 3: Estimate Stories with relative Story Points (10 minutes)
- Look for a field in your project backlog called “Effort Estimate”. (It should already exist in the Project, but might not be visible on the default view.) You can have this field as a number, or modify it to use a “Single select” option to pre-define which values users can enter.
- In-person: Scrum Master, obtain a packet of Planning Poker cards for your team from the facilitator, and give one set to each Development Team member.
- Online: Scrum Master, use Scrum Planning Poker for Agile Teams to set up an instant room, and share the link with the Development Team. (Each Developer should have a full set of agreed numbers.)
- Then, for each Issue identified as a candidate for the Sprint Goal in Challenge 2 (starting with the highest priority ones), collaboratively decide on the required effort in story points using the Planning Poker steps covered in 3.3.3 Estimate Stories with Relative Story Points in Course 1 (Agile Fundamentals).
- Populate the “Effort Estimate” field with this value.
- You can stop once you have estimated all identified candidate items related to the Sprint Goal.
Challenge 4: Validate Sprint Goal and Commit for the Next Sprint (7 minutes)
- As a team, review the Sprint Goal and the identified backlog items against the Sprint Goal in light of your effort estimates.
- If the sprint seems overloaded, discuss and negotiate with the P.O.
to:
- Remove or defer some backlog items
- Adjust the Sprint Goal if necessary
- Development Team: decide together which Issues will be put into the next Sprint after finalising the Sprint Goal. It’s better to overload the Sprint slightly, in case some Issues get blocked or they are completed quicker than expected. Any unfinished items can be moved into the following sprint at the next Sprint Planning session if they remain relevant.
- As we are not using branches or pull requests on this course, please make sure as much as you can that individual developers are working on different files during the upcoming Sprint.
- Update the “Sprint” field for each Issue, in your GitHub Project and set it to the new upcoming Sprint number (that your team added previously in Challenge 1).
We now have a current Sprint in the GitHub Project with a populated Sprint Backlog of stories and tasks. We have a Sprint Goal to aim for and the Sprint is now ready to begin.
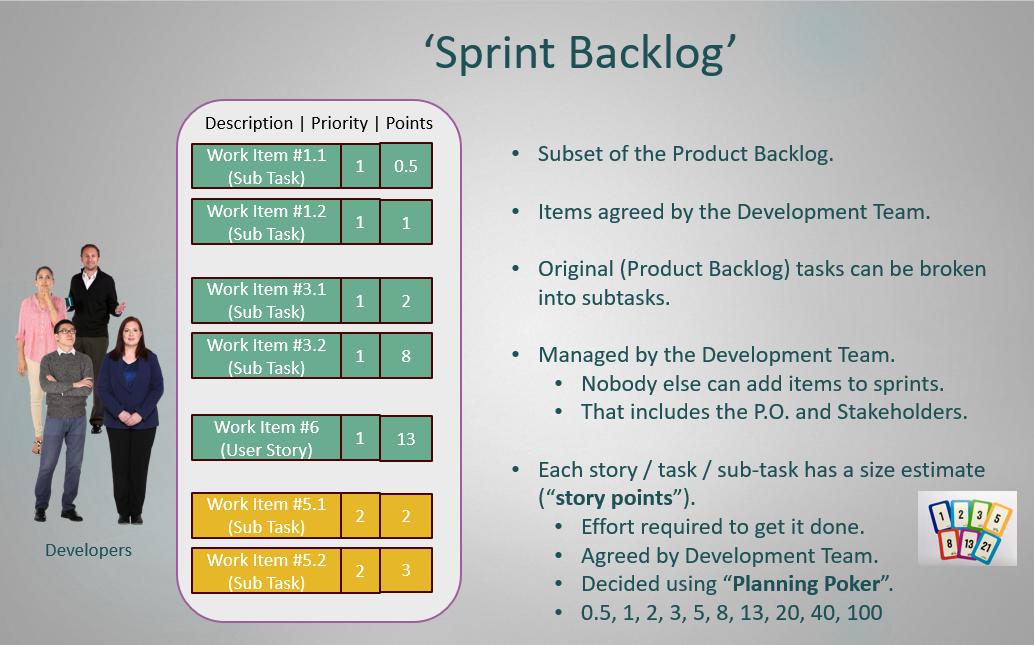
- At the start of each sprint, there is a Sprint Planning Meeting
- The Sprint Planning Meeting is attended by the Scrum Team, Product Owner, and Development Team
- The Product Owner ensures that the highest priority Issues are highlighted.
- Collectively, the Scrum Team decide on a Sprint Goal that represents what is to be achieved during the sprint.
- The Development Team selects candidate backlog items that align with the Sprint Goal.
- The Development Team add a story point estimate for each candidate backlog item. One way to do this is by playing Planning Poker.
- The Development Team, together with the P.O., agrees on a Sprint Goal and commits to the Sprint by creating the Sprint Backlog.
Content from Sprint Development Work
Last updated on 2026-06-05 | Edit this page
5.1. Introduction
During the Sprint Development time, you will be doing the work required to complete the Sprint Backlog Issues that you selected for the current Sprint, to fulfil the Sprint Goal. Most of this current episode will guide you through the required processes. The remaining sections (after the challenges) are provided as reference materials.
Scrum Masters
As you can imagine, the Scrum Team will be really busy in the limited time for development work. Perhaps you can be in charge of reading the notes and checking that all of the challenges below are attempted. You can also contribute to development work if necessary but your main job is to ensure the Development Team are using the tools correctly and following the Scrum process.
5.2. Selecting and Tracking Your Tasks
Before making changes to any project files, you must claim your work on the project board so nobody else accidentally works on the same thing.
As soon as you pick an Issue (a task) to work on, you must assign your name to it on your team’s GitHub Project and mark its status as “In Progress”.
How many tasks can I put into “In Progress”?
In Agile/Kanban, limiting the number of tasks you are working on at the exact same time is called a WIP (Work in Progress) Limit. To keep your workload manageable, try to have a maximum of one active GitHub Issue in your “In Progress” column at once.
If you get stuck because you are waiting on some other task/Issue to complete, update the GitHub Issue’s status to “Blocked” so you can pick up a different task. Always leave a quick comment on the GitHub Issues explaining why it is blocked. For example, If Issue #12 depends on Issue #5, then in Issue #12 you add a comment: “Blocked by #5”
Challenge 1: Select a task to work on
- Each participant working in the Developer role, select a Task/GitHub issue from the Sprint Backlog, assign it to yourself and mark its status as “In Progress”.
- As you update the status, check the “Current Sprint” view in your team’s GitHub Project. What happens to the location of the Issue on the Kanban board, as its status is updated? You can also update an Issue’s status by dragging it between columns on the Kanban board.
- Only one person should be assigned to a GitHub Issue so ownership is completely clear. If a GitHub Issue feels too big for one person, break it down into smaller, individual GitHub Issues.
5.3. Keeping Your Team Updated
Every GitHub Issue has a
comments box where you can type notes or assumptions. You can also
mention or tag teammates to ask questions by using the @
symbol followed by their username (like @JohnDoe). They
will receive a notification so they can jump in and reply.
Relax: We know you don’t have very long…
This workshop is not about producing a flawless, perfect final product. This is about learning how to use GitHub as a simple tool to track a project and communicate as a team:
- Any mistakes or typos provide great examples of things you can add to the backlog to fix later.
- Any breakdown in team organization provides a perfect talking point for your next Sprint Retrospective meeting.
- Continuous improvement is the main goal!
Challenge 2: Work on your active task and keep it updated
Go to your repository on GitHub and open the file you need to work on for this sprint.
If the file does not yet exist, use the template text to create it (seeGuide: creating .md files directly in GitHub). If you have already created it, use the Pencil (Edit) icon to update/edit it (see how to edit .md files directly on the GitHub in Guide).
Save your work using the green Commit changes button. This acts as a permanent “save point” so the team can track progress.
-
While working on your task, use the Issue comments to:
- Share progress updates
- Record assumptions
- Add any relevant notes or blockers
- Share progress updates
Scrum Masters: Continuously monitor the Kanban board to understand progress and identify blockers. If the team is updating regularly, you should not need to chase updates.
(At minimum, each participant should add at least one comment during the task.)
Mid-Sprint Updates to Requirements
It’s not common for requirements to need updating mid-sprint as sprint duration should be adapted to match the rate of change of Stakeholder needs, but it can happen. For example if there was an urgent update to tackle a security breach or risk. If this does occur, the current active sprint should be stopped and the Scrum Team need to follow the Backlog Refinement process, before starting a new sprint.
(If an urgent change in requirements is announced, see Backlog Refinement Episode: Mid-Sprint Changes)
5.4. Peer Reviews & Completing a Task
Since your Team’s Definition of Done requires a peer review before any task can be marked as complete, you cannot simply move your own GitHub Issue directly into “Done.”
This review checkpoint ensures that your work meets the team’s quality standards, catches simple mistakes early, and keeps everyone aligned before you show your progress to stakeholders.
Challenge 3: Request a review
- If you have finished working on an Issue, update its status to “Awaiting Review” on the GitHub project.
- Open the GitHub Issue’s comment section and tag your teammate by
typing the
@symbol followed by their GitHub username to explicitly ask them to review your work.
Challenge 4: Review, feedback, and complete the cycle
Look at the GitHub Issue with “Awaiting Review” status on your board. If a teammate has tagged you in the Issue comment section, open their Markdown file, switch to the Preview tab, and leave an encouraging comment or an “Approved!” message on their GitHub Issue.
If your work has been approved, update the GitHub Issue status to Done in the GitHub Project.
If changes are requested, move the Issue back to In Progress, update the Markdown file using the edit (pencil) icon, and ask your reviewer to check it again once updated.
- The GitHub Project board is our visual control center. If a task isn’t updated on the board, the team won’t know it happened!
- “Committing” is just the GitHub word for “Saving.” Every save creates a clear history of your progress.
- Peer reviews keep quality high and help us catch simple mistakes early before we show our work to stakeholders.
Content from Sprint Review
Last updated on 2026-06-08 | Edit this page
Overview
Questions
- How do we conduct Sprint Review meetings?
- What do these meeting achieve?
Objectives
- Use Sprint Review meetings to demonstrate the Sprint Increment to the Stakeholders
- Have experience of and understand the task of Backlog Refinement.
6.1. Introduction
In this episode, you will prepare for and conduct a Sprint Review Meeting. This is a recap from the Agile Fundamentals Course, where you learned that a typical sprint review includes:
- Demonstration of completed work
- Feedback collection
- Alignment with the product vision
- Celebration of achievements
- Identification of improvements
6.2. Sprint Review Meeting
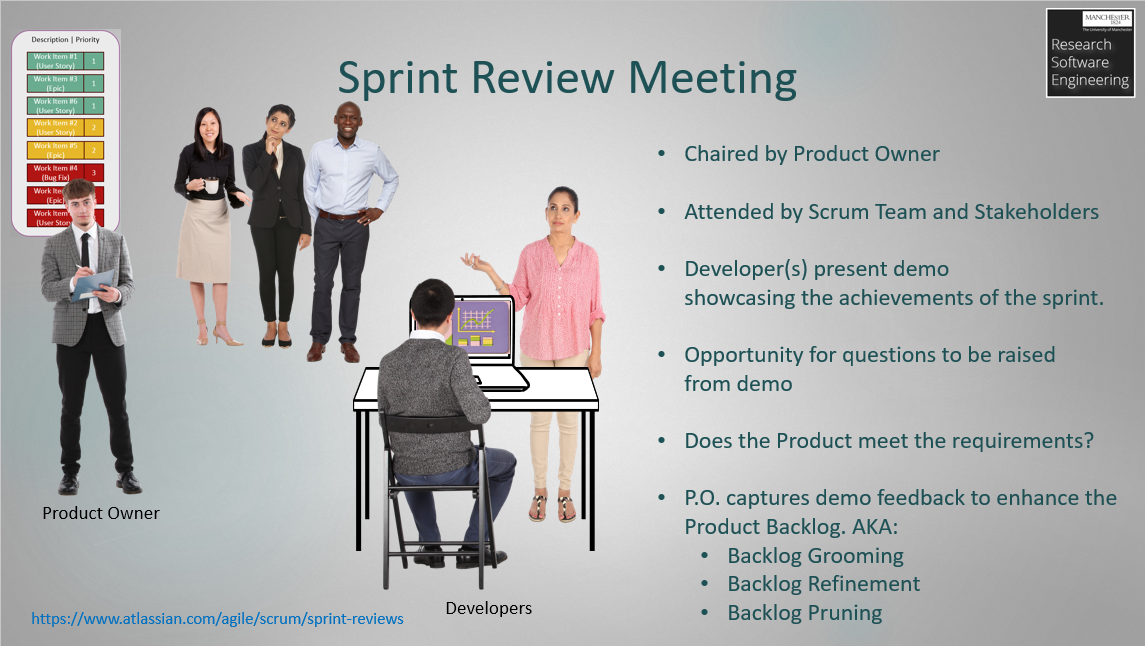
At the end of every sprint the Scrum Master and Development Team will attend a Sprint Review Meeting with the Product Owner (P.O.). The P.O. may wish to also bring Stakeholders with them (e.g. members of their research team). This meeting is an opportunity for the Development Team to demonstrate work, discuss developer output and deliverables and gather feedback from the Product Owner and Stakeholders. If a demonstration is presented, a release of the product should be prepared. Alternatively, the development branch can be demonstrated instead, and a tag must be added to the commit used to conduct the demonstration so there is traceability. It is essential to track what versions of the product have been shown to the Product Owners. For this training course, you may wish to demo your product to a course Facilitator!
Recap: Release Planning
In the Agile Fundamentals course under Release Plan section, you learned how to plan a release and worked toward delivering your first release, also known as a Minimum Viable Product (MVP). In this course, you will learn how GitHub can be used to organise, track, and present completed work through GitHub Releases.
6.2.1. Preparing the “Product Increment” for the Sprint Review on GitHub
Creating a Labelled Release
If your team has completed enough work to demonstrate progress to Stakeholders during the Sprint Review Meeting, then you can prepare a product release using GitHub Releases. A release acts as a snapshot of the work completed during the sprint and helps teams keep track of important project milestones.
Depending on the type of project, a release may include completed
documents, Markdown (.md) files, images, research notes or
other finished work.
Naming Releases
When creating a release, choose a meaningful title that clearly identifies the work completed during the sprint. For software-related products, version numbers are often used. However, for documentation-based products, such as this course, you should use editions instead.
For example:
Sprint 1 Recipe Book EditionFirst Draft EditionCommunity Recipes EditionResearch Notes Edition
Release Management
When producing a release, the “Draft release” feature of GitHub should be used to ensure releases are correctly recorded. Teams should include release notes summarising the work completed during the sprint. Release notes may include:
- completed tasks or Issues
- improvements made
- feedback addressed
- remaining work planned for future sprints
This helps maintain traceability and provides a clear history of project progress over time.
Reminder from the Agile Fundamentals Course:
Only work that has met the “Definition of Done” can be included in the Sprint Review.
“For this course, your team has assigned a pre-defined Definition of Done (DoD) by facilitator: a task is only considered ‘Done’ once it has been peer reviewed before being marked as Done on the GitHub Project Board.”
Challenge 1: Prepare for the Sprint Review (5 minutes)
- Review the Sprint Backlog and choose stories to showcase in the
meeting
- Look at all stories or features completed during the sprint.
- Identify which ones meet the “Definition of Done” and are ready for review.
- If a task is blocked by another task, add a comment in the Issue
comment section such as:
Blocked by #IssueNumber.
- Create release on GitHub
- Decide in your team if there is enough work that you can create a release. If not enough work is ready for a release, prepare any other work that is demonstrable to Stakeholders. For example, planning decisions, documentation structure, diagrams, formatting improvements and/or decisions taken during the sprint.
- Scrum Master Share your screen with all participants and create a GitHub Release following the instructions above. You can also refer to the GitHub documentation here for a step-by-step guide with screenshots on how to create a release in GitHub.
- Add release notes summarising the work completed during the sprint.
- Plan the Demo Sequence
- Decide the order in which stories will be presented.
- Assign team members to demonstrate each story.
- Scrum Master: Make sure all development team memebers are engaged during this process.
Important: GitHub Release
You must practice creating a release using the GitHub Releases feature at least once during this course, even if in Challenge 1 you feel your work is not sufficient to create a release. In such cases, you should still create a release to demonstrate and practise the process using whatever completed work you have available.
6.2.2. Demonstration of Completed Work & Feedback Collection
The key question at this meeting is whether the latest Product Increment meets the current requirements. It also gives the P.O. a chance to capture feedback so it can be used to improve the Product Backlog and keep requirements up-to-date. (We will do more work on Backlog Refinement in the next episode.)
Challenge 2: Conduct a “Sprint Review” Meeting (5 minutes)
- Demonstrate the Product Increment to the P.O. and Stakeholders (course Facilitator) and ask for feedback.
- Add any suggested improvements, missing work or issues identified during the review to the Product Backlog.
- In early sprints, a demonstration might focus more on planning decisions, document structure or organisation of work rather than a fully completed product.
- Celebrate the Development Team’s achievement by recognising and appreciating team members.
Relax: Don’t forget, your team only had limited time to complete the Sprint work. The aim of this course is to learn how Agile practices and GitHub tools support collaboration and project organisation not how to write good Recipe Book.
- Sprint Review Meetings give the team the chance to demonstrate the latest Product Increment.
- GitHub Releases can be used to organise and present completed work.
- Sprint Reviews are useful for checking whether the product is meeting the current requirements and to assist with refining the Backlog.
Content from Sprint Retrospective
Last updated on 2026-06-05 | Edit this page
Overview
Questions
- How do we conduct Sprint Retrospective meetings?
- What does this meeting achieve for the team and the Scrum process?
Objectives
- Demonstrate how positive and negative retrospective feedback can be used to improve the Scrum process.
- Learn how to review previous action items and create actionable plans for continuous improvement.
Introduction
A recap from the Agile Fundamentals course, where you learned in the Sprint Retrospective chapter that:
Sprint retrospectives are regular meetings that take place at the end of every sprint.
Their purpose is to help the team reflect, learn, and continuously improve.
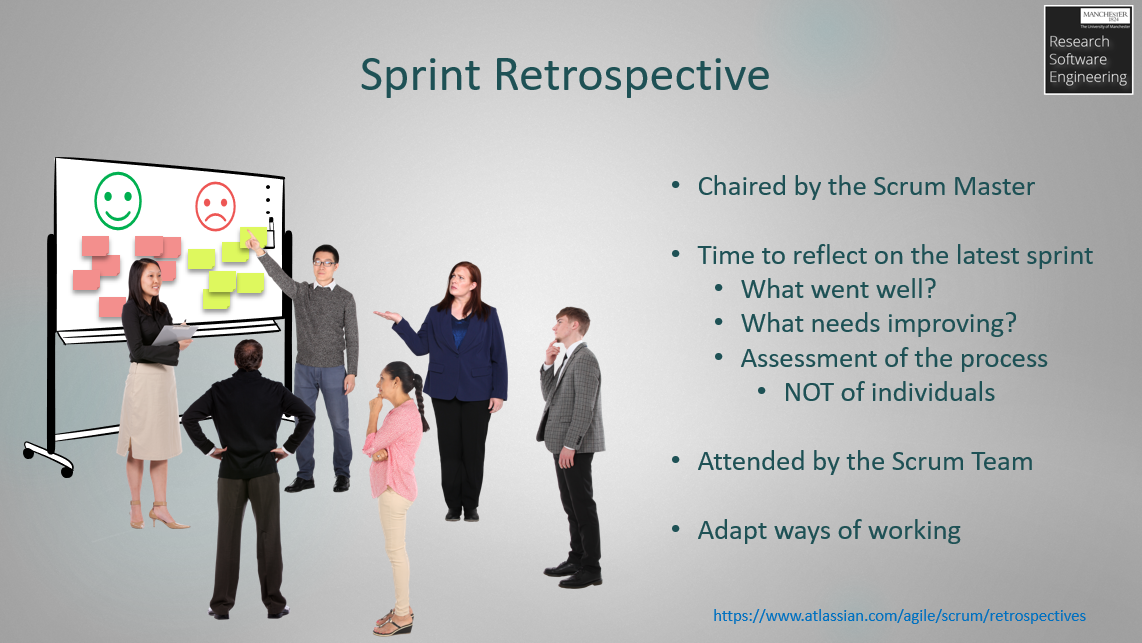
They are often chaired by the Scrum Master, but can also be organised by the Development Team. They should provide a safe space for the Development Team to reflect on the most recent sprint by considering:
What went well?
What didn’t go well?
What changes can we make? (Actions)
To encourage open and honest feedback, a degree of anonymity can be introduced. If physical post-it notes have not been provided by the organisers, you can use IdeaBoardz for this purpose.
Instructions for the Scrum Master:
Please go to IdeaBoardz, click on “Create My Own IdeaBoard,” select “Retrospective,” and share the generated link with your team.
Note: It should be an assessment of the process and NOT of individuals. The output should be agreed recommendations to improve ways of working and could even result in related Tasks being added to the next Sprint.
Sprint Velocity and Insights
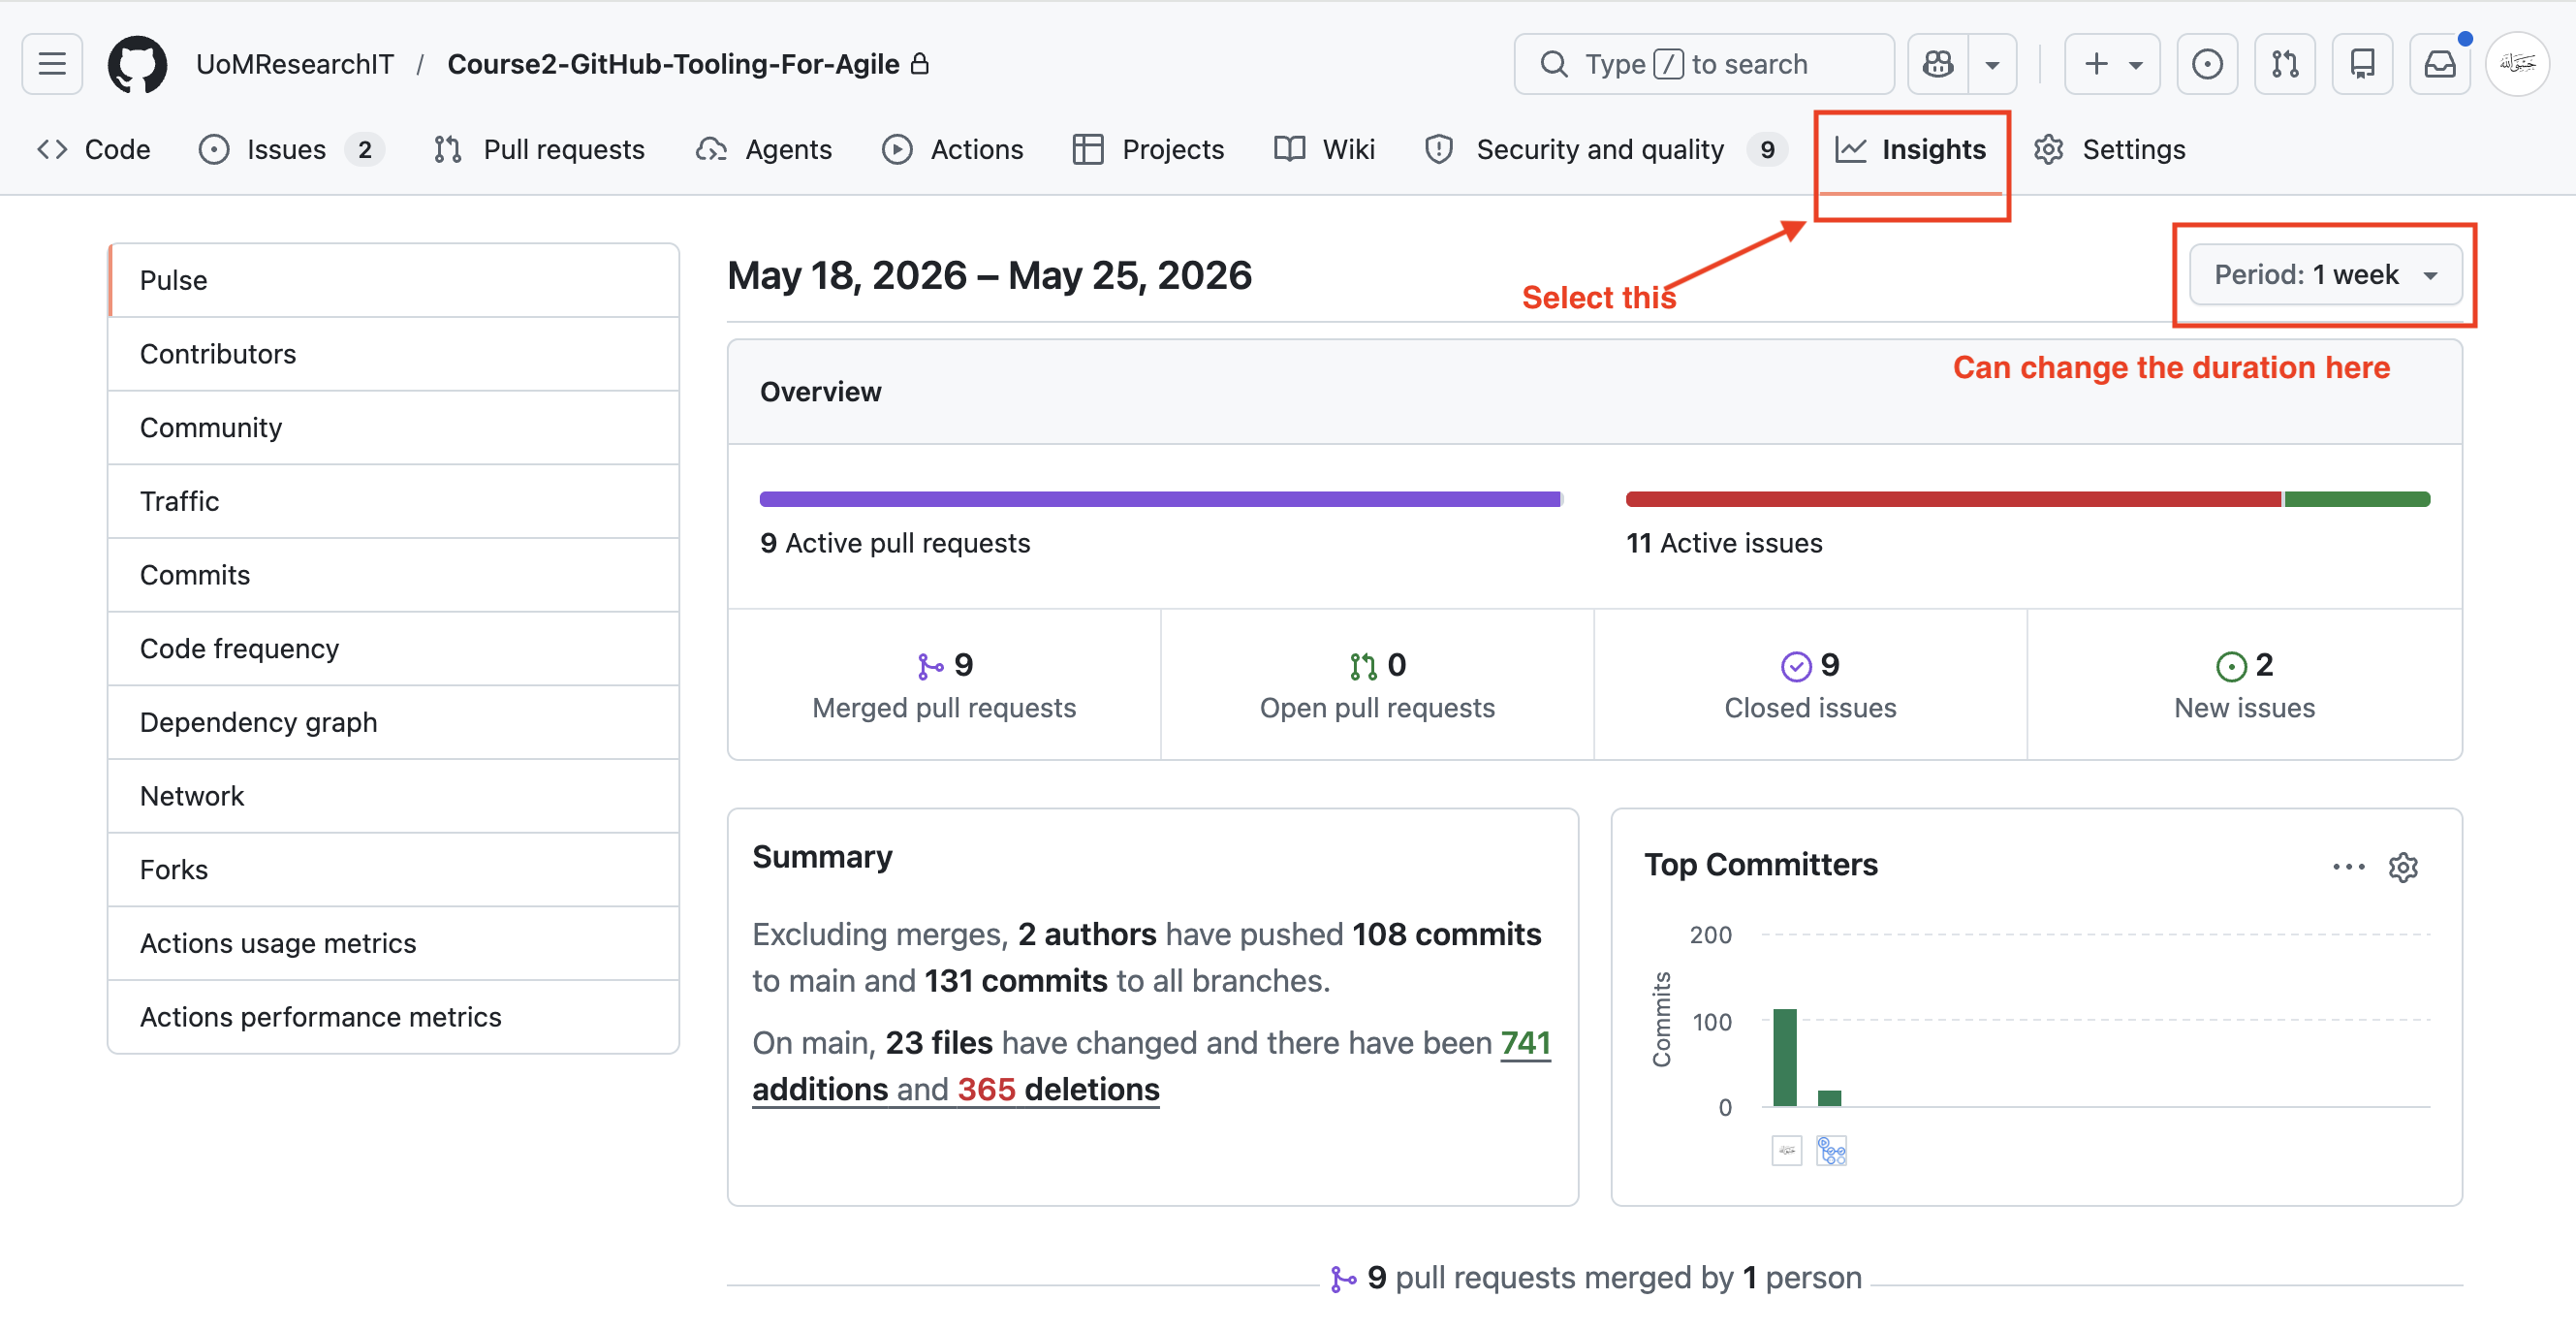
During Sprint Retrospective or stand-up / check-in meetings, the Scrum Master may wish to discuss various quantitative Scrum metrics. GitHub Projects provides an “insights” page accessed via the project which can be used to create custom charts to quantify burn-up and sprint velocity. This can be useful to provide an indication to the Development Team how much work they are able to complete in a given sprint and whether their estimation process is valid.
Smaller Projects
In research environments and smaller projects, these meetings can be relatively short and can be scheduled just prior to the Sprint Planning meetings. They can also be conducted as individual project check-ins depending on your teams ways of working.
Challenge 1: Conduct a Sprint Retrospective (6 minutes)
- As a team, get together and devise a list of what went well and what didn’t go well.
- Scrum Masters: make sure everyone is involved and gets a say and use metrics where appropriate.
- Convert this into a list of actions to be done in the next sprint.
- If you want to, possibly add improvement processes as Issues to the Backlog.
- Facilitator: Show the team the “Insights” page and explain how it is helpful to them at least once during the course (or at least in one sprint).
- Sprint Retrospective meetings are a safe space for Developers to provide feedback on ways of working and improve the process.
- Reviewing past action items ensures continuity, accountability, and progress before planning the next sprint.
- Effective retrospectives rely on facilitation, collaboration, prioritisation, and psychological safety to encourage honest reflection.
Content from Backlog Refinement
Last updated on 2026-06-05 | Edit this page
Overview
Questions
- How do we refine the backlog?
Objectives
- Be able to add new tasks, based on changes in requirements and priorities from the Stakeholder(s).
- Know how to re-prioritise a list of requirements using GitHub Project labels and fields.
7.1. Introduction
To recap from Agile Fundamentals course in Backlog Refinement Chapter you learnt.
The main goals of backlog refinement are to help you:
- Keep the product backlog prioritised so the most important items are at the top.
- Break large stories into smaller, more manageable pieces.
- Ensure top-priority stories are clearly defined, with actionable acceptance criteria, and are ready for Sprint Planning.
Challenge 1: Refine your Backlogs (7 minutes)
- In your teams, look at the Issues in the Product Backlog and see if you need to add any further ones based on what you now understand of the product, technical challenges and any new requirements.
- Check if the priority levels of each Issue has changed:
- This might be based on any new Issues that have been added.
- It may be based on things you learnt during the previous Sprint.
- It may be based on external factors or new risks you have identified.
- Don’t forget to assign tasks to Epics, where appropriate. For a reminder of what Epics are and how to incorporate them in your project, see the Requirements episode
7.2. Handling Mid-Sprint Requirement Changes : This section should be covered only once during the course, in Sprint 3 you can introduce it during sprint 3 development phase.
7.2. Handling Mid-Sprint Requirement Changes
Changes to the Sprint Backlog, if it modifies the Sprint Goal, are not permitted during a Sprint. However, in a research environment, where it is common for urgent and unforeseen tasks to arise at short notice, Product Owners may raise urgent new Issues. The Development Team, as owners of the Sprint Backlog, may choose to add new Issues to the sprint if they cannot wait for the next sprint. However, the Development Team must ensure these Issues have an effort estimate and the total volume of work within the sprint remains constant. This essentially means that for every X story points added, X is removed by removing an Issue from the sprint backlog.
Challenge 2: Have any mid-sprint changes to requirements been announced? (10 minutes)
If the Stakeholders (course organisers) have announced any changes to requirements, then either:
- Add new Issues to the current Sprint, as described above
OR
-
Stop the current active Sprint! This will remove all issues from the Sprint Backlog (but they remain in the Product Backlog).
- In your teams, adopt the Product Owner role and decide how the requirements have changed.
- Follow the steps in the Requirements Gathering episode and then start a new Sprint.
There are a number of terms used to mean Backlog Refinement.
Others are “Backlog Enhancement”, “Backlog Grooming” or “Backlog Pruning”.
Our Product Backlog is once more up to date with the latest set of requirements from the Stakeholder(s) broken down into Issues. We are now ready to do the Sprint Planning meeting, where we will select the next subset of Issues to go into the Sprint Backlog.
- Adding and prioritising Issues is an ongoing task, known as Backlog Refinement. (AKA “Backlog Enhancement”, “Backlog Grooming” or “Backlog Pruning”.)
- The Backlog needs to be fully refined and up-to-date before each Sprint Planning session begins.
- Mid-sprint changes to the Sprint Backlog are permitted if it doesn’t change the sprint goal but sometimes in a research environment, the current sprint just needs to be stopped and a new sprint planned as changes in direction can be dramatic!